In this series on Dev Tester, we're discussing how to run end-to-end testing on multiple browsers using a few of the most popular continuous integration services out there. The purpose of the series is to teach you how to use a testing framework like TestCafe in a continuous integration environment and run its tests on multiple browsers without using third-party services.
Other articles available in this series:


Example test suite used in this article
For this series, we'll use a fully functional TestCafe test suite for the example application used in my book, End-to-End Testing with TestCafe. The test suite covers different scenarios to teach testers how to use TestCafe in a real-world web application called TeamYap. While the tests require access to the TeamYap application - only available when purchasing the book - you can still access the code for the entire test suite on GitHub.
Azure DevOps: Covering the entire software development lifecycle
This article will cover Azure DevOps and how to execute your TestCafe tests using workflows using the integrated Azure Pipelines service.
Azure DevOps is a Microsoft service that provides organizations with a complete platform for managing, developing, testing, and deploying applications. With an Azure DevOps account, your team has access to kanban boards for keeping track of work, host source code, create test plans, and implement continuous integration and continuous delivery into your pipeline, among other services. For most development teams, the main benefit of Azure DevOps is its consolidation of many services these teams use daily.
The Azure DevOps service as it exists today has only been available for a few years. Microsoft has provided similar services for years as a part of Visual Studio Team System and Team Foundation Server. The Azure DevOps platform is flexible, allowing you to pick and choose which services you need, so you don't have to go all-in if you only want to use part of their offerings. We'll see that flexibility in play in this article by only using the Azure Pipelines service.
Despite those previous incarnations of the platform focusing mainly on the Windows and .NET ecosystems, Azure Pipelines is more open and platform-agnostic for most modern software development workflow. You can use the service to work with Windows, Linux, and macOS environments or programming languages and frameworks like .NET, Node.js, Android, and iOS. It also allows integration with other services thanks to a massive list of available extensions, so you won't be locked into Microsoft-specific tooling.
Pricing
As with most continuous integration services, Azure Pipelines charges on a per-minute basis for the amount of time it takes to run your build and for the number of parallel jobs you can execute. Unlike other CI services, your builds will consume the same number of minutes regardless of the runner you use. You can choose to either run your builds on a Microsoft-hosted runner or a self-hosted runner on a server you manage.
For Microsoft-hosted runners, you'll receive 1,800 minutes to use per month, limited to one job at any given time. For additional parallel jobs that you can use to run your builds concurrently, it's $40 per month for each additional job you need. Paying for extra parallel jobs provides you with unlimited build minutes for each of those jobs. If you decide to use a self-hosted runner on your servers, you'll have unlimited minutes for one job at a time. It's $15 per month for each additional job if you want or need to run your builds in parallel.
Using Azure Pipelines with an open-source project, Microsoft will provide ten free parallel jobs with unlimited build minutes. Keep in mind that your project will still consume build time on Microsoft-hosted runners - you'll only have unlimited minutes for the parallel jobs you execute.
Enterprise users have the option of using Azure DevOps Server for on-premise installs, which requires a Windows or Windows Server license. It provides all of the services found on its cloud service but keeps the data inside your network. It also allows teams to access the data through SQL Server reporting services directly.
As mentioned earlier, Azure Pipelines is a part of the Azure DevOps suite of services. Along with Pipelines, you'll have access to other valuable services like Azure Artifacts for package management, Azure Boards to manage your team's work, and Azure Repos for free private Git repositories.
Requesting Azure Pipelines access
In early 2021, Microsoft changed how their free tier access works due to resource abuse. Previously, Azure Pipelines had no restrictions and would grant all projects 1,800 free minutes on the platform. However, all new public projects created since February 2021 and most private projects created since March 2021 won't have access to run builds using Azure Pipelines.
You have the option to pay for usage of the platform, or you can submit a request to receive access for your project, which takes 2-3 business days to process. For the example used in this article, I had to request access to Azure Pipelines, and it took three business days. Requesting access is not necessary if you or your organization is already paying for Azure DevOps accounts.
Getting Azure Pipelines up and running with TestCafe
To get started with Azure Pipelines, you first need to create an account to access Azure DevOps. You can get started with an account for free by signing in with a Microsoft account, or you can also sign in using an existing GitHub account. For organizations with existing Microsoft services, you can also sign in using your company's domain.
After creating an account, you will need to create a new project on Azure DevOps. A new project will provide access to all of the services offered by Azure, including Azure Pipelines, which we'll use for our continuous integration service. Projects can be public or private, depending on your needs. In this article, we'll create a new public project called End-to-End Testing with TestCafe.
With a new Azure DevOps project set up, we can begin setting up our continuous integration environment using the Pipelines functionality. To start, select the Pipelines section, which brings up the New Pipeline creation wizard. First, you need to point Azure to where your organization hosts the code repository you wish to use for CI. Azure supports some of the most popular code hosting services, but you can also connect any accessible Git repository to the service. The example used in this article is hosted on GitHub, so we'll select that service to continue.
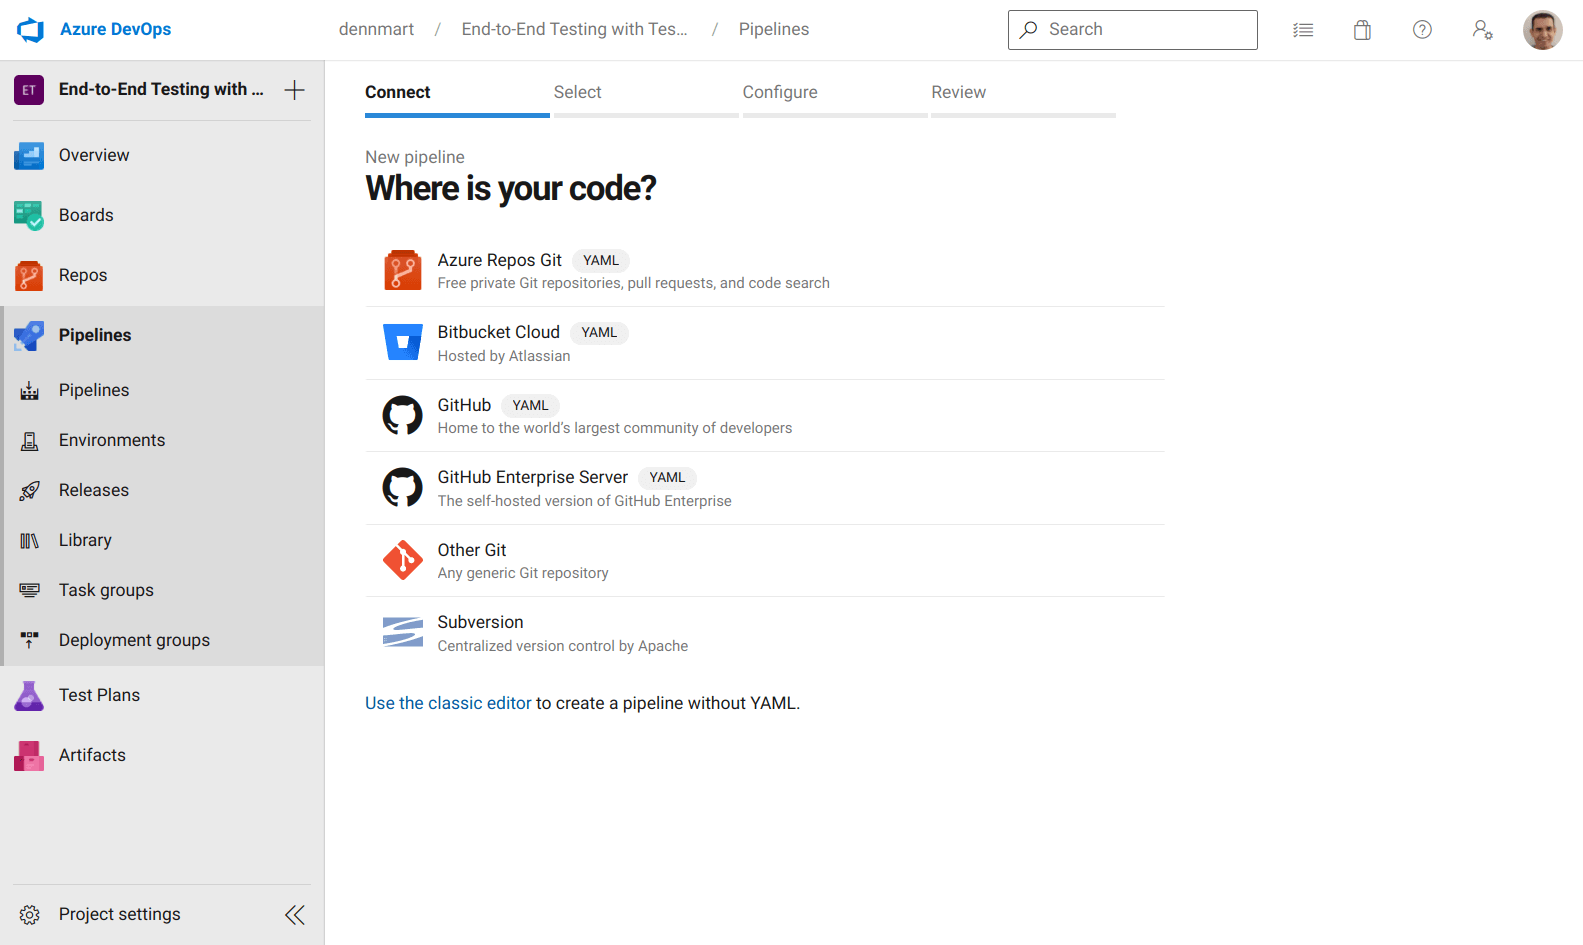
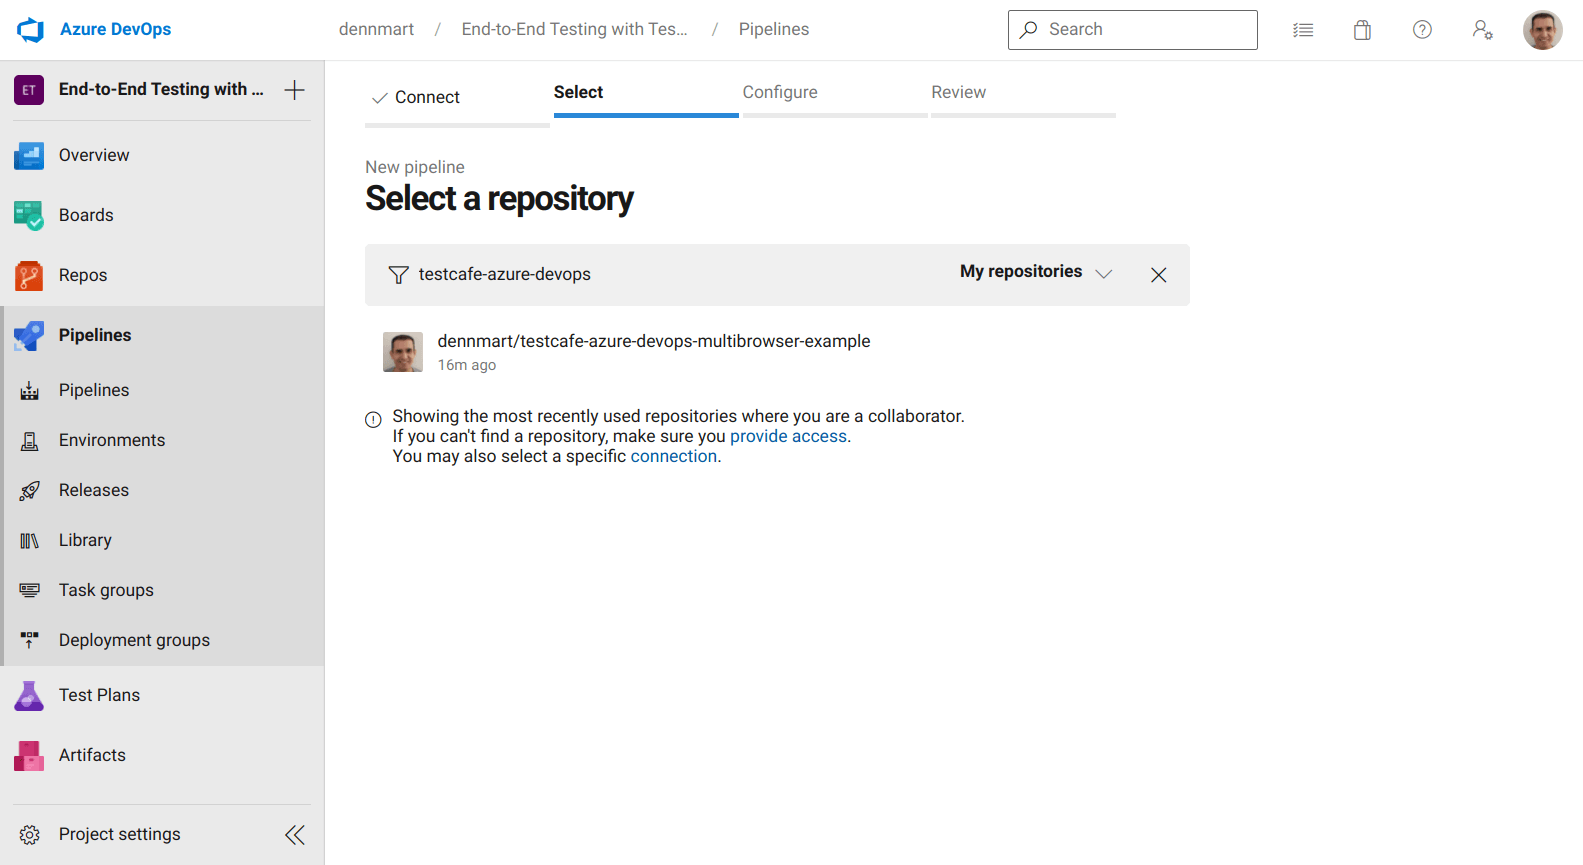
After connecting our GitHub account to Azure, we can search and select the specific code repository containing our tests.
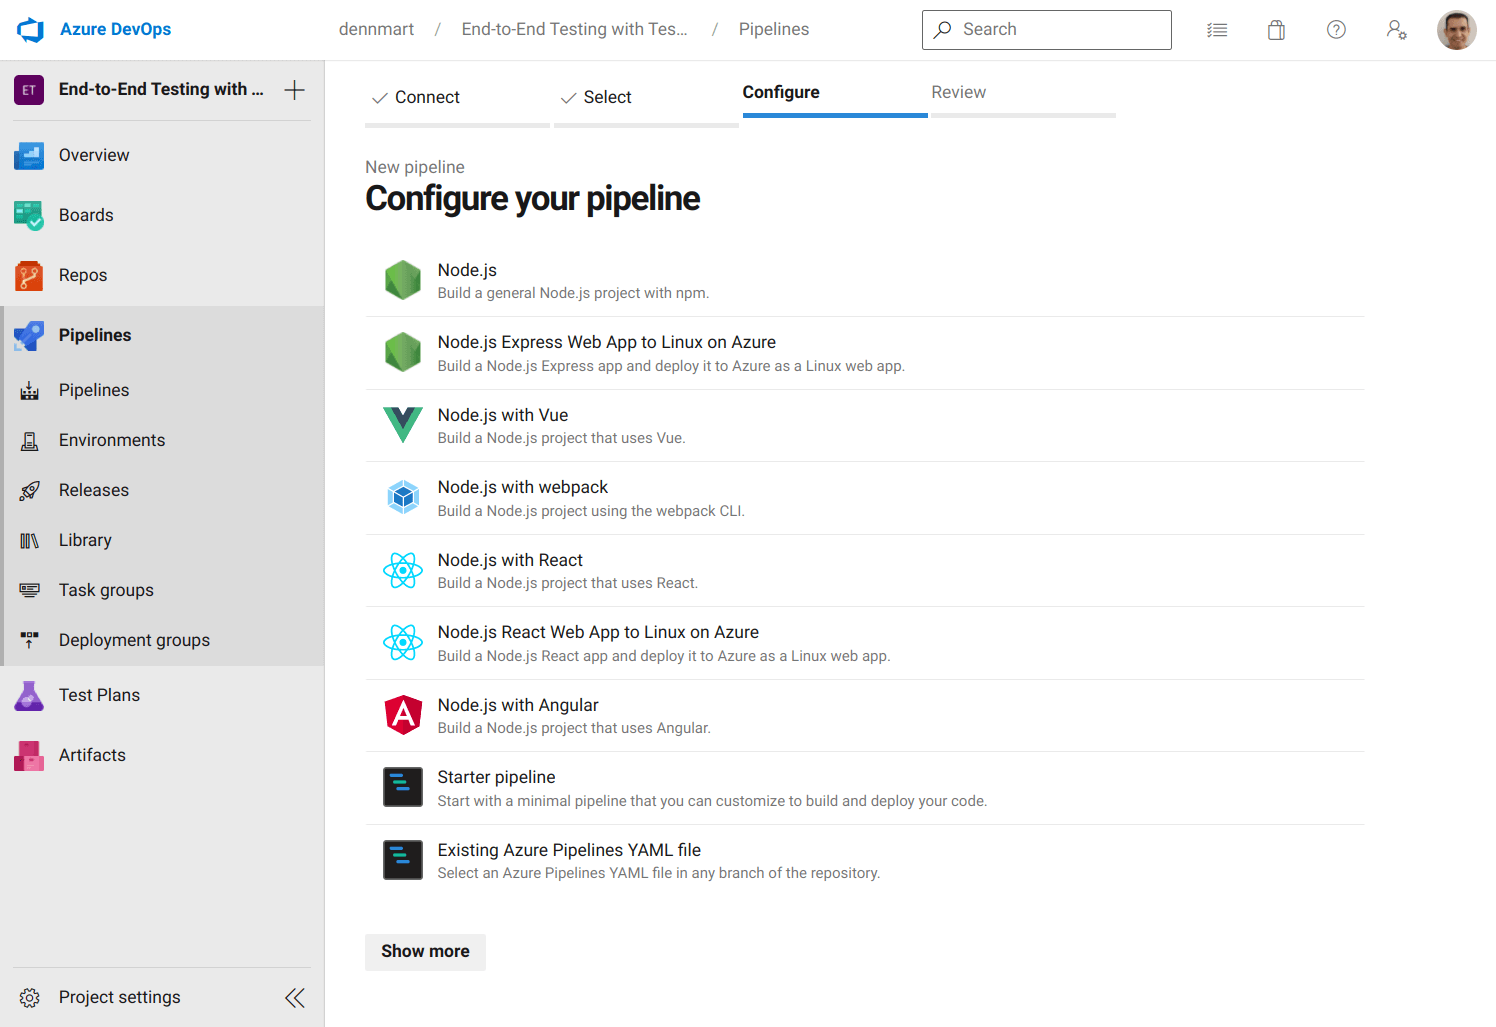
The next step is to configure our pipeline. Azure DevOps provides some standard options to generate a starter configuration file for your project, depending on your codebase. Since TestCafe runs on Node.js, we can use the basic Node.js option to get started quickly. Selecting this option will give us a prepopulated configuration file in YAML suitable for most Node.js projects.
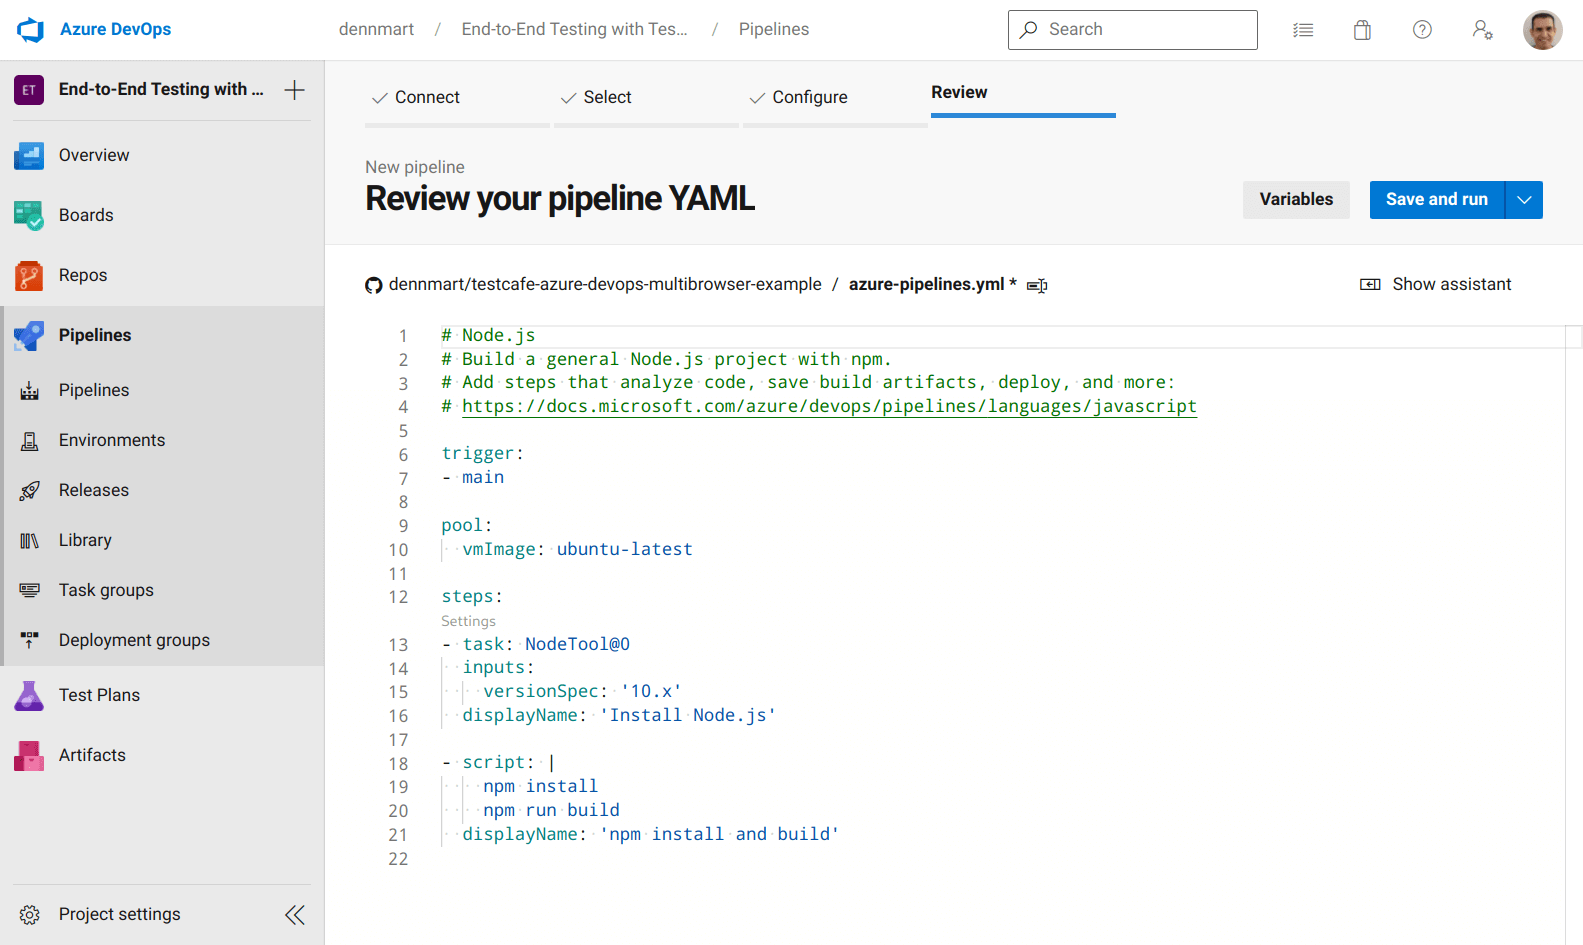
Most continuous integration services use configuration files placed inside the code repository, which the CI service reads and determines whether it needs to trigger a new build. Here, we'll take the YAML file generated by Azure DevOps, modify it for our needs, and commit it to the code repository. Before changing the file, let's go through some of the default configuration to cover the basics of how Azure Pipelines uses this file.
First, we have the trigger setting. This setting tells Azure Pipelines when it should trigger a new build to run our tests. By default, it will check for any code pushes only in the primary branch for your repository. In our example, the primary branch is main, so every time a developer pushes new code to that branch, Azure Pipelines will start a new build.
Next up is the pool setting. In Azure Pipelines, a pool defines the build environments where your pipeline jobs get executed. The build environment spins up the computing infrastructure (also known as an agent) and allows you to run the commands needed to complete your build or tests. Azure provides both Microsoft-hosted and self-hosted agents, depending on your needs. Usually, you'll choose a Microsoft-hosted agent, but if your team has specialized needs, you have the choice to create your own environment.
For this article, we'll use Microsoft-hosted agents since they'll already have the software we need for running our tests without us needing to worry about maintenance or upgrades. These agents conveniently use the same virtualized environments that GitHub Actions uses. If you have used GitHub Actions to run automated workflows in the past, you'll have a good understanding of what you can do with these agents. By default, Azure Pipelines sets up ubuntu-latest, which currently is a virtualized Ubuntu 20.04 environment.
Finally, we have the steps setting, a sequence of commands that run your job. This section is where you define what actions to take inside your build environment to run your workflow. We chose a Node.js pipeline, so the prepopulated configuration file contains some common steps for Node.js projects:
- The first step runs a task called
NodeTool@0to set up Node.js version 10 in the build environment. In Azure, a task is a packaged script to abstract a set of commands for our convenience. Azure provides many tasks for typical setup and build instructions, but you can also create custom tasks for your needs. - The next step runs a script, which are command-line instructions that execute inside the build environment. Azure Pipelines will use
bash(for Windows and macOS environments) orcmd.exe(for Windows environments) depending on your build environment. The prepopulated configuration file runs two commands (npm installandnpm run build) that most Node.js projects use.
These settings only cover the basics of Azure's configuration files. Each setting discussed so far contains more options that we didn't cover. You can find additional information in the YAML schema reference docs.
Now that we understand what the default configuration does, we'll modify it for running TestCafe tests from our code repository. But before we update and commit the configuration file to the repo, our project needs to set a few environment variables to use inside our build environments.
Using sensitive data in your pipeline
The test scenarios in our repository use environment variables to set sensitive data like emails and passwords. While we can write those details directly in our tests, you won't want to include them in your code repository since anyone with access to the codebase can see them. Before executing our tests, though, we'll have to set up that information so the tests can run correctly.
In Azure Pipelines, you can set this information as a variable to make them accessible to your builds. It allows you to set up sensitive data without including it in plain text inside your code, which is what we want in our workflow. It also helps share code and allows other environments to change this data without updating the codebase itself quickly.
Our TestCafe test suite makes use of five environment variables:
TEAMYAP_ADMIN_EMAIL: The email address for the TeamYap organization administrator.TEAMYAP_ADMIN_PASSWORD: The password for the TeamYap organization administrator.TEAMYAP_ADMIN_NAME: The full name of the TeamYap organization administrator, used in one test assertion.TEAMYAP_USER_EMAIL: The email address for a TeamYap user belonging to your organization.TEAMYAP_USER_PASSWORD: The password for the TeamYap user belonging to your organization defined inTEAMYAP_USER_EMAIL.
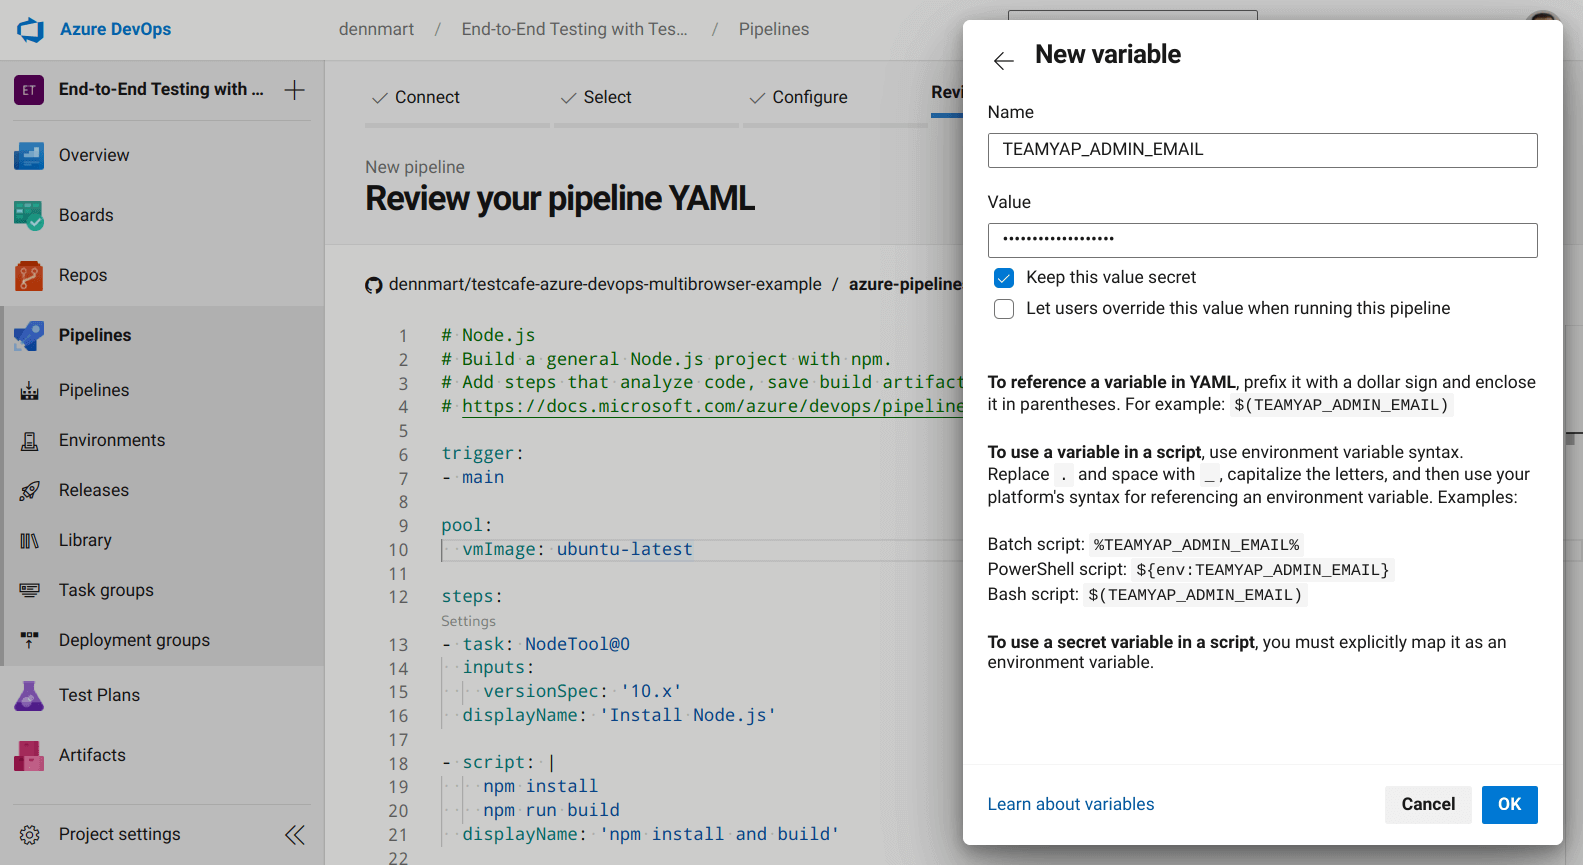
To set the information we'll use for our tests, click on the Variables button on the configuration file review page, and then click on the New Variable button. You can create a new variable by setting the variable's name, which you'll use to reference in your configuration file later, and the value you want to use for that variable.
You can choose to make the variable's value public or private. If you make it private, you have to map it in your configuration explicitly. In the example for this article, we'll set these values as private, and we'll map them in our configuration file when we set up our tests in the next step.
Configure Azure Pipelines to run TestCafe tests using Google Chrome
With our sensitive data set as variables for the pipeline, we can modify the prepopulated configuration file and set up a test. The first test we'll do is to run our TestCafe test suite using Google Chrome on headless mode. To accomplish this, we'll modify the default configuration file to run the tests as needed:
trigger:
- main

pool:
  vmImage: ubuntu-latest

steps:
- task: NodeTool@0
  inputs:
    versionSpec: '12.x'
  displayName: 'Install Node.js v12.x'

- script: npm install
  displayName: 'Install TestCafe

- script: npm run test:chrome:headless
  displayName: 'Run TestCafe tests on headless Chrome'
  env:
    TEAMYAP_ADMIN_EMAIL: $(TEAMYAP_ADMIN_EMAIL)
    TEAMYAP_ADMIN_PASSWORD: $(TEAMYAP_ADMIN_PASSWORD)
    TEAMYAP_ADMIN_NAME: $(TEAMYAP_ADMIN_NAME)
    TEAMYAP_USER_EMAIL: $(TEAMYAP_USER_EMAIL)
    TEAMYAP_USER_PASSWORD: $(TEAMYAP_USER_PASSWORD)
The trigger and pool settings remain the same. However, we'll modify the steps section with some new functionality.
First, we'll modify the Node.js installation task to use the latest version on the v12.x branch. While the ubuntu-latest environment already contains Node.js and we technically don't need to install it, we want to be consistent with our Node.js versions to avoid any surprises between test runs. We built the TestCafe test suite using Node.js version 12.22, so it's a safe bet to keep using this version.
Next, we'll update the script commands to only execute npm install. This command will install TestCafe, which is the only dependency used in the project. We're removing the npm run build command since our project doesn't use that script.
Finally, we'll add a separate script command to run the test inside the build environment and set up the environment variables that our tests use. In our project, we have a few scripts to conveniently run the test suite in the repository. The one we'll use here, npm run test:chrome:headless, will run all TestCafe tests in headless Chrome. The script will execute the following TestCafe command, using our project's installed dependencies:
testcafe chrome:headless *_test.js
In addition to the command to execute the tests, we also need to include our environment variables for the test suite to run successfully. As mentioned in the previous section, we first have to map these as variables in the pipeline before the configuration file can access their values and inject them into the build environment. To do this, we use the env setting for the script step.
The env setting accepts a list of keys and values. The keys are the environment variables that get included in the agent. The values can be any string you want to set for the environment variables. Since we want to use the variables from the pipeline, we're using macro syntax to ensure the values set in the variables get processed before the task gets executed in the build environment. Essentially, when Azure Pipelines processes the configuration file, it will replace the expression (like $(TEAMYAP_ADMIN_EMAIL)) with the value of the defined variable if it exists.
Now that we're done with the configuration file for our first test, we can save the file and run the pipeline to see if everything works as expected. Clicking on the Save and Run button on the review screen opens a pane to commit the YAML file into our code repository. After entering a commit message, an optional extended description, and either committing directly to the primary branch or create a new one, Azure Pipelines will make a new commit to your repo.
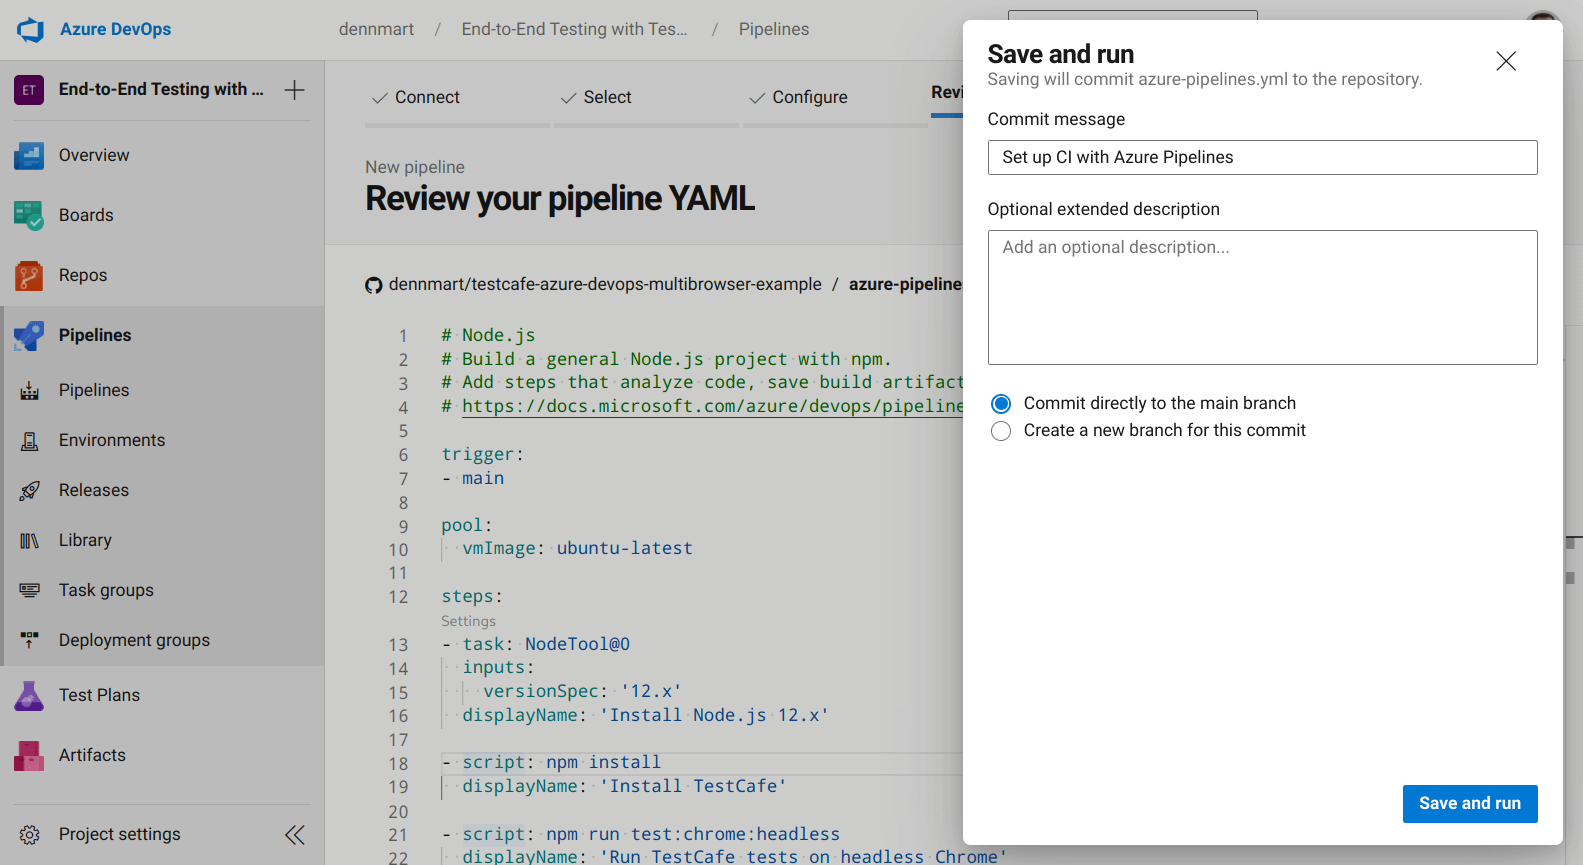
We'll commit the configuration file into the main branch of our example repository. We configured the pipeline to trigger a new build any time new code gets pushed onto this branch, so we'll immediately see a new build running in our project. If the configuration file is correct and our Azure Pipelines project isn't restricted as mentioned in the "Requesting Azure Pipelines access" section of this article, we'll see our first successful build:
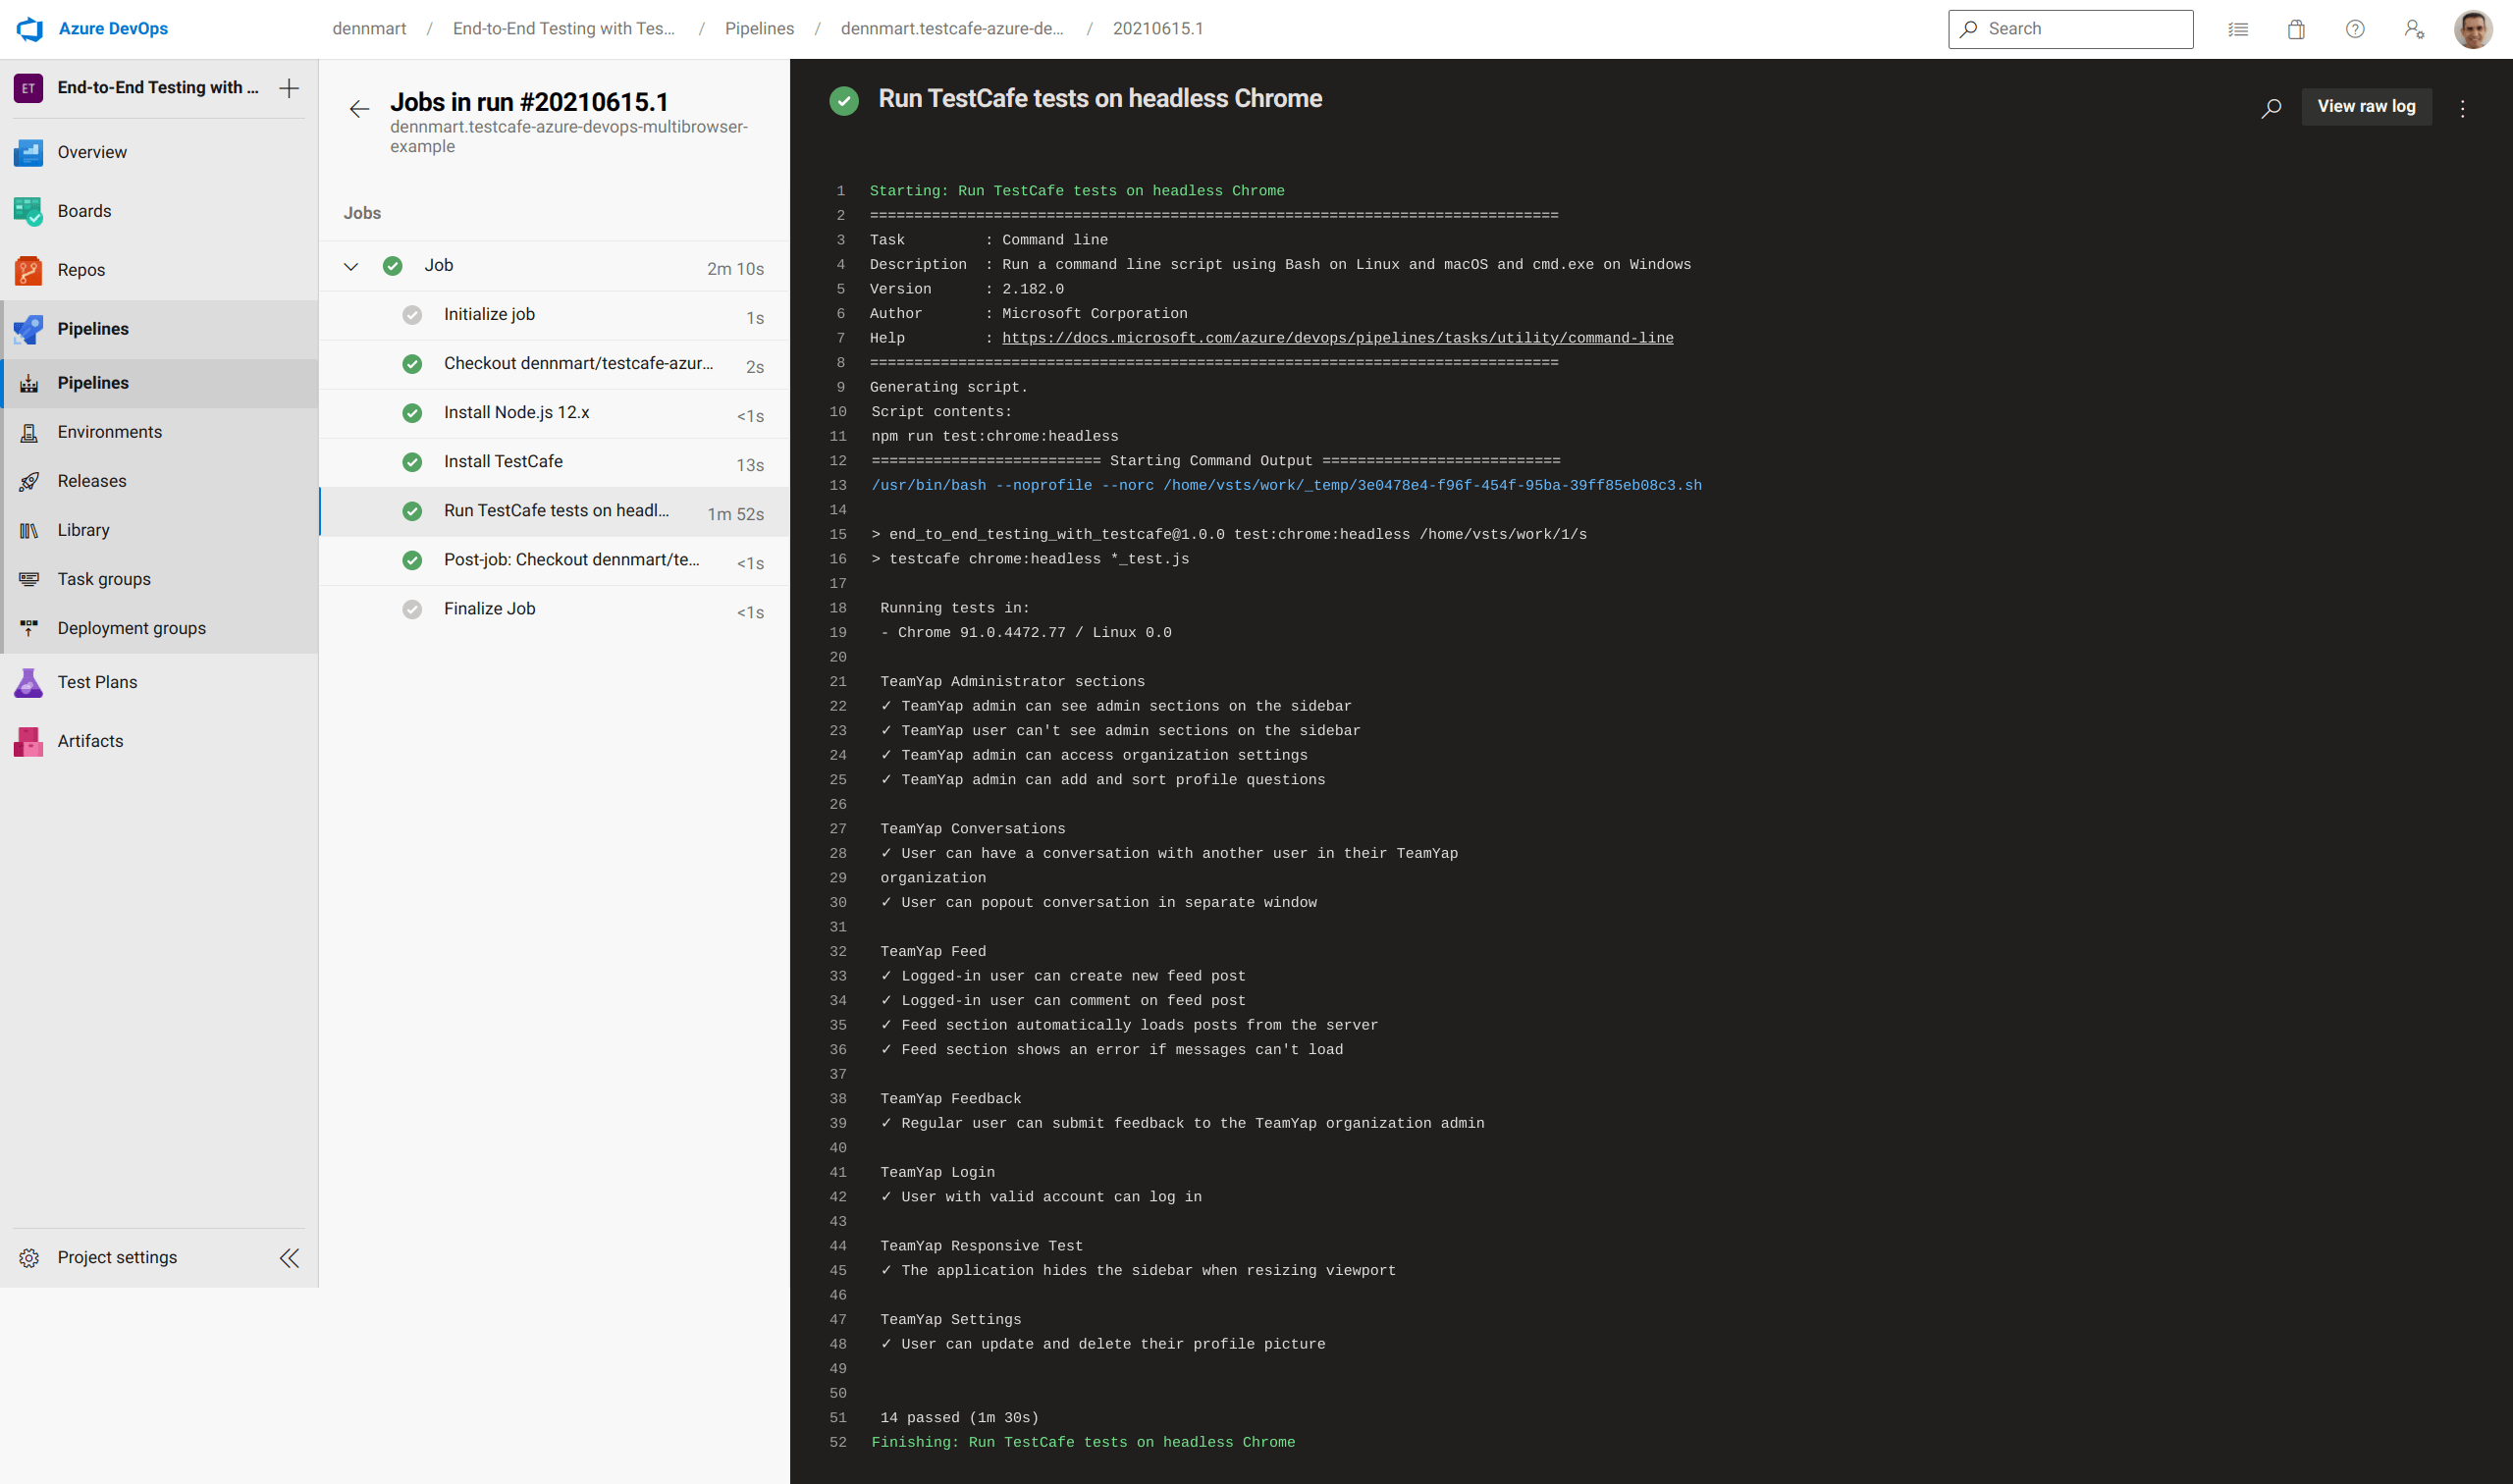
With a straightforward configuration file and a few lines, this example demonstrates the simplicity of getting an end-to-end TestCafe test suite running on Azure Pipelines. The configuration file sets up a fully-fledged Linux build environment that contains Google Chrome, uses a predefined task to install the version of Node.js we wanted effortlessly, and ran the test suite without a hitch. Now that we were successful with our first build let's move forward to see how easy it is to do the same with other browsers.
Configure Azure Pipelines to run TestCafe tests using Mozilla Firefox
Let's begin setting up our pipeline to execute our TestCafe test suite using Mozilla Firefox. We can add additional steps after our existing ones in the configuration file. However, we want to structure our pipeline to distinguish between each test run instead of one long build process with multiple test executions. We'll set up our pipeline as a series of jobs instead of a single job to accomplish this.
We'll begin splitting up each job using the jobs setting on the top level of the YAML structure in the configuration file. This setting accepts one or more job settings, each with its distinct setup and steps. Updating our configuration file into individual steps looks like the following:
trigger:
- main

jobs:
  - job: chrome
    pool:
      vmImage: ubuntu-latest
    steps:
    - task: NodeTool@0
      inputs:
        versionSpec: '12.x'
      displayName: 'Install Node.js v12.x'

    - script: npm install
      displayName: 'Install TestCafe

    - script: npm run test:chrome:headless
      displayName: 'Run TestCafe tests on headless Chrome'
      env:
        TEAMYAP_ADMIN_EMAIL: $(TEAMYAP_ADMIN_EMAIL)
        TEAMYAP_ADMIN_PASSWORD: $(TEAMYAP_ADMIN_PASSWORD)
        TEAMYAP_ADMIN_NAME: $(TEAMYAP_ADMIN_NAME)
        TEAMYAP_USER_EMAIL: $(TEAMYAP_USER_EMAIL)
        TEAMYAP_USER_PASSWORD: $(TEAMYAP_USER_PASSWORD)

  - job: firefox
    pool:
      vmImage: ubuntu-latest
    steps:
    - task: NodeTool@0
      inputs:
        versionSpec: '12.x'
      displayName: 'Install Node.js v12.x'

    - script: npm install
      displayName: 'Install TestCafe

    - script: npm run test:firefox:headless
      displayName: 'Run TestCafe tests on headless Firefox'
      env:
        TEAMYAP_ADMIN_EMAIL: $(TEAMYAP_ADMIN_EMAIL)
        TEAMYAP_ADMIN_PASSWORD: $(TEAMYAP_ADMIN_PASSWORD)
        TEAMYAP_ADMIN_NAME: $(TEAMYAP_ADMIN_NAME)
        TEAMYAP_USER_EMAIL: $(TEAMYAP_USER_EMAIL)
        TEAMYAP_USER_PASSWORD: $(TEAMYAP_USER_PASSWORD)
Each job contains the same steps, changing the script to execute our tests using either npm run test:chrome:headless or npm run test:firefox:headless for each browser we want to use in our tests. Separating our jobs this way benefits us by isolating each test run to identify potential issues if they arise. However, the most important benefit for our test suite is that it will allow us to set dependencies on other jobs.
Unfortunately, our end-to-end test suite has an issue executing tests in parallel. Since the tests point to the same instance of the application on the browser, running multiple tests inserts and deletes data simultaneously. Eventually, they'll trip over each other. For example, a job running tests from Chrome may delete data from one section of the application just before a separate job running tests from Firefox runs an assertion looking for that data, causing it to fail.
Ideally, we would isolate the data for each continuous integration job. Setting up data for end-to-end tests to fix issues like these takes some effort, but that's out of the scope of this article. Instead, we'll set up our pipeline to tell Azure to run each job sequentially instead of in parallel as it does by default. To accomplish this, we need to tell Azure Pipelines that the firefox job needs to run after the chrome job. We can do this using dependsOn:
- job: firefox
  pool:
    vmImage: ubuntu-latest
  dependsOn: chrome
  steps:
  - task: NodeTool@0
    inputs:
      versionSpec: '12.x'
    displayName: 'Install Node.js v12.x'

  - script: npm install
    displayName: 'Install TestCafe

  - script: npm run test:firefox:headless
    displayName: 'Run TestCafe tests on headless Firefox'
    env:
      TEAMYAP_ADMIN_EMAIL: $(TEAMYAP_ADMIN_EMAIL)
      TEAMYAP_ADMIN_PASSWORD: $(TEAMYAP_ADMIN_PASSWORD)
      TEAMYAP_ADMIN_NAME: $(TEAMYAP_ADMIN_NAME)
      TEAMYAP_USER_EMAIL: $(TEAMYAP_USER_EMAIL)
      TEAMYAP_USER_PASSWORD: $(TEAMYAP_USER_PASSWORD)
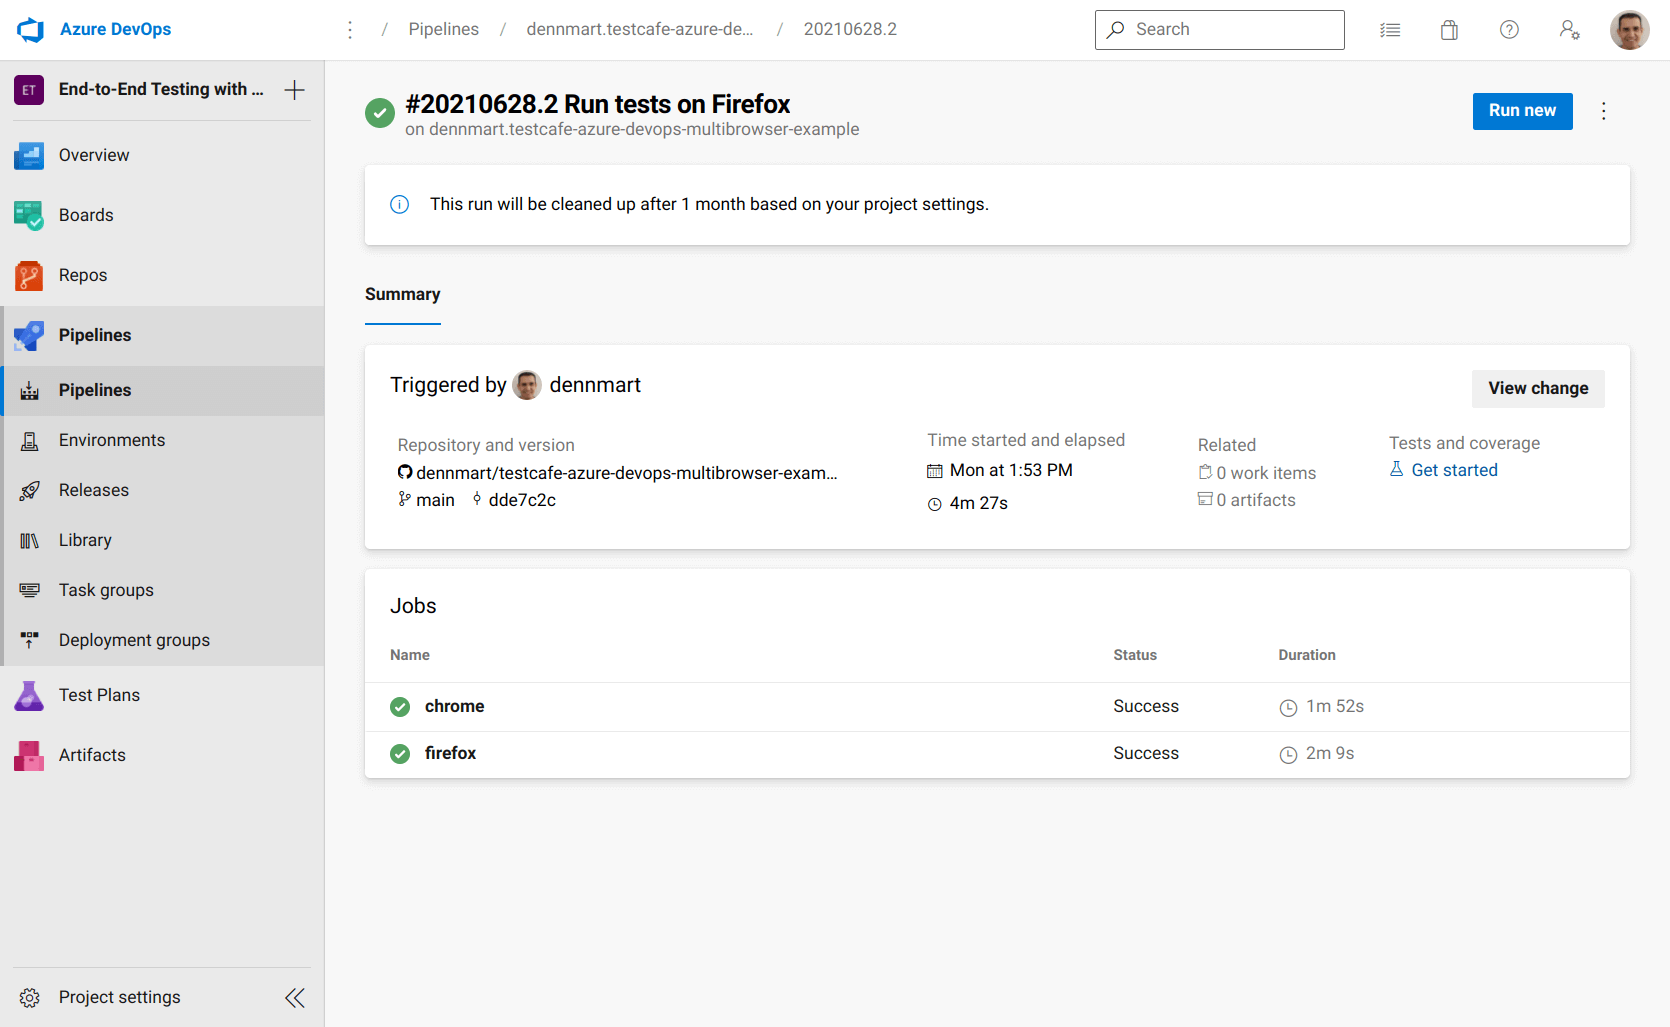
The dependsOn setting inside the job tells Azure Pipelines only to run this job if the dependent jobs have completed successfully. When we update the configuration file and push the commit to the GitHub repository, Azure Pipelines will run our build with two jobs. First, it executes the TestCafe test suite using Chrome. Once that job finishes up successfully, it will immediately run the test suite using Firefox. While this means our total build time will double, it will avoid the data issues mentioned above and make our tests pass on both browsers.
Sidebar: Refactoring the configuration file
You may have noticed that we're beginning to have some duplication in each job. Since we'll continue adding more jobs to this configuration file, it's an excellent time to see if we can refactor our configuration file before proceeding.
We can start encapsulating some of the duplication by using a template. Azure Pipelines allows us to define reusable sections, as some of our setup steps for each job, into a separate file which we can reference in our main configuration. Doing this reduces the possibility of mistakes if we need to modify these repeated sections in the future and makes our configuration file a bit more readable.
A good candidate to move into a template file is the basic setup for each job. In both the chrome and firefox jobs, we're setting up Node.js and installing the project dependencies in the exact way. We can move these steps into another file. Let's create a new directory in our repo called azure to place our template files. Inside this directory, create a new file called node-setup.yml with the following contents:
steps:
  - task: NodeTool@0
    inputs:
      versionSpec: '12.x'
    displayName: 'Install Node.js 12.x'

  - script: npm install
    displayName: 'Install TestCafe'
We'll set up our template to reuse some steps in our configuration file in this example. Azure Pipelines also supports other templates, like jobs or stages, for further flexibility in organizing your pipelines. We won't be including these in our example, but they're handy for larger pipelines and projects.
We can now take this template and remove the duplicate steps in our main configuration file. First, we'll delete the two steps we moved into the template file. Then, we'll reference our template file using the template setting:
trigger:
- main

jobs:
  - job: chrome
    pool:
      vmImage: ubuntu-latest
    steps:
    - template: azure/node-setup.yml

    - script: npm run test:chrome:headless
      displayName: 'Run TestCafe tests on headless Chrome'
      env:
        TEAMYAP_ADMIN_EMAIL: $(TEAMYAP_ADMIN_EMAIL)
        TEAMYAP_ADMIN_PASSWORD: $(TEAMYAP_ADMIN_PASSWORD)
        TEAMYAP_ADMIN_NAME: $(TEAMYAP_ADMIN_NAME)
        TEAMYAP_USER_EMAIL: $(TEAMYAP_USER_EMAIL)
        TEAMYAP_USER_PASSWORD: $(TEAMYAP_USER_PASSWORD)

  - job: firefox
    pool:
      vmImage: ubuntu-latest
    dependsOn: chrome
    steps:
    - template: azure/node-setup.yml

    - script: npm run test:firefox:headless
      displayName: 'Run TestCafe tests on headless Firefox'
      env:
        TEAMYAP_ADMIN_EMAIL: $(TEAMYAP_ADMIN_EMAIL)
        TEAMYAP_ADMIN_PASSWORD: $(TEAMYAP_ADMIN_PASSWORD)
        TEAMYAP_ADMIN_NAME: $(TEAMYAP_ADMIN_NAME)
        TEAMYAP_USER_EMAIL: $(TEAMYAP_USER_EMAIL)
        TEAMYAP_USER_PASSWORD: $(TEAMYAP_USER_PASSWORD)
The configuration file will work the same as before, but now we don't have the duplicated steps to deal with. If we have to change the way our project is set up, like updating the version of Node.js or running additional commands, we only need to handle it once in the template file, and all of our jobs will have those details ready to use in the pipeline.
Another area of duplication you may notice is the use of environment variables when running our tests in both jobs. Unfortunately, we cannot remove this duplication due to the way Azure Pipelines runs each step during a build, as specified in their documentation:
Each step runs in its own process on an agent and has access to the pipeline workspace on a local hard drive. This behavior means environment variables aren't preserved between steps but file system changes are.
While we can't remove all the duplication we currently have in the configuration file, moving what we can into a template and referring to that reusable setup helps make the pipeline easier to follow and maintainable in the long run.
Configure Azure Pipelines to run TestCafe tests using Microsoft Edge
Next up, we'll add another job to run the test suite using Microsoft Edge. We can use the windows-latest agent for this job, a virtualized environment running Windows Server 2019. This environment already has Microsoft Edge preinstalled, so we don't have to include additional steps to set up the browser. The job will look essentially the same as our existing jobs with a few minor tweaks:
trigger:
- main

jobs:
  - job: chrome
    pool:
      vmImage: ubuntu-latest
    steps:
    - template: azure/node-setup.yml

    - script: npm run test:chrome:headless
      displayName: 'Run TestCafe tests on headless Chrome'
      env:
        TEAMYAP_ADMIN_EMAIL: $(TEAMYAP_ADMIN_EMAIL)
        TEAMYAP_ADMIN_PASSWORD: $(TEAMYAP_ADMIN_PASSWORD)
        TEAMYAP_ADMIN_NAME: $(TEAMYAP_ADMIN_NAME)
        TEAMYAP_USER_EMAIL: $(TEAMYAP_USER_EMAIL)
        TEAMYAP_USER_PASSWORD: $(TEAMYAP_USER_PASSWORD)

  - job: firefox
    pool:
      vmImage: ubuntu-latest
    dependsOn: chrome
    steps:
    - template: azure/node-setup.yml

    - script: npm run test:firefox:headless
      displayName: 'Run TestCafe tests on headless Firefox'
      env:
        TEAMYAP_ADMIN_EMAIL: $(TEAMYAP_ADMIN_EMAIL)
        TEAMYAP_ADMIN_PASSWORD: $(TEAMYAP_ADMIN_PASSWORD)
        TEAMYAP_ADMIN_NAME: $(TEAMYAP_ADMIN_NAME)
        TEAMYAP_USER_EMAIL: $(TEAMYAP_USER_EMAIL)
        TEAMYAP_USER_PASSWORD: $(TEAMYAP_USER_PASSWORD)

  - job: edge
    pool:
      vmImage: windows-latest
    dependsOn: firefox
    steps:
    - template: azure/node-setup.yml

    - script: npm run test:edge:headless
      displayName: 'Run TestCafe tests on headless Edge'
      env:
        TEAMYAP_ADMIN_EMAIL: $(TEAMYAP_ADMIN_EMAIL)
        TEAMYAP_ADMIN_PASSWORD: $(TEAMYAP_ADMIN_PASSWORD)
        TEAMYAP_ADMIN_NAME: $(TEAMYAP_ADMIN_NAME)
        TEAMYAP_USER_EMAIL: $(TEAMYAP_USER_EMAIL)
        TEAMYAP_USER_PASSWORD: $(TEAMYAP_USER_PASSWORD)
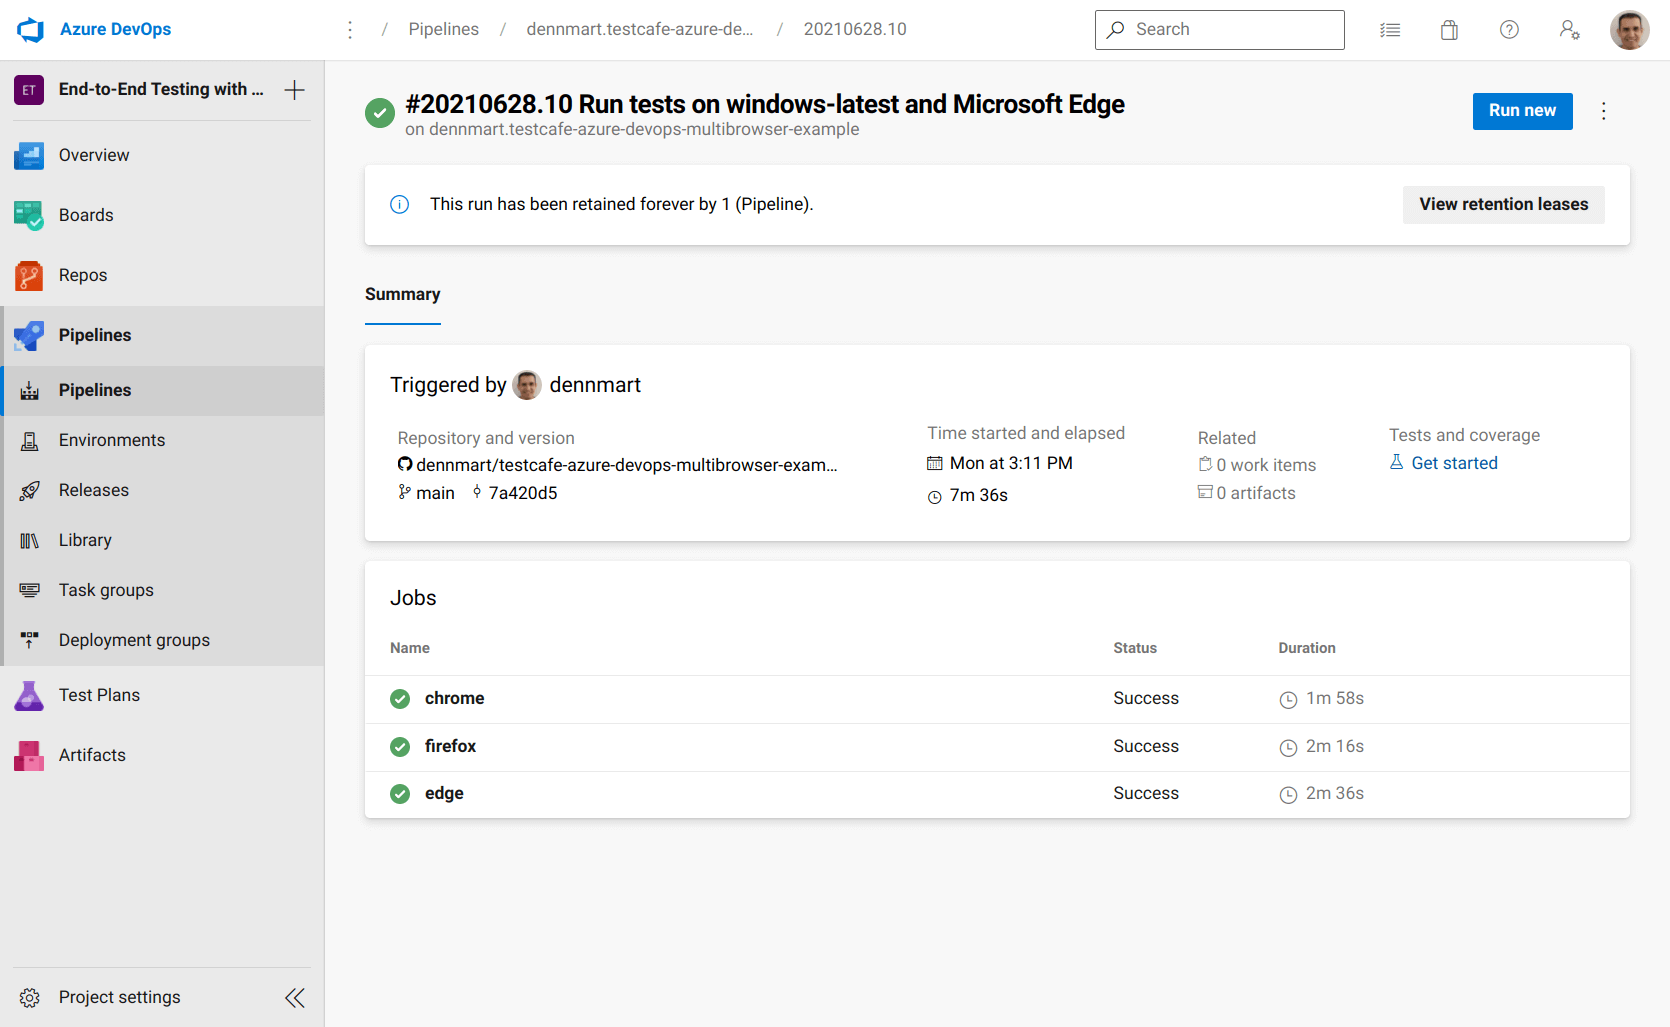
Our new job is called edge. The only differences in the configuration are that we're using the windows-latest environment as mentioned above, and we'll wait for the firefox job to complete successfully. The argument to execute the TestCafe tests also slightly changes to launch TestCafe on headless Edge. Thanks to Azure Pipelines, everything else remains the same, allowing us to use the same tasks and scripts to set up Node.js and launch TestCafe on both Ubuntu and Windows build environments.
Updating this configuration file with the new job in the YAML configuration file and pushing it to the code repository will execute all three jobs, one after another.
Configure Azure Pipelines to run TestCafe tests using Apple Safari
To complete the full coverage of most major browsers for our end-to-end tests, I intended to set up a job on Azure Pipelines to run the test suite using Apple Safari and Microsoft's macos-latest agent. The macOS environment has Apple Safari set up already, and we can use the same actions to check out the code and set up Node.js. However, the environment has a few "gotchas" that prevented the job from running successfully.
The macos-latest runner is a macOS 10.15 virtualized environment, and it has System Integrity Protection enabled by default. Unfortunately, this setting requires TestCafe to accept screen recording permissions before executing its tests. We can't do this in a headless environment, so we can't run our tests as we do on the other hosted runners.
Microsoft also provides an older macOS agent, macOS-10.14, which is a macOS 10.14 environment. This version of the agent does not have System Integrity Protection enabled, but we can't launch our tests using Safari in headless mode, so the job fails since it cannot find the browser in a headless environment.
The TestCafe documentation provides a workaround by running the TestCafe tests remotely and adding a few commands to open Safari and execute the tests that way. For our test suite, however, this workaround will cause some tests to fail. One test case resizes the browser to validate design responsiveness, and another uses TestCafe's multi-window support. Both of these scenarios are unsupported by TestCafe when testing on remote browsers.
If you don't have TestCafe test scenarios with these limitations, the remote browser workaround will work on Azure Pipelines. Otherwise, you'll need to use an external service like BrowserStack or LambdaTest to execute your tests on Apple Safari properly.
Summary
Azure DevOps is a complete package for development teams and testers to organize, build, and manage their software projects. Although Azure is a Microsoft product, you can use their services with most modern software development tools. The Azure DevOps platform contains tools for managing test plans, hosting source code, and establish automated workflows. You can pick and choose for your needs.
This article demonstrates how easy it is to use the Azure Pipelines functionality in an Azure DevOps project for setting up a continuous integration process in your organization. With a small configuration file, you can spin up a build environment based on Linux, Windows, and macOS, and get complete end-to-end test suites built on TestCafe to run using Google Chrome, Mozilla Firefox, and Microsoft Edge without resorting to third-party services.
Like many other CI services, Azure Pipelines couldn't handle our TestCafe tests with their macOS environment. However, the service is still an excellent choice for setting up your browser UI tests for web applications. If your organization is looking for a CI solution that integrates with other software development and project management tools, Azure DevOps is an attractive solution for your team.
Have you used Azure Pipelines for running end-to-end tests for web applications? If you have, share any tips, tricks, or personal experiences with others in the comments section!

