
While the days of wildly different behavior based on browsers and operating systems are a distant memory, it's still essential to ensure your web applications work as intended under different configurations. The rapid improvements and releases of web technology can bring small changes that can significantly affect the functionality of your app, making constant verification a necessity in modern software development.
Ideally, you'll have your automated test suites set up to run automatically through a continuous integration service. That way, you can ensure your web application gets tested on most major browsers without the need to have a team running through scenarios manually. Getting automated UI tests to execute on external systems requires a bit of know-how. Still, most testing frameworks and CI services will handle your test suite automatically once you get it up and running.
In this series on Dev Tester, we're discussing how to run end-to-end testing on multiple browsers using a few of the most popular continuous integration services out there. The purpose of the series is to teach you how to use a testing framework like TestCafe in a continuous integration environment and run its tests on multiple browsers without using third-party services.
Other articles available in this series:
 Dennis Martinez
Example test suite used in this article
For this series, we'll use a fully functional TestCafe test suite for the example application used in my book, End-to-End Testing with TestCafe. The test suite covers different scenarios to teach testers how to use TestCafe in a real-world web application called TeamYap. While the tests require access to the TeamYap application - only available when purchasing the book - you can still access the code for the entire test suite on GitHub.
 dennmart
GitHub Actions: Run any workflow right from the tool you use daily
This article will cover GitHub Actions and how to execute your tests using workflows on the service. For those new to software development, GitHub is a service that allows individual developers and development teams to host their codebase using Git, a version control system. In simple terms, GitHub allows developers to share code, track changes, and collaborate with others anywhere in the world. GitHub has been around since 2008, and it's the most well-known service of its kind. If you work in the software development industry, you likely know about GitHub already.
In 2018, the company released limited beta access to GitHub Actions to allow developers to automate and perform different workflows for their code repositories on GitHub. With GitHub Actions, you can trigger jobs for any type of GitHub-related event, like running tests, sending notifications to your team, or deploying a new release of your application to your servers. Best of all, it's all integrated into the tools you already use - no need to rely on other services.
Like other continuous integration services out there, GitHub Actions provides multiple runners for your jobs, such as Windows, macOS, and Linux containers, along with ARM-based environments. You can also use your own hardware to execute GitHub Actions workflows for specific needs. GitHub Actions also has tons of predefined actions in their marketplace, covering almost anything you need to do on the system. The tight integration with GitHub (where you likely host your codebase) and all the different actions at your disposal make GitHub Actions a solid choice for your automated tests.
Pricing
Pricing for GitHub Actions on their hosted runners is based on minutes used for executing your workflows, and the amount of minutes depends on your GitHub account and repositories. For free users or teams, you receive 2,000 minutes of use per month for all of your private repositories. Paid users (GitHub Pro accounts for individuals and GitHub Team accounts for organizations) receive 3,000 minutes per month. If you use GitHub Actions on a self-hosted runner or open-source repositories on a GitHub-hosted runner, usage is completely free.
GitHub uses a "minute multiplier" system depending on the hosted runner used to run your workflow. Linux containers have a 1x minute multiplier, Windows containers have a 2x multiplier, and macOS containers have a 10x multiplier. For example, a job that takes five minutes to complete will consume 5 minutes if executed in a Linux container, 10 minutes on a Windows container, and 50 minutes on a macOS container. To reduce your monthly usage, you'd want to run most of your jobs on Linux unless you need Windows or macOS specifically.
Besides the per-minute usage, you also have a limit of how many jobs you may run concurrently. Free plans for both individuals and teams allow 20 concurrent jobs. Pro plans for individuals allow 40 concurrent jobs, and Team plans for organizations allow 60 jobs simultaneously. You have other usage limits depending on your account, but likely you won't run into these.
Getting GitHub Actions up and running with TestCafe
Unsurprisingly, you'll need a GitHub account to work with GitHub Actions. You'll likely have a GitHub account already, but if you don't, you can sign up for a free account. You don't need to pay for their service unless you primarily work with private repositories or need extra collaboration with other developers. As a GitHub service, don't expect it to work well with other code repository services like GitLab or BitBucket. Those platforms have their own version of CI and CD systems which we'll cover in future articles in this series.
You'll also need to have your end-to-end tests hosted in a GitHub repository. The GitHub documentation has a complete guide on doing this if you've never set up a repo before. Once your tests are in a code repository (regardless of whether they're in the same place or not), you'll need to configure the repo containing the tests to let GitHub Actions know how to execute them.
Most continuous integration services look for configuration files located inside the repo, and GitHub Actions is no exception. GitHub looks for configuration files placed in a directory called .github/workflows to determine if it needs to trigger a workflow based on an event like pushing code to the repository or creating a pull request. You can place one or more configuration files using YAML syntax inside of this directory for different workflows.
We'll create a single workflow that gets triggered when pushing new code to the repository for this article. To start, we'll create a new file inside of the .github/workflows directory called end-to-end.yml. You can name your workflow file anything you want, but it's always a good idea to use a name representing the actions it will trigger. When your project grows, you'll probably have multiple workflows, so having a descriptive filename helps quickly identify what each configuration file does.
To start, let's set up a name for this workflow and tell GitHub Actions how we want to trigger it:
name: End-to-end tests

on:
  push:
    branches:
      - main
The name setting describes our workflow and gets displayed on the Actions section of your code repository. It's not a required setting but valuable if you have multiple workflows in the same codebase. If not set, the Actions section will use the name of your workflow file.
The on setting is required and instructs GitHub Actions when to run the jobs in the workflow. GitHub provides plenty of events that trigger workflows, like creating a new pull request or adding a new issue in the GitHub code repository. In this example, we want to activate the end-to-end testing workflow whenever someone pushes a code commit into the repository, so we'll use the push event.
You can also configure this trigger further to occur only when the push event happens in specific Git branches. By default, the push event will get triggered when pushing code to any branch in the repository. For other forms of automated testing, it's a good practice to do. However, end-to-end tests take lots of time to execute and may block your team if they're working on separate feature branches. Depending on your needs, you can decide only to conduct these tests when updating the primary branch. In our example, we'll only run these tests when updating the main branch.
Using secrets in your workflows
Before creating our first workflow job, there's one more step needed. The test scenarios in our repository use environment variables to set sensitive data like emails and passwords. While we can write those details directly in our tests, ideally you won't want to include them in your code repository since anyone with access to the codebase can see them. Before executing our tests, though, we'll have to set up that information so the tests can run correctly.
GitHub Actions allows you to securely set up environment variables and make them accessible to your workflows through encrypted secrets. In GitHub, you can set secrets for a repository or an organization, and these will remain encrypted until used in a workflow. It allows you to set up sensitive data without having to include it in plain text inside your code, which is what we want in our workflow. It also helps to share code and allow other environments to quickly change this data without updating the codebase itself.
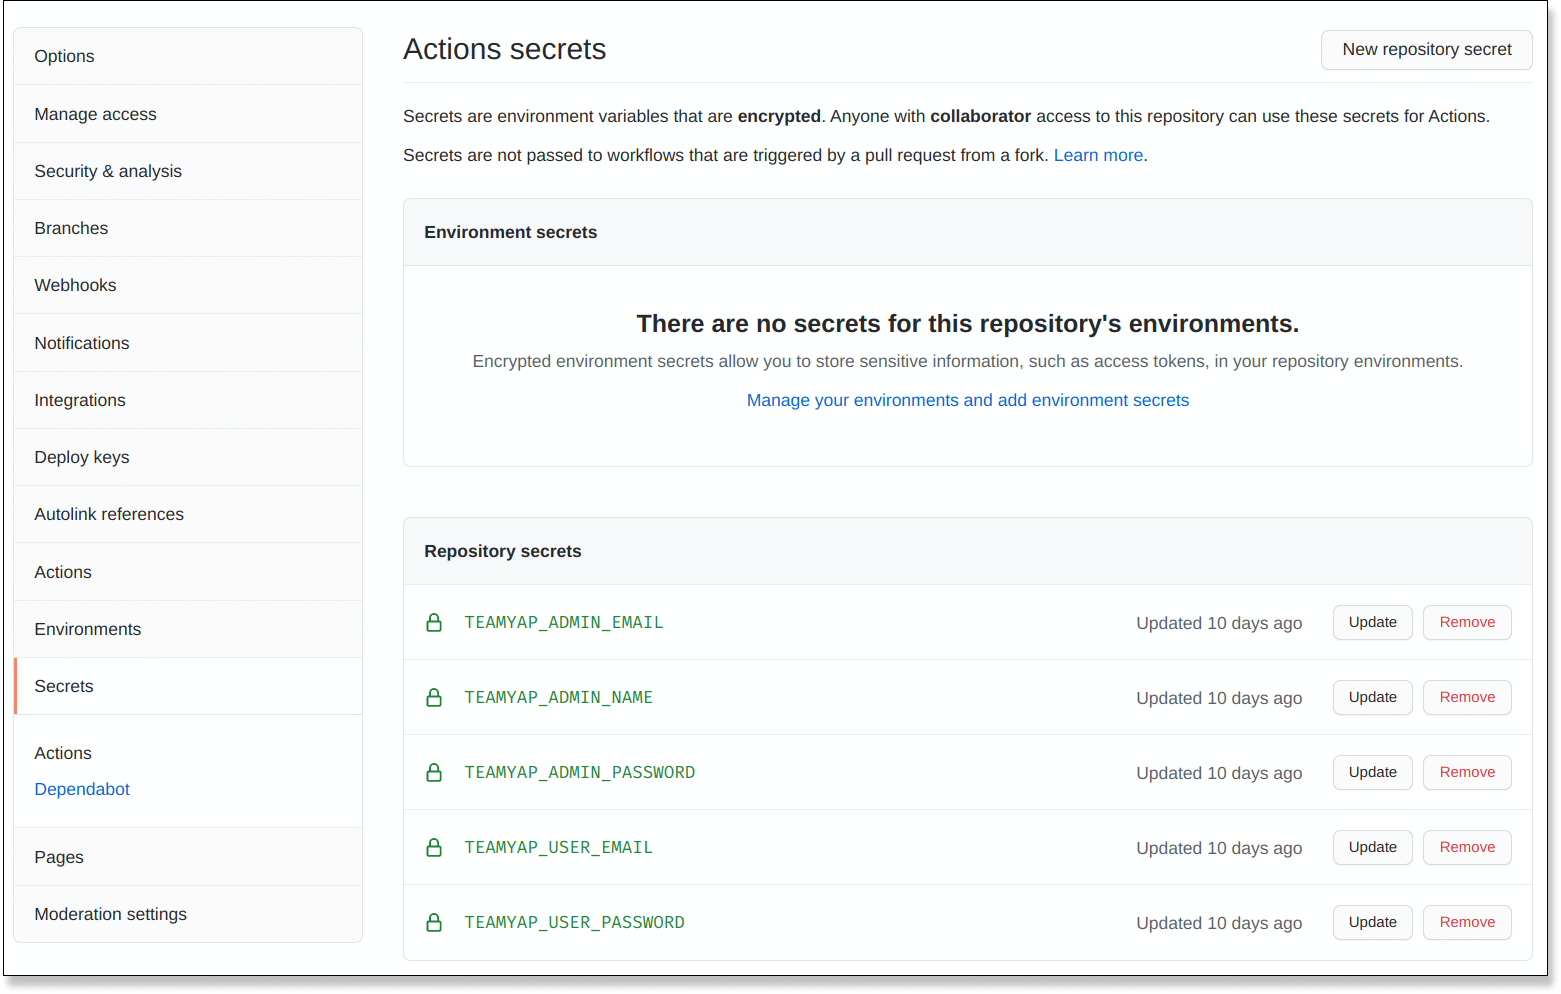
Our TestCafe test suite makes use of five environment variables:
TEAMYAP_ADMIN_EMAIL: The email address for the TeamYap organization administrator.TEAMYAP_ADMIN_PASSWORD: The password for the TeamYap organization administrator.TEAMYAP_ADMIN_NAME: The full name of the TeamYap organization administrator, used in one test assertion.TEAMYAP_USER_EMAIL: The email address for a TeamYap user belonging to your organization.TEAMYAP_USER_PASSWORD: The password for the TeamYap user belonging to your organization defined inTEAMYAP_USER_EMAIL.
The GitHub documentation contains detailed access for creating repository secrets, so we won't go through the steps to do it in this article. Once the secrets get set up in the repository, you can see them defined. Their values aren't accessible, so you and your team can only update or delete the secrets once defined.
Configure GitHub Actions to run TestCafe tests using Google Chrome
With our initial setup and secrets in place, we can finally begin to set up our first job in the workflow. Inside our .github/workflows/end-to-end.yml configuration file, we'll add a jobs setting. This setting consists of one or more sections to define the environment where you want to run your build and the steps to perform. To start, we'll set up a new job to execute our TestCafe tests using Google Chrome on headless mode. The configuration will look like this:
name: End-to-end tests

on:
  push:
    branches:
      - main

jobs:
  chrome:
    runs-on: ubuntu-latest
    env:
      TEAMYAP_ADMIN_EMAIL: ${{ secrets.TEAMYAP_ADMIN_EMAIL }}
      TEAMYAP_ADMIN_PASSWORD: ${{ secrets.TEAMYAP_ADMIN_PASSWORD }}
      TEAMYAP_ADMIN_NAME: ${{ secrets.TEAMYAP_ADMIN_NAME }}
      TEAMYAP_USER_EMAIL: ${{ secrets.TEAMYAP_USER_EMAIL }}
      TEAMYAP_USER_PASSWORD: ${{ secrets.TEAMYAP_USER_PASSWORD }}
    steps:
      - name: Checkout repository
        uses: actions/checkout@v2

      - name: Set up Node.js
        uses: actions/setup-node@v2
        with:
          node-version: 12.22.0

      - name: Run TestCafe tests on headless Chrome
        uses: DevExpress/testcafe-action@latest
        with:
          args: "chrome:headless *_test.js"
The first key under the jobs setting is the name of this specific job. We called this job chrome, but it can be any name you prefer. It's best to use a descriptive name here since we'll use it later in the configuration file. Under the name of your job, you'll begin defining the specifications on how to run the test. In this scenario, we have three additional settings to configure.
First, we have to tell GitHub Actions which type of machine we want to use for our job, called a runner, using the runs-on setting. As mentioned earlier, you have the choice to use a GitHub-hosted runner or host your own. Unless you have a specific need or a dedicated DevOps team to handle setting up a self-hosted runner, the most straightforward route is to choose one of GitHub's. We'll use the ubuntu-latest runner for our Chrome tests, which is a virtualized Ubuntu 20.04 environment. The VM contains lots of preinstalled software ready for use, including Google Chrome. You can read more about GitHub-hosted runners and the preinstalled software in each runner in their documentation.
Next, we have to set up our environment variables for the job using the env setting. This setting lets you define a map of environment variables. Earlier in this example, we set up the environment variables we need as secrets. However, you still need to tell GitHub Actions when to use these secrets. In the configuration file, you can access these secrets through an expression (defined in GitHub Actions as ${{ <expression> }} using the secrets context. The secrets context lets you access the repository secrets set earlier.
Finally, we get to define what actions to take inside the build environment using the steps setting. This section allows you to set a series of steps, either by executing commands directly (using the run setting) or by using predefined actions provided by GitHub or the developer community (using the uses setting). Each step also contains an optional name setting to describe the commands taking place.
Our workflow uses three different predefined actions:
actions/checkout@v2: This action places your code inside of the build environment. This example will copy all of our TestCafe tests inside the hosted runner for later use.actions/setup-node@v2: This action downloads and installs a specific version of Node.js, and optimizes the process by caching the download from previous builds.DevExpress/testcafe-action@latest: This action provided by DevExpress, the team behind TestCafe, installs TestCafe and runs your tests using the arguments specified in the step.
The first step to check out the codebase step doesn't require any additional configuration. The next step to set up Node.js uses the with setting to use a specific version (defined in node-version). For this example, we're using Node.js version 12.22 since it's the version initially used while building the test suite. Technically, this isn't necessary since the hosted runner already has Node.js installed, but we want to be consistent with our Node.js versions to avoid any surprises between test runs.
The final step to run our TestCafe tests also uses the with setting to tell the action which arguments (args) to use with the testcafe command. The action only needs the arguments to place after the command. Since we want to run our tests on headless Chrome, we'll use those arguments to trigger the test.
With a fully-fledged .github/workflows/end-to-end.yml file all set up, place it inside the code repository and commit it. Once you push the configuration file to the main branch in the repository, GitHub Actions will automatically read the configuration. Since we set the configuration to run after every push to the main branch, the workflow will get triggered immediately, and GitHub Actions will begin performing each defined step in your job.
If all goes well, you'll have your first test suite executed and a friendly green passing status:
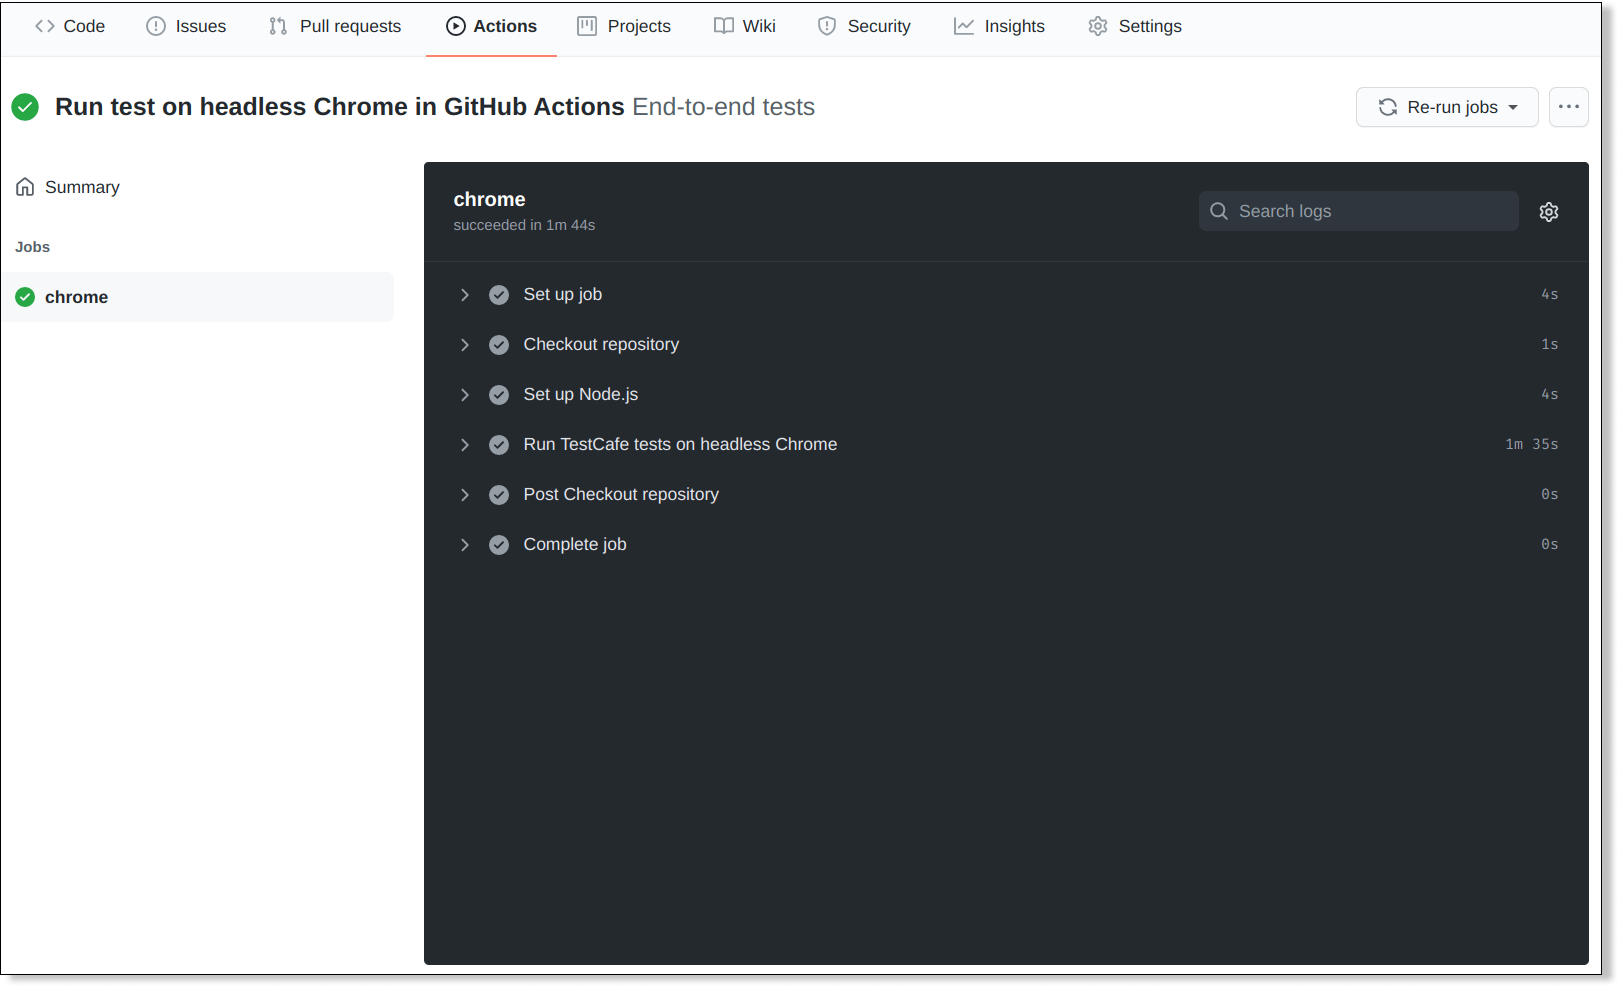
This simple setup is just an example of how easy it is to integrate an automated workflow into your GitHub code repositories. With a short configuration file, you can have GitHub Actions spin up a complete Linux environment with Google Chrome, quickly set up Node.js and TestCafe with predefined actions from the marketplace, and have everything ready to execute your test suite. Now that the first job was a success let's see how simple it is to run tests under other browsers on GitHub Actions.
Configure GitHub Actions to run TestCafe tests using Mozilla Firefox
Let's add another job to run our end-to-end tests, this time using Mozilla Firefox. We already have most of the setup required by GitHub Actions using their hosted runner. The only thing we'll need to do is add a new section under the jobs setting to execute it in our workflow:
name: End-to-end tests

on:
  push:
    branches:
      - main

jobs:
  chrome:
    runs-on: ubuntu-latest
    env:
      TEAMYAP_ADMIN_EMAIL: ${{ secrets.TEAMYAP_ADMIN_EMAIL }}
      TEAMYAP_ADMIN_PASSWORD: ${{ secrets.TEAMYAP_ADMIN_PASSWORD }}
      TEAMYAP_ADMIN_NAME: ${{ secrets.TEAMYAP_ADMIN_NAME }}
      TEAMYAP_USER_EMAIL: ${{ secrets.TEAMYAP_USER_EMAIL }}
      TEAMYAP_USER_PASSWORD: ${{ secrets.TEAMYAP_USER_PASSWORD }}
    steps:
      - name: Checkout repository
        uses: actions/checkout@v2

      - name: Set up Node.js
        uses: actions/setup-node@v2
        with:
          node-version: 12.22.0

      - name: Run TestCafe tests on headless Chrome
        uses: DevExpress/testcafe-action@latest
        with:
          args: "chrome:headless *_test.js"

  firefox:
    runs-on: ubuntu-latest
    env:
      TEAMYAP_ADMIN_EMAIL: ${{ secrets.TEAMYAP_ADMIN_EMAIL }}
      TEAMYAP_ADMIN_PASSWORD: ${{ secrets.TEAMYAP_ADMIN_PASSWORD }}
      TEAMYAP_ADMIN_NAME: ${{ secrets.TEAMYAP_ADMIN_NAME }}
      TEAMYAP_USER_EMAIL: ${{ secrets.TEAMYAP_USER_EMAIL }}
      TEAMYAP_USER_PASSWORD: ${{ secrets.TEAMYAP_USER_PASSWORD }}
    steps:
      - name: Checkout repository
        uses: actions/checkout@v2

      - name: Set up Node.js
        uses: actions/setup-node@v2
        with:
          node-version: 12.22.0

      - name: Run TestCafe tests on headless Firefox
        uses: DevExpress/testcafe-action@latest
        with:
          args: "firefox:headless *_test.js"
Our new job is called firefox and is nearly identical to the Google Chrome job, except for the arguments used in the TestCafe step. Along with Google Chrome, the ubuntu-latest GitHub-hosted runner also has Mozilla Firefox preinstalled, so we can use the build environment in the same way. Each step of the job works the same as the chrome job - the code gets checked out in the build environment, we install Node.js version 12.22, and we run our tests using the arguments for headless Firefox.
Unfortunately, these changes will cause the tests to fail:

What happened? In our case, the reason these tests now fail is that they're running at the same time. When setting more than one job in a GitHub Actions workflow, all jobs run in parallel by default. Unfortunately, that won't work well with our particular test suite. The TestCafe tests point to the same application, inserting and deleting data simultaneously, so they'll eventually trip over each other. For instance, the Chrome job may delete data from one section just before the Firefox job runs an assertion looking for something previously set up in the test, causing it to fail.
Ideally, we would isolate the data for each continuous integration job. Setting up data for end-to-end tests to fix issues like these takes some effort, but that's out of the scope of this article. Instead, we'll tell CircleCI to run each test sequentially instead of concurrently to avoid these problems. To accomplish this, we can tell GitHub that the firefox job needs to run after the chrome job, using the needs setting:
firefox:
  runs-on: ubuntu-latest
  needs: chrome
  env:
    TEAMYAP_ADMIN_EMAIL: ${{ secrets.TEAMYAP_ADMIN_EMAIL }}
    TEAMYAP_ADMIN_PASSWORD: ${{ secrets.TEAMYAP_ADMIN_PASSWORD }}
    TEAMYAP_ADMIN_NAME: ${{ secrets.TEAMYAP_ADMIN_NAME }}
    TEAMYAP_USER_EMAIL: ${{ secrets.TEAMYAP_USER_EMAIL }}
    TEAMYAP_USER_PASSWORD: ${{ secrets.TEAMYAP_USER_PASSWORD }}
  steps:
    - name: Checkout repository
      uses: actions/checkout@v2

    - name: Set up Node.js
      uses: actions/setup-node@v2
      with:
        node-version: 12.22.0

    - name: Run TestCafe tests on headless Firefox
      uses: DevExpress/testcafe-action@latest
      with:
        args: "firefox:headless *_test.js"
The needs setting tells GitHub Actions to only run this job if the specified jobs have been completed successfully. By making this change, GitHub Actions first runs the TestCafe test suite using Chrome, and once done, it will immediately trigger the test suite using Firefox. While this means our total build time will double, it will solve our data issues and make our tests pass on both browsers.
Sidebar: Refactoring the configuration file
You may have noticed that we're beginning to have some duplication in our job definitions. We have the setup for the environment variables done twice, along with some duplicate steps. Since we'll continue adding more jobs to this workflow, it's an excellent time to see if we can refactor our configuration file before proceeding.
Unfortunately, we can't remove the duplication from the steps because each job in the workflow starts from scratch with the GitHub-hosted runner, and we need to set up the code and Node.js. However, we can tidy up the environment variables. If you check the GitHub Actions documentation for the workflow syntax, you'll see that the env setting can be set on a workflow basis instead of making them available only for a single job.
To refactor the setup for the environment variables and only set them up once, all you need to do is copy the env settings outside of any of the two jobs currently defined in the workflow and delete them from each job:
name: End-to-end tests

on:
  push:
    branches:
      - main

env:
  TEAMYAP_ADMIN_EMAIL: ${{ secrets.TEAMYAP_ADMIN_EMAIL }}
  TEAMYAP_ADMIN_PASSWORD: ${{ secrets.TEAMYAP_ADMIN_PASSWORD }}
  TEAMYAP_ADMIN_NAME: ${{ secrets.TEAMYAP_ADMIN_NAME }}
  TEAMYAP_USER_EMAIL: ${{ secrets.TEAMYAP_USER_EMAIL }}
  TEAMYAP_USER_PASSWORD: ${{ secrets.TEAMYAP_USER_PASSWORD }}

jobs:
  chrome:
    runs-on: ubuntu-latest
    steps:
      - name: Checkout repository
        uses: actions/checkout@v2

      - name: Set up Node.js
        uses: actions/setup-node@v2
        with:
          node-version: 12.22.0

      - name: Run TestCafe tests on headless Chrome
        uses: DevExpress/testcafe-action@latest
        with:
          args: "chrome:headless *_test.js"

  firefox:
    runs-on: ubuntu-latest
    needs: chrome
    steps:
      - name: Checkout repository
        uses: actions/checkout@v2

      - name: Set up Node.js
        uses: actions/setup-node@v2
        with:
          node-version: 12.22.0

      - name: Run TestCafe tests on headless Firefox
        uses: DevExpress/testcafe-action@latest
        with:
          args: "firefox:headless *_test.js"
Placing the env setting outside of any job makes the defined environment variables available for all jobs in the workflow, so we'll avoid duplication to make the configuration file easier to follow and maintainable in the long run.
Configure GitHub Actions to run TestCafe tests using Microsoft Edge
Next up, we'll add another job to run the test suite using Microsoft Edge. We can use GitHub's windows-latest runner for this job, which is a virtualized environment running Windows Server 2019. This runner already has Microsoft Edge preinstalled, so we don't have to include additional steps to set up the browser. The job will look essentially the same as our existing jobs:
edge:
runs-on: windows-latest
needs: firefox
steps:
- name: Checkout repository
uses: actions/checkout@v2
- name: Set up Node.js
uses: actions/setup-node@v2
with:
node-version: 12.22.0
- name: Run TestCafe tests on headless Edge
uses: DevExpress/testcafe-action@latest
with:
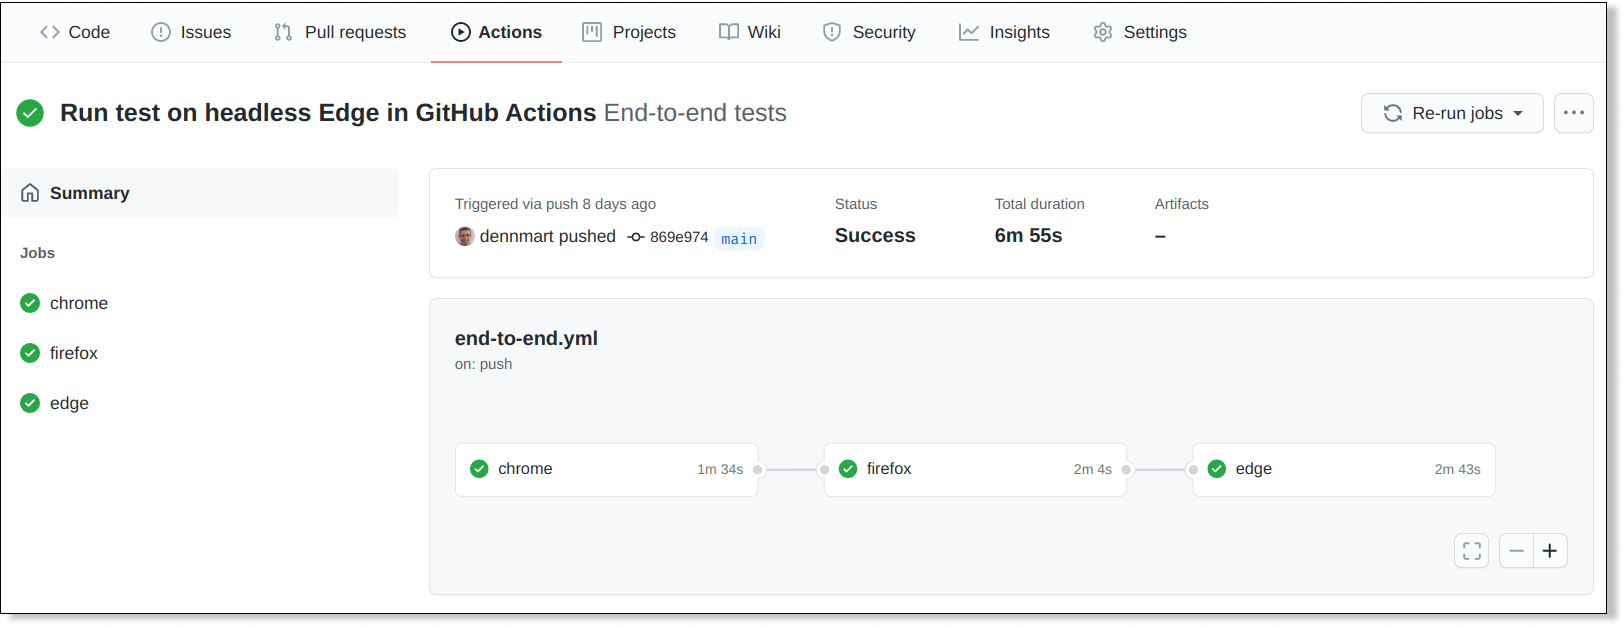
args: "edge:headless *_test.js"Our new job is called edge. The only differences in the configuration are that we're using the windows-latest runner as mentioned above, and we'll wait for the firefox job to complete successfully. The argument to execute the TestCafe tests also needs to slightly change to use headless Edge. Everything else remains the same, thanks to the checkout, Node.js, and TestCafe actions working on both Ubuntu and Windows hosted runners.
Adding this configuration to the bottom of the .github/workflows/end-to-end.yml configuration file and pushing it to the GitHub repository will execute all three jobs, one after another.
Configure GitHub Actions to run TestCafe tests using Apple Safari
To complete the full coverage of most major browsers for our end-to-end tests, I intended to set up a GitHub Actions job to run the test suite using Apple Safari and the macos-latest GitHub-hosted runner. The macOS environment has Apple Safari set up already, and we can use the same actions to check out the code and set up Node.js. However, the environment has a few "gotchas" that prevented the job from running successfully.
The macos-latest runner is a macOS 10.15 virtualized environment, and it has System Integrity Protection enabled by default. Unfortunately, this setting requires TestCafe to accept screen recording permissions before executing its tests. We can't do this in a headless environment, so we can't run our tests as we do on the other hosted runners.
The TestCafe documentation provides a workaround by running the TestCafe tests remotely and adding a few commands to open Safari and execute the tests that way. For our test suite, however, this workaround will cause some tests to fail. One test case resizes the browser to validate design responsiveness, and another uses TestCafe's multi-window support. Both of these scenarios are unsupported by TestCafe when testing on remote browsers.
If you don't have TestCafe test scenarios with these limitations, the remote browser workaround will work on GitHub Actions. Otherwise, you'll need to use an external service like BrowserStack or LambdaTest to execute your tests on Apple Safari properly.
Summary
GitHub Actions gives you the ability to automate any workflow on your GitHub-hosted code repository. If you already use GitHub to host your code repository, GitHub Actions is an excellent option to use for your continuous integration needs, thanks to its tight integration with the service. You won't have to use additional services to get up and running.
This article shows how simple it is to use GitHub Actions to run your TestCafe tests using Google Chrome, Mozilla Firefox, and Microsoft Edge without resorting to third-party services. You can spin up complete build environments based on Linux, Windows, and macOS with the tools needed for most modern software projects preinstalled. The available actions on the marketplace handle most of the setup with a single line of configuration. Finally, you can control how and when your jobs run under different conditions.
Although we couldn't use GitHub-hosted runners to run TestCafe tests using Apple Safari, GitHub Actions is still an excellent choice for running complete end-to-end tests for web applications, especially if your code is already on GitHub. The hosted runners provided by GitHub, and the extensive marketplace of ready-to-use actions make it one of the better services available to run your end-to-end tests.
Have you used GitHub Actions for running end-to-end tests for web applications? If you have, share any tips, tricks, or personal experiences with others in the comments section!