

Last week's article on Dev Tester covered a new API testing tool called APId. The article covers the core functionality of the tool with an example using a standard RESTful API. It serves as a great introduction to have automated end-to-end test coverage for your APIs.
Writing tests for your API is excellent to help catch regressions before any code is shipped out to production. But you'll only get that benefit if you run the tests frequently - preferably after every change made to the codebase.
That's where continuous integration comes into play. Continuous integration is a broad topic that could span multiple articles. A simple definition is that continuous integration is a practice used by development teams to monitor code changes and kick-off processes to ensure the codebase is healthy.
One of the main processes used in continuous integration is to run automated tests. Any time someone commits a change to the codebase, a server runs the automated test suite for the project and alerts the team of any issues. This way, the team can fix any problems early and avoid releasing a buggy or unusable application to their users.
A continuous integration service typically handles this work. You can do tons of other things with these services, like building the application and deploying it automatically. For the rest of this article, the focus for continuous integration is to show how to run end-to-end tests after code updates.
Setting up end-to-end tests on CircleCI
This article uses CircleCI as the continuous integration service for the examples shown. There are lots of excellent continuous integration services out there like Travis CI, Semaphore CI, and AWS CodeBuild. If you or your team have the resources, you can even host a continuous integration service on your in-house servers with Jenkins or Drone CI. I'm most familiar with CircleCI, which is why I chose it as the basis for our examples.
CircleCI is simple to set up on an existing project, and it allows up to 1500 minutes of free build time per month. For small projects with little development activity, it's enough for multiple code repositories.
Please keep in mind that this article does not cover every detail about the CircleCI setup. While the article talks about setting up the tests from the beginning, I won't go into detail about what each section does. The main focus of the article is to set up the application and run the tests with CircleCI and APId. If you're interested in understanding more about this setup, please leave a comment below, and I'll gladly help out.
To demonstrate how to use CircleCI to run API tests using APId, I'll use the same application and tests covered in the previously mentioned article. I'll set up CircleCI to use the Airport Gap API used to write the end-to-end tests. You can find the application's code repo on GitHub. The repository has end-to-end tests written for the application in apid.yaml. These are the same tests that last week's article covered.
One thing to note here is that the tests are using environment variables for specific values, such as the URL for the API and the test user account information. These variables are set up on CircleCI in the project's settings.
Before starting, we need to create the configuration file for the application. CircleCI expects the root of your application to contain the configuration in .circleci/config.yml. Inside the code repository, you can create the .circleci directory (note the period in the beginning) and open an empty file called config.yml.
Inside this file, we'll begin setting up the application. Since every application has its particular way to set things up, I won't go into detail with everything here:
version: 2

jobs:
  end_to_end_tests:
    working_directory: ~/airport_gap
    docker:
      - image: circleci/ruby:2.6.5-node
        environment:
          PGHOST: 127.0.0.1
          PGUSER: airport_gap
      - image: circleci/postgres:12.1-alpine
        environment:
          POSTGRES_USER: airport_gap
          POSTGRES_DB: airport_gap_development
          POSTGRES_PASSWORD: ""
    steps:
      - checkout

      - run:
          name: Configure Bundler
          command: |
            echo 'export BUNDLER_VERSION=$(cat Gemfile.lock | tail -1 | tr -d " ")' >> $BASH_ENV
            source $BASH_ENV
            gem install bundler

      - restore_cache:
          name: Restore Cache (Bundler)
          keys:
            - airport-gap-bundler-{{ checksum "Gemfile.lock" }}

      - run:
          name: Install dependencies (Bundler)
          command: bundle install --path vendor/bundle

      - save_cache:
          name: Saving Cache (Bundler)
          key: airport-gap-bundler-{{ checksum "Gemfile.lock" }}
          paths:
            - vendor/bundle

      - restore_cache:
          name: Restore Cache (Yarn)
          keys:
            - airport-gap-yarn-{{ checksum "yarn.lock" }}

      - run:
          name: Install dependencies (Yarn)
          command: yarn install --frozen-lockfile --prefer-offline --cache-folder ~/.cache/yarn

      - save_cache:
          name: Saving Cache (Yarn)
          key: airport-gap-yarn-{{ checksum "yarn.lock" }}
          paths:
            - ~/.cache/yarn
Here's a summary with what's happening here:
- We're setting up CircleCI to use the configuration for version 2.0 of their service.
- We're setting up a job called
build, which is the default job name that's triggered when code is updated. CircleCI allows multiple jobs in a workflow (like unit tests and frontend tests), but that's out the scope for this setup. - Airport Gap is a Rails application and requires a PostgreSQL database. CircleCI uses Docker to set up the environments needed for these.
- CircleCI checks out the latest code, so we can begin setting up the application's dependencies.
So far, the configuration is doing the initial setup to run the application. Once it's all set up, the next step is to seed the database for the tests by adding the following to the CircleCI configuration:
      - run:
          name: Database setup
          command: bin/rails db:prepare

      - run:
          name: Seed the database
          command: bin/rails db:seed
Here I'm using a few built-in Rails commands that handle setting up the database (creating the database and tables) and populating seed data. In the case of Airport Gap, the code repository has a CSV file. Rails first reads the file and inserts each row into the database. It also creates a test user account used during testing.
I used this approach because it's the simplest way for me to seed data in a Rails application. There are different strategies for setting up data to use in end-to-end tests, depending on your situation. I highly recommend experimenting with different approaches to see what works best for your project.
With the database taken care of, APId is next in line for setting up. You can use APId in one of two ways - using Docker, or using the command-line interface. For this article, I opted to use the command-line interface since it's how I'm using APId to run tests locally.
The APId binary contains the command-line interface needed to execute the tests. All you need to do in CircleCI is download the binary and set its permissions:
      - run:
          name: Download APId binary
          command: |
            curl -o apid https://cdn.getapid.com/cli/latest/apid-latest-linux-amd64
            chmod u+x apid
This step downloads the APId binary to the working directory - where your code is - and sets the binary to make it executable. It's similar to how you would set up APId in your local development environment.
Running APId tests on CircleCI
So far, our configuration sets up the Airport Gap application, seeds the database with the data we'll use during testing, and sets up APId to run our end-to-end tests. Almost everything is ready to begin testing. Before writing the steps to run our end-to-end tests, we'll first need an application for our tests to run.
In the previous Dev Tester article, the tests run against the public-facing server for Airport Gap. This setup works, but that also means you won't run your tests against the latest version of the application. The main reason for setting up a continuous integration service is to run tests when something changes. If you run the tests on an existing application, you're losing one of the main benefits of continuous integration.
To deal with this, we'll run the Airport Gap application inside CircleCI itself. Again, the steps needed to run your specific application vary so I won't go into detail:
      - run:
          name: Start application server
          command: bin/rails s -d

      - run:
          name: Wait for application
          command: dockerize -wait http://localhost:3000 -timeout 1m
For this example, we'll start up an instance of the Airport Gap application. Since it takes a few sections for the application to boot up, we don't want to proceed with the tests until we're sure that the server is up and running. For this, we'll use dockerize to wait for the application (which is running in http://localhost:3000) to respond successfully.
Finally, all that's left to do is to run the tests with APId:
      - run:
          name: Run end-to-end tests
          command: ./apid check
Since the APId binary is set up in the same directory as the tests, the only thing that you need to do is run ./apid check. This step picks up the tests from apid.yaml and runs them as they would run in your local environment.
The CircleCI configuration is now complete. Before committing this file to your code repository, you will need to tell CircleCI to keep an eye out for changes to the project. This step is done by logging in to the CircleCI dashboard and clicking the "Add Projects" button to set up your project. More information is available in the CircleCI documentation.
Once your project is set up, you can commit the CircleCI configuration file to your repository. If you've set up the environment variables for the test suite correctly and the application is running as expected, you'll see the results for the tests on CircleCI's build page:
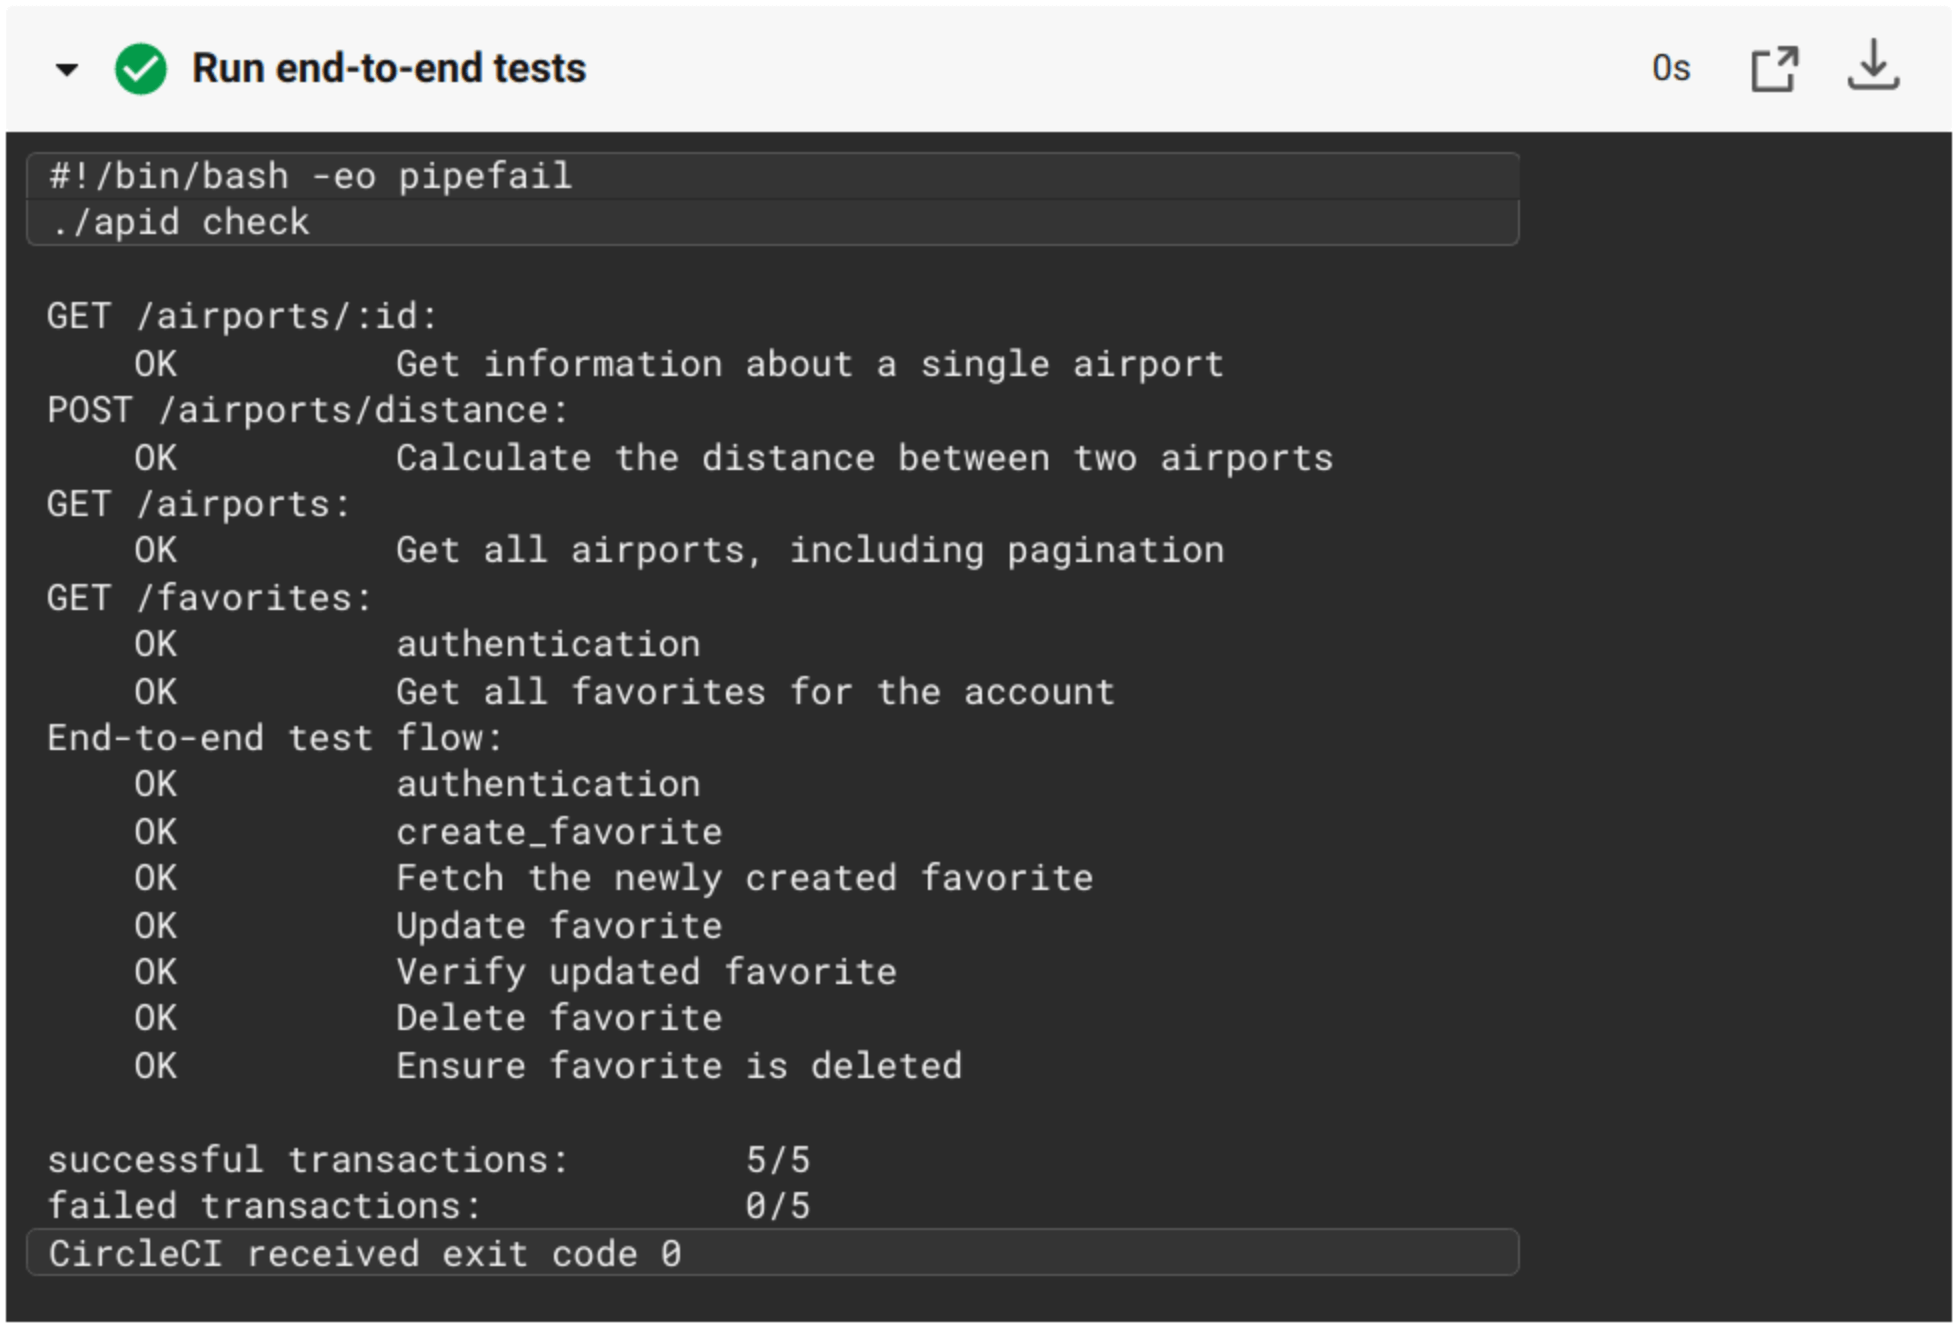
Success! Now every time your code changes, these tests ensure the API is running as expected. There's no need to remember to run the tests because CircleCI does that for you. The full configuration for CircleCI is available here.
Once you have these tests set up, make sure you have some notifications set up for the service. Most continuous integration services send notifications through email or a chat service like Slack. Take advantage of this - if the tests break, you'll want the team to know about it.
Summary
This article shows how simple it is to use a continuous integration service like CircleCI to handle your test automation. Combining continuous integration with a robust and stable test suite gives you and your team the confidence to build quality software faster than ever.
While this article covers end-to-end testing with CircleCI, you can take the ideas shown here to cover all of your test automation needs, regardless of the services used. As mentioned, there are plenty of continuous integration services that can do the same for your project, no matter your project's needs.
Using APId to run end-to-end tests is just the tip of the iceberg. Continuous integration can do all sorts of automated testing, from unit tests to static code analysis to end-to-end tests. You can test and build your application in different environments at once. If you have long-running tasks that take hours to complete, you can schedule them in the middle of the night and have the results waiting for you in the morning. The possibilities are endless.
Continuous integration and end-to-end tests lead to improvements across the board. Bugs are caught and fixed faster, and a stable application with faster updates will delight your customers. With a little bit of effort up front, you can keep your application stable and reliable for years to come.