
If you have to create automated tests for an API, you will most likely use or explore using Postman. Postman is possibly the most well-known API development and testing tool out there and with good reason. It's an excellent tool for both developers and testers to create documentation and demonstrate how your application APIs should work.
Using Postman gives you an excellent starting point for building a test suite to check your API works as expected. However, depending on your test cases and API endpoints, you'll likely run into limitations with Postman:
- Because Postman does so much, its interface can feel confusing and somewhat bloated if all you want to do is API testing.
- Once you start testing more than a handful of API endpoints, it can feel a bit messy to organize your different scenarios for each one.
- If you want to use Postman on a continuous integration environment, you'll have to use Newman, the command-line companion to Postman. While both tools should technically work the same, they're still separate tools, and you might stumble with issues where your test results differ.
- If you have multiple team members collaborating on API testing and documentation, Postman's pricing can get a bit steep for small organizations, since it's a monthly fee per user.
I recently worked on a project that's using Postman for API documentation and testing. The team began experiencing most of these pain points directly, so we set out to look for a better solution to get the team building automated tests as they continued building the API. The team had no dedicated testers, so the development team was responsible for test automation.
Since the current developers are comfortable with JavaScript, we began looking for JavaScript tools to help with these efforts. After some experimenting, we landed on a lovely combination of tools that made our API testing effortless to build and easy to maintain. After implementing these testing tools, our automation coverage skyrocketed.
The JavaScript tools to run your API tests
The application under test was a Node.js application, so we wanted to find testing tools that worked well in that environment. Thankfully, the Node.js ecosystem has no shortage of excellent tools for all your testing needs. You'll find a library or framework to run everything from basic unit tests to end-to-end tests and everything in between.
With so many choices at our disposal, our focus was to find simple-to-use, battle-tested libraries that have been around for some time. One of the team's desires was to find stable tools that any JavaScript developer could easily pick up. After tinkering around with a few well-known libraries, we found some great libraries that fit the bill.
SuperTest
SuperTest provides a high-level abstraction for testing HTTP requests - perfect for APIs. If you have a Node.js application that runs an HTTP server (like an Express application), you can make requests using SuperTest directly without needing a running server. One of the nice things about SuperTest is that while it can run tests without any additional tools, it can integrate nicely with other testing frameworks, as you'll see next.
Mocha
One of the better-known JavaScript testing frameworks, Mocha runs on both Node.js and the browser, making it useful for testing asynchronous functionality. One of the cool things about Mocha is it allows you to write your tests in different styles like BDD (it, describe, etc.) and TDD (suite, test, etc.). Mocha fits in nicely with SuperTest, helping you organize your tests in your team's preferred way.
Chai
Chai is an assertion library that you can pair with other testing frameworks like Mocha. While not strictly necessary for writing a test suite, it provides a more expressive and readable style for your tests. Like Mocha, Chai allows you to choose BDD-style (expect) or TDD-style (assert) assertions so that you can combine the library with most frameworks without any clashes.
Using these three tools, you can create a fast, stable, and maintainable automated test suite for your APIs with little effort.
Putting these tools into play
To demonstrate how SuperTest, Mocha, and Chai work together, we'll use these tools to automate a few tests for an application called Airport Gap. The Airport Gap application provides a RESTful API to help others use it to improve their API automation testing skills.
Keep in mind that the Airport Gap application is not a Node.js application, so this article won't show how you can use these testing tools to integrate directly with Node.js. However, you can still use them to build tests for any accessible API. This article will create the tests in a separate code repository, but if you have a Node.js application, these tools will work best with your test code alongside the app.
First, create a new project inside an empty directory and initialize it by running npm init -y to create a default package.json file. For now, you don't have to edit this file. With the project initialized, you can set up the latest versions of SuperTest, Mocha, and Chai libraries with the following command:
npm install --save supertest mocha chaiThat's all you need to get started with creating automated tests for your API. Let's start by creating your first API test for the Airport Gap application.
The Airport Gap documentation shows all available endpoints you can use for your tests. Let's start with the endpoint that returns all available airports, GET /airports. This endpoint returns a paginated list of 30 airports at a time, so a quick way to verify that this works is to create a test that calls the endpoint and returns a list of 30 results.
Create a new file inside the project directory called airports.test.js, which you'll use to write your test code. You can name this test file anything you prefer, but including .test.js as part of the filename makes it easier to execute the tests as the test suite expands. In the new file, let's write our first API test. Here's the code, and we'll explain what's going on after:
const request = require("supertest")("https://airportgap.dev-tester.com/api");
const expect = require("chai").expect;

describe("GET /airports", function () {
  it("returns all airports, limited to 30 per page", async function () {
    const response = await request.get("/airports");

    expect(response.status).to.eql(200);
    expect(response.body.data.length).to.eql(30);
  });
});
If you're familiar with JavaScript, this test will be readable even if you've never used any of the libraries in the project.
First, the test loads the SuperTest library and assigns it to the variable request. The SuperTest library returns a function which you can use to initialize an HTTP server. You can also pass a string with the URL of the host you want to use if you're not working directly with a Node.js application, which is what we're doing in this article.
Notice that the specified host is the API's base URL, including the /api subdirectory. Using the base URL allows you to make requests to your API endpoints without needing to write the entire URL every time, as you'll see later when we use SuperTest inside our test scenario.
The next library loaded comes from Chai. Since Chai allows you to use both TDD and BDD assertion styles, you need to specify which one you want to use. For these examples, we're going with the BDD style, using the expect interface. If you prefer the should BDD interface or assert with the TDD style, you can easily switch using Chai. It's one reason why we chose the library since it accommodates different tastes for any team.
After loading the required libraries, now you'll get into the heart of your test scenarios. Following the BDD style, the test uses Mocha's describe interface to group your test scenarios. The describe function accepts a string as a description of the tests and a function to define your test cases. Like Chai, you can use the TDD interface instead if that's your preference. You don't have to load any Mocha libraries, since we'll use Mocha's runner to execute the tests.
The it function from Mocha is the place to define a single test scenario. Like the describe function, the first argument is a string to describe the test case, and the second argument is a function to write the code for your test steps. Notice that we're using an asynchronous function as the second argument for it. Inside the test, you'll make requests using SuperTest, which returns a promise. Using async and await allows you to resolve the promise to get the API response more cleanly instead of resolving the promise through chaining.
The test scenario has two steps. First, you use SuperTest's request function to call the API using the get function. This function requires at least one parameter - the URL for your request. Since we initialized the request function with our base URL for the Airport Gap API, it's unnecessary to write the entire URL when making requests. All you need is the endpoint, and SuperTest automatically appends it to your base URL.
As mentioned, the get function returns a promise, so to resolve it cleanly, you can use the await keyword. SuperTest makes a request to your host and endpoint, and saves the response in the response variable, which you'll use to run the test's assertions. SuperTest fetches lots of information from the API request, like the body, headers, status codes, and much more.
With the API response in hand, you can finally make your assertions to ensure that the API works as expected. The test uses Chai with the expect function and the to and eql chained methods to construct your assertion. Chai has tons of methods for building assertions, and it's worthwhile to read which ones are available to help you create your tests as needed.
This test contains two assertions. First, the test verifies if the API request's status code was 200 - meaning that the request was successful - using response.status. The next assertion looks at the response body (response.body) and checks if the data key contains 30 items. SuperTest is smart enough to check the content type from the response and appropriately parses the information into a JavaScript object. It makes verifying your JSON APIs much easier to do since you don't have to worry about parsing the response.
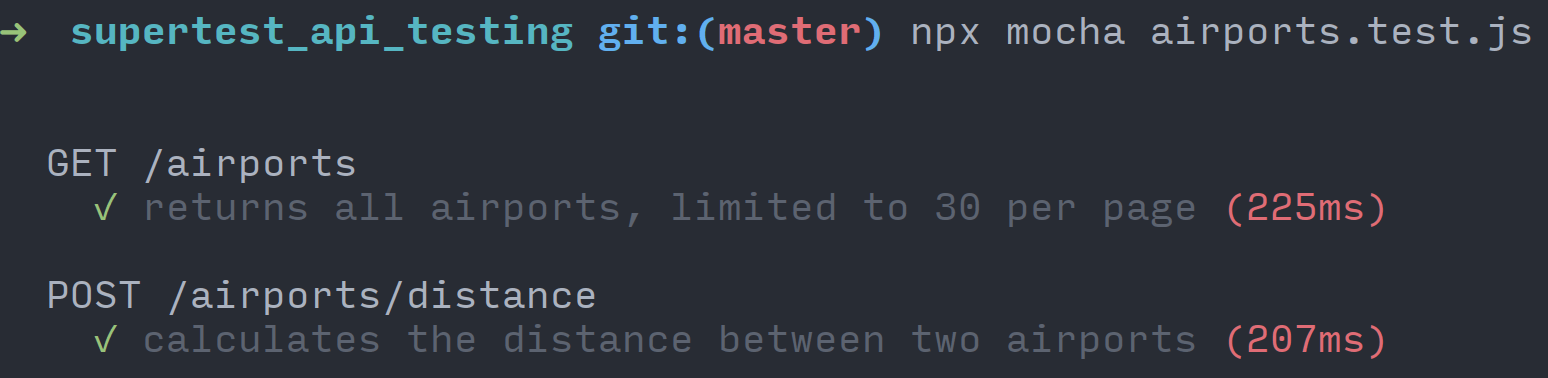
The test is all set up and ready to execute. To run your tests using Mocha, you can use the mocha executable included when installing the package. The easiest way to use it is with the npx command, which will find the executable inside your project. Open your terminal and run the following command:
npx mocha airports.test.jsIf everything works as expected, Mocha will execute your tests and show your test results. The default reporter shows the description of your tests, grouped by the describe method, and displays the results and the execution time for each test.

You've written and executed your first API test using SuperTest, Mocha, and Chai! In less than ten lines of code (not counting blank lines), you already have an automated test to verify an API request that you can re-run at any time. It can't get any simpler than that.
Running POST request tests
Let's write another test, this time checking how a POST request to the API works. The POST /airports/distance endpoint allows you to send two airport codes, and it returns the distance between them in different units of length. Let's see how SuperTest handles the request. Under the existing test in airports.test.js, create a new test case:
describe("POST /airports/distance", function () {
  it("calculates the distance between two airports", async function () {
    const response = await request
      .post("/airports/distance")
      .send({ from: "KIX", to: "SFO" });

    expect(response.status).to.eql(200);

    const attributes = response.body.data.attributes;
    expect(attributes).to.include.keys("kilometers", "miles", "nautical_miles");
    expect(attributes.kilometers).to.eql(8692.066508240026);
    expect(attributes.miles).to.eql(5397.239853492001);
    expect(attributes.nautical_miles).to.eql(4690.070954910584);
  });
});
This test is a bit longer than the first example, but most of the way we use the SuperTest, Mocha, and Chai libraries are similar, so we won't go into detail for this test. Let's focus on the parts that did change.
The first difference is the way you need to make the request to the API. Since this endpoint is a POST request, you'll use the post function. The function works the same as get, and you only need to specify the endpoint for the API. However, you can chain the send function to your request to submit any required parameters. Since we're testing a JSON API, you can use a regular JavaScript object with your parameters, and SuperTest sends the correct request body.
Another difference is one of the assertions made to verify that the API response contains specific keys. Here, we're using Chai's include and keys methods to confirm that the response includes the keys with the calculated distances. You can check the entirety of the API response body, but we're just going to do some spot-checks for purposes of this article. We also perform validations on this test's actual values, but these are also for demonstration purposes. You might not want to run these kinds of assertions if your API data can easily change.
Now that you've seen the changes in these tests, it's time to execute them to make sure everything's working as expected. You can run the tests the same way as before:
npx mocha airports.test.jsNow you have two test scenarios, and if everything is correct, you'll have two successful test results for different API requests and endpoints.
Testing authenticated endpoints
The examples shown so far run tests against public API endpoints. What if you have an API that requires authentication? The Airport Gap API has some endpoints that require authentication. These protected endpoints require an API token passed as a header. For instance, one endpoint that requires authentication is the POST /favorites API endpoint. This endpoint allows an Airport Gap user to save their favorite airports to their account to look up later.
Let's begin creating a few tests to validate this behavior. First, we'll cover the test case to verify that the POST /favorites endpoint doesn't allow access without a token. After verifying that the Airport Gap API won't allow access, we'll write a test that accesses the same endpoint, this time with an authentication token.
To keep the test suite organized, create a new file in the project directory called favorites.test.js. Inside this new file, let's first write the test scenario to ensure that an unauthenticated user can't access this endpoint:
const request = require("supertest")("https://airportgap.dev-tester.com/api");
const expect = require("chai").expect;

describe("POST /favorites", function () {
  it("requires authentication", async function () {
    const response = await request.post("/favorites").send({
      airport_id: "JFK",
      note: "My usual layover when visiting family",
    });

    expect(response.status).to.eql(401);
  });
});
By now, the test structure should be familiar to you. We're loading up the SuperTest and Chai libraries, create a new test group and set up a test scenario to validate that the endpoint requires authentication. The POST /favorites endpoint requires the airport_id parameter and also accepts an optional note parameter, both of which we'll use in our request. When making a request to a protected endpoint in the Airport Gap API without a valid token, the API returns a 401 response, which is what we're checking here.
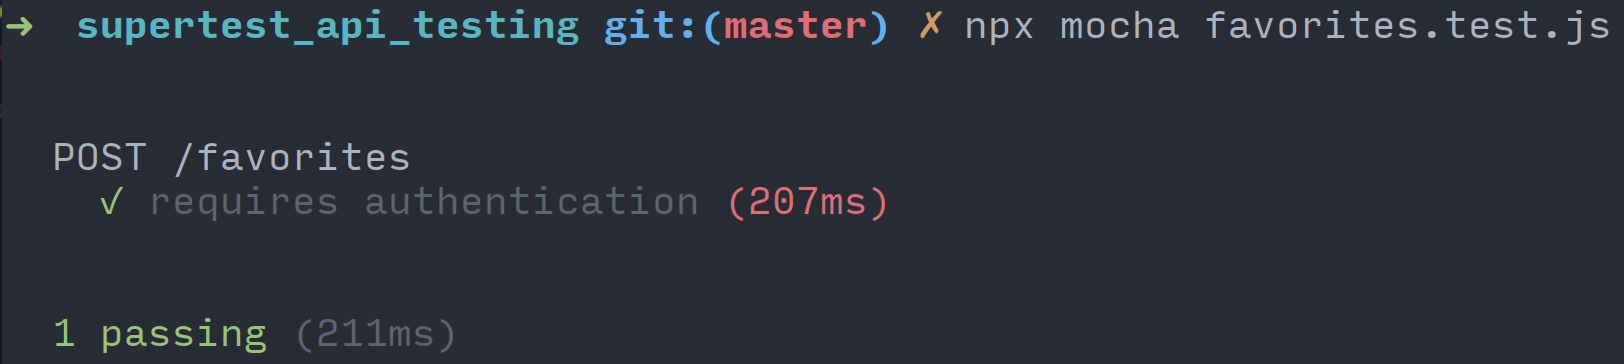
Run this new test scenario to make sure it's working as expected:
npx mocha favorites.test.jsYou'll see the now-familiar results for this test case:
Now that you verified how the API works without authentication, let's go through a longer flow to make similar requests with an authentication token. If you have an Airport Gap account, you can find your API token in your account page and use it directly in your tests either by setting it in the code or through an environment variable. We'll use an environment variable to keep sensitive keys out of the codebase.
The next example follows an end-to-end flow that uses multiple authenticated API endpoints. The test starts by creating a new favorite airport in the user's account. Then, it updates the newly-created record through an API request and validates the data returned. Finally, the test will delete the record, and we'll validate that it's not found anymore.
In the favorites.test.js file, add your new test case under the existing scenario:
it("allows an user to save and delete their favorite airports", async function () {
  // Check that a user can create a favorite.
  const postResponse = await request
    .post("/favorites")
    .set("Authorization", `Bearer token=${process.env.AIRPORT_GAP_TOKEN}`)
    .send({
      airport_id: "JFK",
      note: "My usual layover when visiting family",
    });

  expect(postResponse.status).to.eql(201);
  expect(postResponse.body.data.attributes.airport.name).to.eql("John F Kennedy International Airport");
  expect(postResponse.body.data.attributes.note).to.eql("My usual layover when visiting family");

  const favoriteId = postResponse.body.data.id;

  // Check that a user can update the note of the created favorite.
  const putResponse = await request
    .put(`/favorites/${favoriteId}`)
    .set("Authorization", `Bearer token=${process.env.AIRPORT_GAP_TOKEN}`)
    .send({
      note: "My usual layover when visiting family and friends",
    });

  expect(putResponse.status).to.eql(200);
  expect(putResponse.body.data.attributes.note).to.eql("My usual layover when visiting family and friends");

  // Check that a user can delete the created favorite.
  const deleteResponse = await request
    .delete(`/favorites/${favoriteId}`)
    .set("Authorization", `Bearer token=${process.env.AIRPORT_GAP_TOKEN}`);

  expect(deleteResponse.status).to.eql(204);

  // Verify that the record was deleted.
  const getResponse = await request
    .get(`/favorites/${favoriteId}`)
    .set("Authorization", `Bearer token=${process.env.AIRPORT_GAP_TOKEN}`);

  expect(getResponse.status).to.eql(404);
});
The API requests made using the request function all look the same, except for a new portion we haven't used previously. To send the authentication token as part of the request as a header, you can chain the set function to your request. This function uses two parameters. The first parameter is the name of the request header, and the second parameter is the value you want to send to the server for that header. For the Airport Gap API, it expects to find the Authorization header with the value of Bearer token=<token>.
After setting up this end-to-end test, let's execute it and see how it goes.
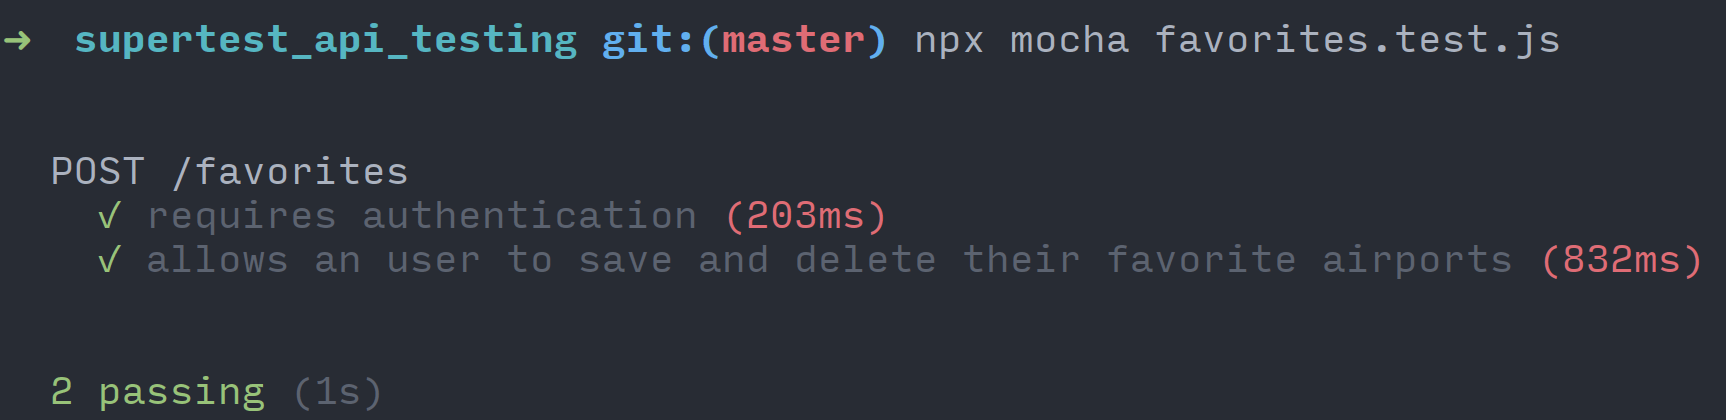
This test can give you a clearer idea of how potent SuperTest is for making HTTP requests of all kinds. Here, you see the different HTTP methods you can use, and how chaining different methods like send and set allows you to pass along all the data your API requests need. This test can be improved in a few ways, like cleaning up the account favorites if there's an error in the middle of the execution, but we'll leave it as an exercise to the reader.
Cleaning things up
Although the current tests are relatively short and straightforward, you can begin to take some steps in organizing and cleaning up the test suite now. It's a good practice to try to get some organization going in your codebase before it spirals out of control.
The first thing you might have noticed is that we have some duplication creeping in. We have two separate files with the same setup to load the libraries. For these basic examples, it's not a big deal. But imagine you continue expanding this test suite and have a few more files. If you have to change the setup, like using a different base URL for the API, you'll have to go into each one and adjust it manually. It'll be nice to have it in one place.
You can begin organizing your test setup with a configuration file that you can place in the root of your project directory. The configuration file can export some of the common functionality used throughout your test suite, which you can include where needed. That way, you can keep some of your setup and configuration in a single place.
To do this, start by creating a new file called config.js inside of your project directory. Inside this file, you can move the common setup used in each test suite and export these functions:
const request = require("supertest")("https://airportgap.dev-tester.com/api");
const expect = require("chai").expect;

module.exports = {
  request,
  expect,
};
Now you can replace the setup at the beginning of both test files with this configuration:
const { request, expect } = require("./config");Your tests should work the same with this change, and your test suite becomes more maintainable by having the basic setup consolidated in a single place. If you need to set up additional libraries or configure the existing functions differently, you only need to do them once in the configuration file.
One last thing to do is to make it easier to execute your tests from the command line. Typing npx mocha *.test.js is simple to do, but we can make it easier by adding a quick command to execute your tests. Open the package.json file and find the scripts key. By default, it includes a test command, which doesn't do anything. Replace the value of the test key with your Mocha command (the npx command is no longer necessary):
{
  "scripts": {
    "test": "mocha *.test.js"
  },
  // The rest of your configuration remains the same.
}
With this change, all you need to execute your tests is to run the npm test command. While this change doesn't save a ton of time now, it helps in other ways. Most JavaScript projects use the npm test command as a standard way to execute tests regardless of the testing tools used, so anyone joining your team can get up and running quickly. Another benefit is that it keeps your test command the same if you have to include additional command-line flags in the future.
If you want to check out the source code for the project shown in this article, it's available on GitHub: https://github.com/dennmart/dead_simple_api_testing.
Summary
With lots of web applications relying on APIs to work, you need to make sure these systems are always working as expected. A fast and stable automated test suite will ensure that the APIs that power the essential parts of your business continue to work as they grow and expand.
If your team uses JavaScript - which is likely since it's one of the most-used programming languages nowadays - you won't have to step away from your existing toolset and environment to create your tests. You can find plenty of testing frameworks and libraries to build your test automation for your APIs.
In this article, you saw the combination of three tools to allow you to build a robust automated test suite for APIs quickly. SuperTest enables you to make any HTTP requests with ease. The Mocha testing framework organizes and runs your tests in the way your team prefers, whether its TDD or BDD style. Chai's assertions fit in nicely with Mocha to validate your API responses. All three together combine to create a maintainable and speedy test suite.
These aren't the only tools you can use, though. As mentioned in this article, you have plenty of options to choose from if you want to build your test automation around JavaScript. If you don't like Mocha, you have similar frameworks like Jest or Jasmine. If Chai isn't your cup of tea (pun intended), other assertion libraries like should.js or unexpected work equally well.
API testing doesn't have to be complicated. After all, the only thing APIs do is receive a request and send back a response. With a few tools in place, you can create a simple yet powerful test suite to make sure your APIs are as reliable as possible to keep your applications running smoothly.
How do you and your team handle API testing? What issues or pain points have you ran into? Let me know by leaving your comments below!