
If you need to create robust end-to-end tests for web applications with cross-browser compatibility out of the box, few tools are as solid as TestCafe. Anyone who's followed this site for a while knows that I'm a massive fan of TestCafe—so much that I wrote a book on how to create effective end-to-end tests using it.
You may know about TestCafe for building automated, browser-driven UI tests for any website. However, as of a few weeks ago, you can now use TestCafe for automated API testing. It's an exciting addition to an already excellent and fully-featured testing tool and will help you get even more value out of TestCafe in your test suite.
Why use TestCafe for API testing?
Since TestCafe's primary use case is for automating end-to-end tests, why would you want to use it for testing an API? Testers have no shortage of options for automated API tests. I've covered a few tools previously on this site, like APId and SuperTest. These tools were built specifically for API testing and have been around for a while, so in most cases, they're more mature and thoroughly documented. Still, there are some benefits to using TestCafe for building your API tests:
- If you're already using TestCafe for your end-to-end testing, you won't need to include any additional dependencies to get into API testing.
- When starting your automated testing strategy, you can have a head-start with API testing and later add end-to-end tests when it makes more sense.
- You can replace slow and flaky end-to-end tests with faster and more reliable API tests if it doesn't make sense to test through the user interface.
In this article, let's take the latest version of TestCafe for a spin to see how it works for testing your APIs.
Setting up TestCafe to test an API
We'll use an application I created called Airport Gap as the API to test. The Airport Gap application provides a RESTful API to help others improve their API automation testing skills. It also provides a suitable starting point to show some examples for API testing with TestCafe.
Before proceeding, we have to decide where we want to place the API tests we'll build. In most projects, it makes sense to include your tests in your application's code repository. For simplicity's sake, I'll create the test suite in a separate directory dedicated to the test suite. Either choice is okay, as long as you understand which option works best for your needs. You can still follow along regardless of where you place your API tests.
Installing TestCafe takes a minute, as long as you have Node.js and npm installed in your system. Once those dependencies are up and running, you can install TestCafe using npm in the current directory where you plan to put the tests:
npm install --save-dev testcafe@latest
In this example, we'll specify that we want to install the latest version of TestCafe to ensure we get the version that introduces API testing (v1.20). We'll also install it as a development dependency to keep TestCafe in the current directory. The official installation instructions in the TestCafe documentation mention installing TestCafe globally, which you can do if you prefer.
That's all you need to start using TestCafe. Let's begin creating our first API test using TestCafe.
Creating your first API test with TestCafe
For our first test, we'll check out one of Airport Gap's publicly-accessible endpoints. The Airport Gap documentation shows all available endpoints you can use for your tests. Let's start with the endpoint that returns all available airports, GET /airports. This endpoint returns a paginated list of 30 airports at a time, so a quick way to verify that this works is to create a test that calls the endpoint and returns a list of 30 results.
We'll create a new file called airports.test.js inside the directory used to store our tests. This file will contain some tests associated with the public endpoints. You can name the file anything you prefer, but including .test.js as part of the filename helps with maintenance in the long haul. and makes it easier to execute all the tests in the project, as you'll see later.
In the new file, I'll write our first API test, showing the code first and then explaining what's going on after:
fixture("Airport Gap - Public Endpoints");

test("Fetch all airports, limited to 30 per page", async (t) => {
  const response = await t.request("https://airportgap.dev-tester.com/api/airports");

  await t.expect(response.status).eql(200);
  await t.expect(response.body.data.length).eql(30);
});
This test makes a request to the Airport Gap API as indicated in the documentation and stores the response in an object. The object has lots of valuable data about the API request and response, which we'll then use to make assertions.
Let's break down this test, line by line:
fixture("Airports - Public Endpoints"): TestCafe organizes its tests with fixtures. This function, automatically imported when running the test, returns an object used to configure the tests in the file. For instance, in end-to-end tests, we can usefixtureto set the URL to open when the test execution begins or to run hooks to initialize or teardown the tests. We don't need any of this functionality for testing an API, so we'll only set a descriptive name for the tests to help identify the group during test execution.test("GET /airports returns all airports, limited to 30 per page", async (t) => { ... }): Thetestfunction provided by TestCafe is a function that has two main parameters - the name of the test, and anasyncfunction where we'll write our test code. Theasyncfunction from the parameters includes a test controller object, which exposes the TestCafe Test API through thetvariable and allows us to perform actions and assertions during our test scenario.const response = await t.request("https://airportgap.dev-tester.com/api/airports"): Therequestmethod in the test controller object is a brand-new addition to TestCafe, and it's what allows us to build API tests. This method is simple—it makes HTTP requests to an API and returns the server response, which we're storing in theresponsevariable in this example. Thet.requestmethod requires either a string parameter for the URL to make aGETrequest (like we're doing here) or an object parameter where you'll have more control over your request that we'll see later.await t.expect(response.status).eql(200): With the HTTP request made to the API, we can now use the response to make our test assertions using TestCafe's built-in assertions. This first assertion will check the status code received from Airport Gap usingstatusfrom the response and ensure it's a200status code, which means the response was successful.await t.expect(response.body.data.length).eql(30): The next assertion also uses the API response to check thebodyreturned from the API. Since the Airport Gap API returns a JSON response (as determined by theContent-Typeheader returned by the API request), TestCafe automatically setsbodyas an object, so we can use regular JavaScript to check the result. In this example, the API request returns an object with adatakey, and we want to ensure its value contains 30 items since it's what we'd expect according to the API documentation.
The breakdown for each line of code takes a bit to explain, but the test is almost self-explanatory. All the test does is make a request to an API, and we check that the response is what we expected.
We can execute the tests with the following command in your terminal:
npx testcafe chrome:headless airports.test.js
Although this is an API-only test, we'll still need to specify a browser for the TestCafe command line interface to work. After a second or two, you'll see the test results if everything went well:
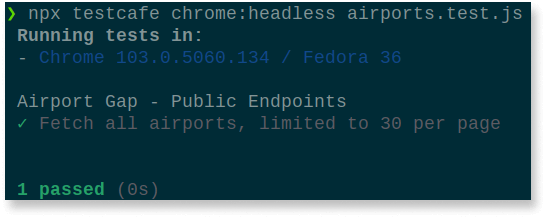
It looks like we're all good with our first test. With just a few lines of code, we built a simple yet effective API test using TestCafe.
Running POST API tests
Now that you've seen how API testing works with TestCafe, let's cover another scenario. This time, we'll make a call to an API endpoint using a POST request and sending data. The POST /airports/distance endpoint on Airport Gap allows you to send two airport codes, and it returns the distance between them in different units of length. Let's see how TestCafe can make this request. Under the existing test in airports.test.js, create a new test case:
test("Calculate the distance between two airports", async (t) => {
  const response = await t.request({
    url: "https://airportgap.dev-tester.com/api/airports/distance",
    method: "post",
    body: { from: "KIX", to: "HNL" },
  });

  await t.expect(response.status).eql(200);

  const attributes = response.body.data.attributes;
  await t.expect(attributes.kilometers).eql(6613.6637624983405);
  await t.expect(attributes.miles).eql(4106.679303789583);
  await t.expect(attributes.nautical_miles).eql(3568.6050364010352);
});
We don't need to create a new fixture, so we can add new tests to the same file. There's a bit of extra code happening in this example, but the scenario works similarly to our first test. We won't go into the same detail as before and instead focus on the part different for this API test.
The primary difference in this test case is how we're making the request to the Airport Gap API. Because the endpoint is a POST request, we need to tweak how we use the t.request method from TestCafe. In our first example, we made a GET request so we could use a string as the parameter. For non-GET requests, we need to set an object to tell TestCafe which HTTP method to use. For this test, we'll set an object with three parameters:
url: The URL where TestCafe will make the request.method: The HTTP method to use for the request.body: The request body to send over to the API.
One thing to note is since we're testing a JSON API, we can use a regular JavaScript object as the request body. TestCafe will automatically set the appropriate request headers over to the Airport Gap API.
Besides the different use of the t.request method, everything else should look familiar. We're making a few assertions to check the response status code and spot-checking some of the attribute values inside the response body. You might not want to run these kinds of tests if your API data changes frequently, but they're included in this example for simplicity.
After seeing how POST requests work in TestCafe API tests, it's time to execute them to verify that it's working as intended. You can run the tests as we did before:
npx testcafe chrome:headless airports.test.js
Now you have two test scenarios and two successful test results for different API requests and endpoints if everything worked well:

Setting request headers for authentication
The examples shown so far run tests against public API endpoints that don't require authentication. However, the Airport Gap API has a few endpoints that do require authentication. One such endpoint that requires authentication is POST /favorites. This endpoint allows an Airport Gap user to save their favorite airports and personal notes to look up later in their account.
Let's see how we can use TestCafe to access API endpoints requiring authentication. First, we'll write a test case to verify that the POST /favorites endpoint doesn't allow access without a token. After verifying that the Airport Gap API won't allow access, we'll put everything together to write a complete end-to-end test that accesses the same endpoint, this time with what we need to authenticate a user.
We can add new tests to the same file we've used to write our tests so far. But to keep the test suite organized, we'll create a new file in the same directory called favorites.test.js. Inside this new file, let's write the test scenario to ensure that an unauthenticated user can't access protected endpoints:
fixture("Airport Gap - Favorites");

test("Creating favorite airports requires authentication", async (t) => {
  const response = await t.request({
    url: "https://airportgap.dev-tester.com/api/favorites",
    method: "post",
    body: {
      airport_id: "JFK",
      note: "My usual layover when visiting family",
    },
  });

  await t.expect(response.status).eql(401);
});
Since this is a new file, we'll want to set up a fixture to identify this group of tests. Next, we'll have our new test case. By now, the code should look familiar. The POST /favorites endpoint requires the airport_id parameter and also accepts an optional note parameter, both of which we'll use in our request. When making a request to a protected endpoint in the Airport Gap API without the proper authentication, the API returns a 401 status code, which is what we're validating here.
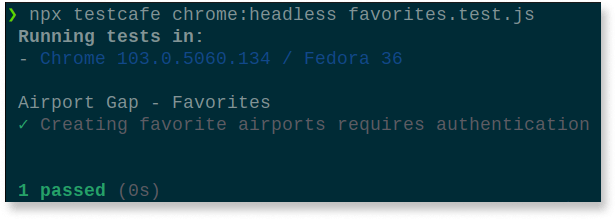
Run this new test scenario to make sure it's working as expected:
npx testcafe chrome:headless favorites.test.js
We should get the now-familiar results for this test case:
Now that you have verified how the API works against restricted endpoints let's begin making requests using authentication. As noted in the documentation, any protected endpoints in Airport Gap require we pass an API token as a request header. If you have an Airport Gap account, you can find your API token on your account page.
To go even further, we'll create a complete end-to-end flow that makes multiple requests to authenticated API endpoints. The test starts by creating a new favorite airport in the user's account and validating its creation. Next, it updates the newly-created record through an API request and validates the change in the response. Finally, the test will delete the record, and we'll validate that it's not available anymore.
In the favorites.test.js file, add your new test case under the existing scenario:
test("End-to-end flow for managing favorite airports", async (t) => {
  // Create a new favorite airport.
  const postResponse = await t.request({
    url: "https://airportgap.dev-tester.com/api/favorites",
    method: "post",
    body: {
      airport_id: "JFK",
      note: "My usual layover when visiting family",
    },
    headers: {
      Authorization: `Bearer token=${process.env.AIRPORT_GAP_TOKEN}`,
    },
  });

  await t.expect(postResponse.status).eql(201);
  await t.expect(postResponse.body.data.attributes.airport.name).eql("John F Kennedy International Airport");
  await t.expect(postResponse.body.data.attributes.note).eql("My usual layover when visiting family");

  const favoriteId = postResponse.body.data.id;

  // Modify the note of the created favorite airport.
  const putResponse = await t.request({
    url: `https://airportgap.dev-tester.com/api/favorites/${favoriteId}`,
    method: "put",
    body: { note: "My usual layover when visiting family and friends" },
    headers: {
      Authorization: `Bearer token=${process.env.AIRPORT_GAP_TOKEN}`,
    },
  });

  await t.expect(putResponse.status).eql(200);
  await t.expect(putResponse.body.data.attributes.note).eql("My usual layover when visiting family and friends");

  // Delete the created favorite airport.
  const deleteResponse = await t.request({
    url: `https://airportgap.dev-tester.com/api/favorites/${favoriteId}`,
    method: "delete",
    headers: {
      Authorization: `Bearer token=${process.env.AIRPORT_GAP_TOKEN}`,
    },
  });

  await t.expect(deleteResponse.status).eql(204);

  // Verify that the favorite airport was deleted.
  const getResponse = await t.request({
    url: `https://airportgap.dev-tester.com/api/favorites/${favoriteId}`,
    method: "get",
    headers: {
      Authorization: `Bearer token=${process.env.AIRPORT_GAP_TOKEN}`,
    },
  });

  await t.expect(getResponse.status).eql(404);
});
This test is much more extensive than the others covered in this article, but most of it should look similar. We're making multiple API requests in a single test case and using different HTTP methods like PUT and DELETE for other endpoints. However, the most significant change done here is sending the authentication token as part of the API request using the t.request method.
To accomplish this, all we need to do is add the header parameter as part of the request, which accepts an object of key-value pairs as the API accepts. For the Airport Gap API, it expects to find the Authorization header with the value of Bearer token=<token>. We can set the token directly in the tests, but keeping sensitive data like authentication tokens out of your tests is a good practice to always have in mind. In this example, we'll use an environment variable to keep the token out of the codebase.
After setting up this end-to-end test and the environment variable, let's execute all of our tests with the following command:
npx testcafe chrome:headless *.test.js
Since we used the pattern of naming our test files ending with .test.js, we can use the wildcard character (*) to tell TestCafe to run all of our tests. This command lets us run our entire API test suite:

This comprehensive end-to-end test hopefully gives you a clear idea of the potential for TestCafe to test APIs quickly and easily. These tests have plenty of room for improvement, like cleaning up the account favorites if there's an error in the middle of the execution, but that's left as an exercise to you if you want additional API testing practice.
If you want to check out the source code for the tests used in this article, it's available on Github:
 dennmart
Additional information
Here's more information about TestCafe's API testing if you're interested in learning more:
- TestCafe's API Testing Guide: The official guide from TestCafe explains how API testing works with TestCafe and its current limitations.
t.requestmethod: The complete reference for thet.requestmethod, including parameters, return values, and how to use proxies and different authentication methods.
Summary
While TestCafe excels in testing web applications through the user interface, you can now use it to build an API test suite alongside your existing end-to-end tests. This article covers the basics of getting API tests up and running quickly with TestCafe by going through a few scenarios running against a real API. It shows how easy it can be to build a robust and comprehensive test suite with little effort. If you're already using TestCafe or plan to write end-to-end tests for your web application projects, consider looking at how it can help keep the quality of your APIs high throughout its lifespan.
Would you consider using TestCafe for testing your APIs? Why or why not? Let me know by leaving a comment below!