
This article is an excerpt from one of the chapters of my upcoming book, End-to-End Testing with TestCafe. If you're interested in learning more about the book, visit https://testingwithtestcafe.com, or enter your email address below to receive the first three chapters of the book free and a discount not available anywhere else.
Want to boost your automation testing skills?
Enter your email address below to receive the first three chapters of the End-to-End Testing with TestCafe book for free.
Earlier in this book, way back in Chapter 2, we briefly touched upon reporters in TestCafe. Reporters are used for displaying the results of your test run using different kinds of formats. So far, you've only seen the default reporter when running your tests, but TestCafe has other reporters available to use if you need to show your test results in a different format.
TestCafe ships with five different reporters you can begin to use immediately. Each reporter displays the outcome of your test execution in various ways, giving you some options on how you need to manage the results. You can use them for showing the results of each test as they run, including detailed error information if an assertion fails. You can also use the output of a reporter for an external service to process.
TestCafe's built-in reporters
Below are the built-in reporters included with TestCafe, created and maintained by the TestCafe team.
spec
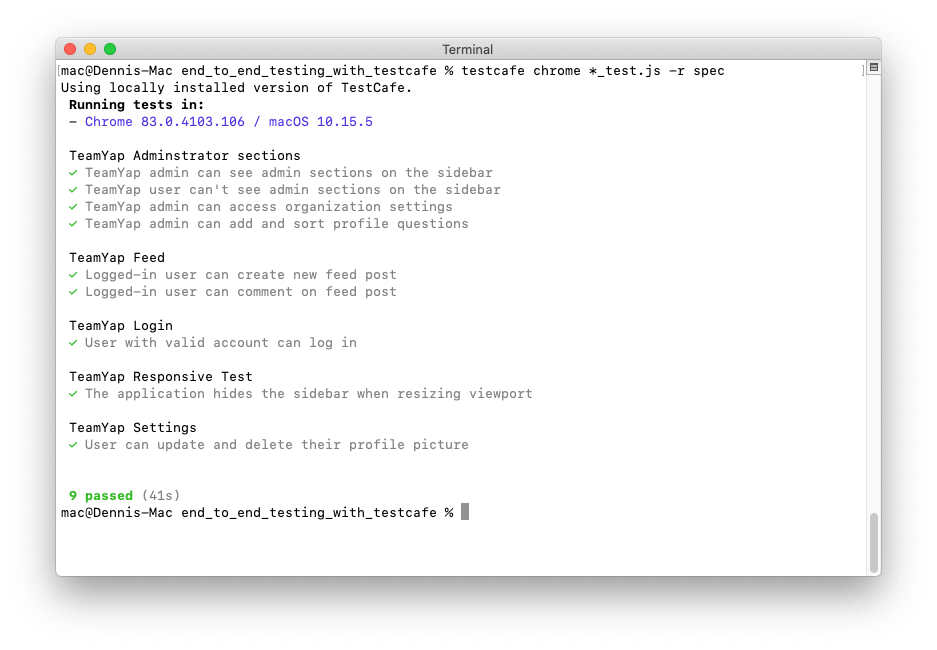
The spec reporter is the default used by TestCafe. This reporter groups your tests by fixture and displays each test scenario's full name under its fixture. At the end of the test run, it shows the number of tests executed, the result of each test (passed, skipped, or failed), and the total time the test execution took. It does not display how long each test took to execute.
Configuration examples
The following examples use the spec reporter when running your tests using the configured browser and test files.
Command line setting:
testcafe chrome *_test.js -r spec
testcafe chrome *_test.js --reporter spec
Configuration file setting:
{
  "reporter": "spec"
}
list
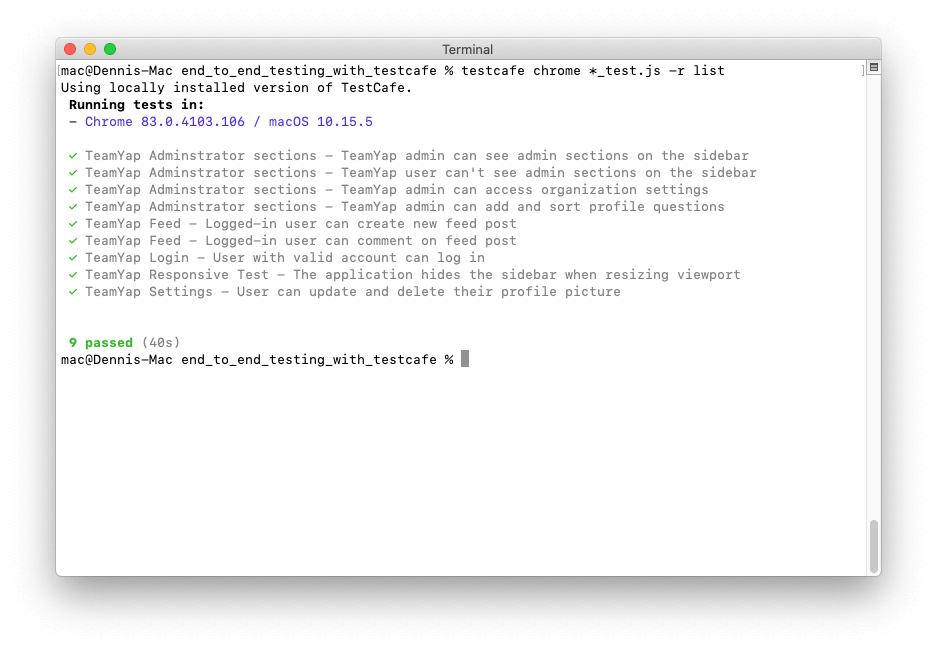
The list reporter displays both the fixture name and test scenario name as a list, one per line. The output is similar to the spec reporter, with the main difference being that it doesn't group the tests by its fixture. At the end of the test run, it shows the number of tests executed, the result of each test (passed, skipped, or failed), and the total time the test execution took. It does not display how long each test took to execute.
Configuration examples
The following examples use the list reporter when running your tests using the configured browser and test files.
Command line setting:
testcafe chrome *_test.js -r list
testcafe chrome *_test.js --reporter list
Configuration file setting:
{
  "reporter": "list"
}
minimal
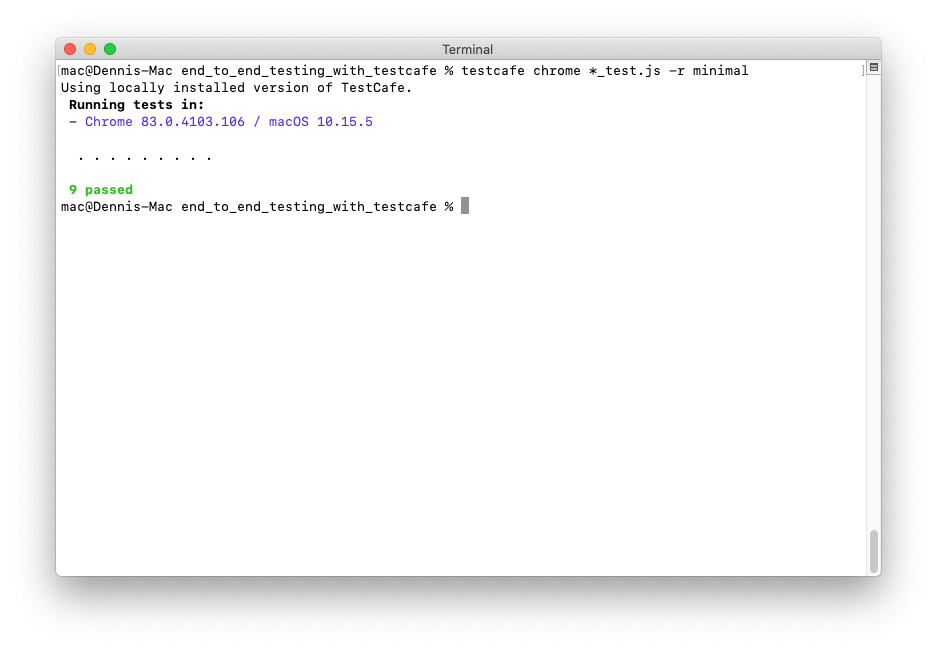
The minimal reporter only uses a few symbols to display the result of your tests, without showing any fixture or test scenario names. Passing tests are shown as a dot, failing tests with an exclamation point, and skipped tests with a dash. At the end of the test run, it only shows the number of tests executed and the result of each test (passed, skipped, or failed). It does not display how long each test took to run, or the total time the test execution took.
Configuration examples
The following examples use the minimal reporter when running your tests using the configured browser and test files.
Command line setting:
testcafe chrome *_test.js -r minimal
testcafe chrome *_test.js --reporter minimal
Configuration file setting:
{
  "reporter": "minimal"
}
xunit
The xunit reporter returns the results of your test run in XML, using the standard xUnit format (more widely known as the JUnit format). This reporter is useful when executing your tests in a continuous integration system such as Jenkins or CircleCI. Usually, continuous integration systems can collect, process, and format these XML files into a readable document as part of your test run history.
<?xml version="1.0" encoding="UTF-8" ?>
<testsuite name="TestCafe Tests: Chrome 83.0.4103.106 / macOS 10.15.5" tests="9" failures="0" skipped="0" errors="0" time="34.554" timestamp="Thu, 18 Jun 2020 05:44:13 GMT" >
<testcase classname="TeamYap Administrator sections" name="TeamYap admin can see admin sections on the sidebar" time="5.082">
</testcase>
<testcase classname="TeamYap Administrator sections" name="TeamYap user can't see admin sections on the sidebar" time="4.138">
</testcase>
<testcase classname="TeamYap Administrator sections" name="TeamYap admin can access organization settings" time="1.813">
</testcase>
<testcase classname="TeamYap Administrator sections" name="TeamYap admin can add and sort profile questions" time="6.337">
</testcase>
<testcase classname="TeamYap Feed" name="Logged-in user can create new feed post" time="3.091">
</testcase>
<testcase classname="TeamYap Feed" name="Logged-in user can comment on feed post" time="4.045">
</testcase>
<testcase classname="TeamYap Login" name="User with valid account can log in" time="2.899">
</testcase>
<testcase classname="TeamYap Responsive Test" name="The application hides the sidebar when resizing viewport" time="2.919">
</testcase>
<testcase classname="TeamYap Settings" name="User can update and delete their profile picture" time="4.158">
</testcase>
</testsuite>Configuration examples
The following examples use the xunit reporter when running your tests using the configured browser and test files.
Command line setting:
testcafe chrome *_test.js -r xunit
testcafe chrome *_test.js --reporter xunit
Configuration file setting:
{
  "reporter": "xunit"
}
json
The json reporter returns the results of your test run in a simple JSON format. Like the xunit reporter, this reporter works well when you want to process your test results in another service. Since most build systems accept the xUnit / JUnit XML format as a standard, you may not need these reporters for those kinds of environments. However, for custom services, JSON is a flexible alternative. It also contains additional information about your test run, like metadata and screenshot paths.
{
  "startTime": "2020-06-18T05:47:40.385Z",
  "endTime": "2020-06-18T05:48:15.520Z",
  "userAgents": [
    "Chrome 83.0.4103.106 / macOS 10.15.5"
  ],
  "passed": 9,
  "total": 9,
  "skipped": 0,
  "fixtures": [
    {
      "name": "TeamYap Login",
      "path": "/home/dennmart/src/end_to_end_testing_with_testcafe/login_test.js",
      "meta": {},
      "tests": [
        {
          "name": "User with valid account can log in",
          "meta": {},
          "errs": [],
          "durationMs": 3331,
          "screenshotPath": null,
          "skipped": false
        }
      ]
    },
    {
      "name": "TeamYap Feed",
      "path": "/home/testcafe/end_to_end_testing_with_testcafe/feed_test.js",
      "meta": {},
      "tests": [
        {
          "name": "Logged-in user can create new feed post",
          "meta": {},
          "errs": [],
          "durationMs": 3096,
          "screenshotPath": null,
          "skipped": false
        },
        {
          "name": "Logged-in user can comment on feed post",
          "meta": {},
          "errs": [],
          "durationMs": 4504,
          "screenshotPath": null,
          "skipped": false
        }
      ]
    },

    // Shortened for brevity...

  ],
  "warnings": []
}
Configuration examples
The following examples use the json reporter when running your tests using the configured browser and test files.
Command line setting:
testcafe chrome *_test.js -r json
testcafe chrome *_test.js --reporter json
Configuration file setting:
{
  "reporter": "json"
}
Other ways of using reporters
When running your tests with any reporter, it will output its results in the terminal as standard output (stdout). During your test suite development, you'll want to see the results as your tests execute, so using the standard output in your terminal works well. But if you need to process the results in a separate service, you'll usually need to store them in a file. TestCafe allows you to save the test results from any reporter to a file by specifying a file path along with the configured reporter.
In the command line, you can add the file path after the reporter type, separated by a colon. The following command line example shows how to save the results of a test run in a JSON file under the reports sub-directory in your current project.
testcafe chrome *_test.js -r json:reports/test_results.jsonIf you want to configure the same setting in your .testcaferc.json configuration file, the reporter key needs to be an object with a name and output property for setting the reporter type and file path, respectively.
{
  "reporter": {
    "name": "json",
    "output": "reports/test_results.json"
  }
}
Also, you're not limited to using a single reporter when executing your tests. You can combine multiple reporters for a single test run. The only issue to keep in mind when using more than one reporter is that only one can output the results in the terminal. The rest of the reporters used in the test run need to save the results as a file. If you attempt to output the results of more than one reporter to stdout, TestCafe will throw an error.
In the command line, you can specify multiple reporters by separating each reporter type with a comma, keeping in mind that only one reporter can display its results in the terminal. The following command line example shows how to use the minimal and xunit reporters in a single test run.
testcafe chrome *_test.js -r minimal,xunit:reports/results.xmlIf you use the configuration file to set up multiple reporters, the reporter key needs to be an array of objects, each using the name and output properties as required.
{
  "reporter": [
    {
      "name": "minimal"
    },
    {
      "name": "xunit",
      "output": "reports/results.xml"
    }
  ]
}
If these reporters don't serve your needs or you want to extend TestCafe's functionality even further, you can find reporters created by the TestCafe community by searching for the term testcafe-reporter at https://www.npmjs.com/. You'll discover reporters that can change the way the test results look or submit the results to external test management tools like TestRail and Jira for managing your test cases automatically.
If you found this article useful, you can pre-order the End-to-End Testing with TestCafe book at https://testingwithtestcafe.com and receive $10 off the book's original price when pre-ordering before the expected release date (on or before July 15, 2020).
You can also enter your email address below to receive the first three chapters of the book for free. In addition to the book sample, you'll get an exclusive discount to buy the book when it's released.
Want to boost your automation testing skills?
Enter your email address below to receive the first three chapters of the End-to-End Testing with TestCafe book for free.