If you're working among a group of testers at a company, your team is most likely using a test case management tool. These tools are indispensable for testing teams. A useful test case management tool provides a single source for the organization's test plans, allows the team to collaborate with creating and maintaining test cases, and see reports of your test runs.
In my experience, these tools work great with manual testing scenarios, as they provide testers with all they need to do their work. However, it's a bit tricky to get these systems in sync with automated testing. Sometimes the test case management tool doesn't provide a simple way to integrate external tools. Other times, your test automation framework makes it difficult to use its results elsewhere.
Thankfully, most modern test case management tools provide many ways to hook up third-party tools, such as test automation frameworks. For instance, a web-based test case management tool can have an API to create a new test run, aggregate your test results, and close the run. This way, any system can manage this information without the need to do it manually.
One such tool with a robust API is TestRail. It's one of the most popular test case management tools out there. Given its popularity, chances are your preferred automated testing framework has a library or plugin that sends your test run details to TestRail.
In this article, I'll show you how to use TestCafe to log your test runs in TestRail automatically.
The need to track automated tests in TestRail
In my previous job, the testing team used TestRail to keep track of their testing work. Their test plans and cases were detailed in the system, giving the rest of the team visibility into how they ran tests for our projects. It also helped non-QA team members like developers and project managers identify areas of risk, helping
Initially, QA performed most of their tests manually, and they would use TestRail as their guide. As the company grew and we had more projects to work on, this approach didn't scale very well. Some projects began to suffer, quality-wise, because there wasn't much time for the team to do what they needed. That's where we started to introduce more automated tests into the mix.
When the team began to write end-to-end tests with TestCafe, we wanted to acknowledge those automated tests alongside the team's manual testing efforts. At first, the team went through the results for the automated test suite and manually marked the results for each test case in TestRail. Obviously, doing this isn't the best use of a tester's time.
As more test automation got introduced to our projects, the testing team wanted to find a way to keep TestRail synchronized with our automated test runs since it took too much time to keep this information up to date on all relevant systems. We noticed that someone created a TestCafe reporter called testcafe-reporter-html-testrail that handles this for you.
After getting it set up, it worked exactly for what we needed. The reporter automatically opened a new test run on TestRail and sent over the results for our test cases. It worked great for the testers, who needed to focus on manual testing or verifying reported failures.
Making sure TestRail is ready to receive your TestCafe test results
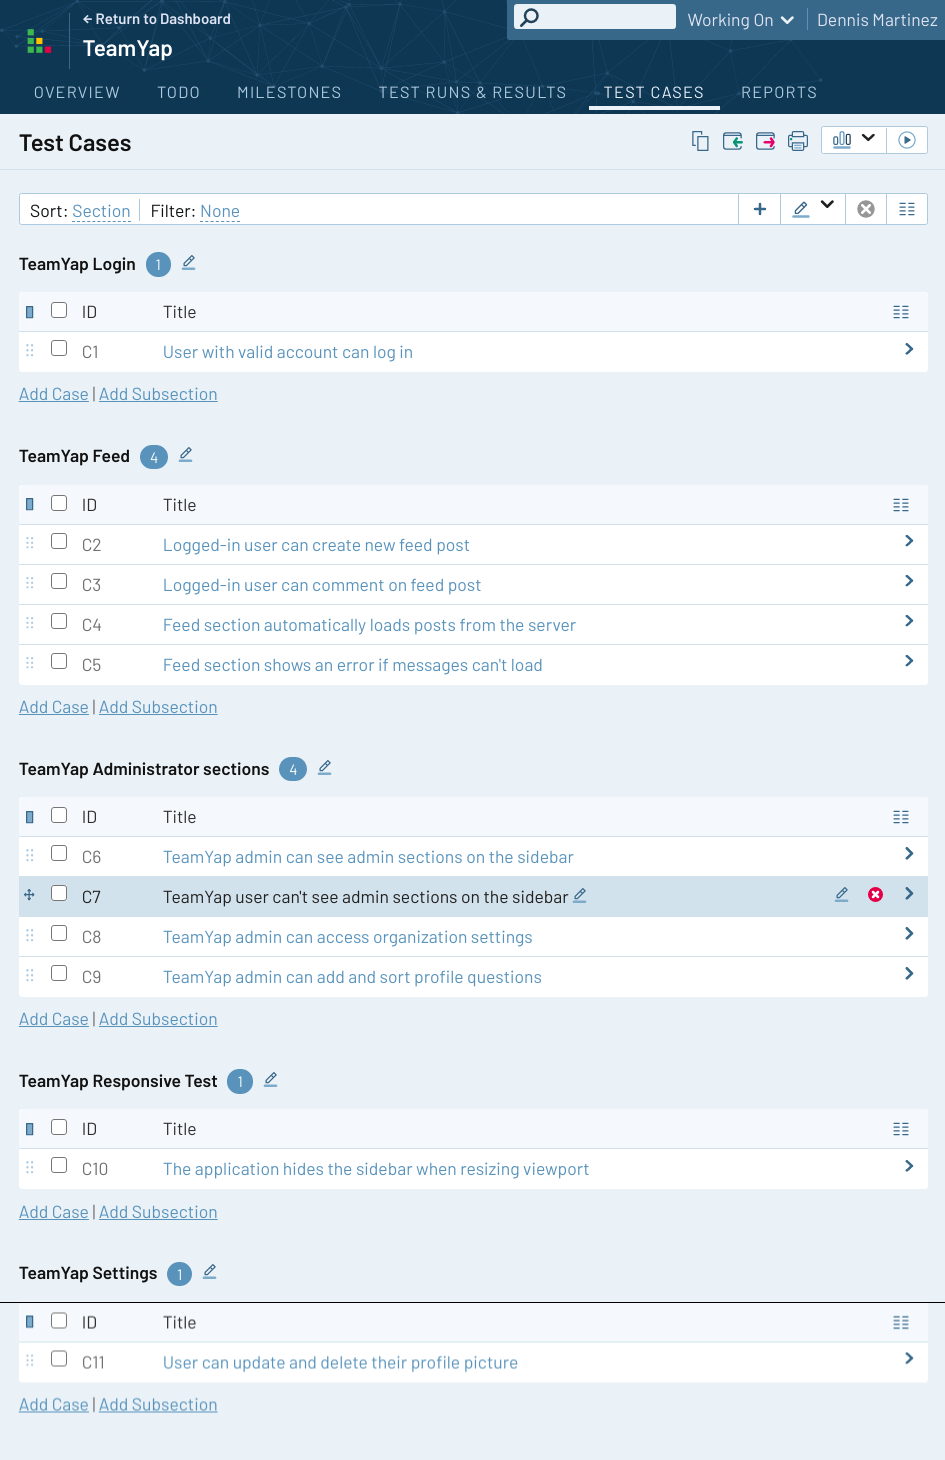
Before showing how the integration between TestRail and TestCafe works, let's make sure TestRail is set up correctly. In the examples for this article, I'll use a TestRail Cloud account, which I set up for the TeamYap application test plan. The TestRail account has a single repository for TeamYap, and I added different sections for each test case similar to the structure for the automated tests.
Keep in mind that the sections and test case names don't matter with the integration between TestRail and TestCafe. The main thing you'll need is the Test Case ID, which you'll see in use later in this article. The important thing is that you have enough test cases written in TestRail to match with the automated tests written with TestCafe.

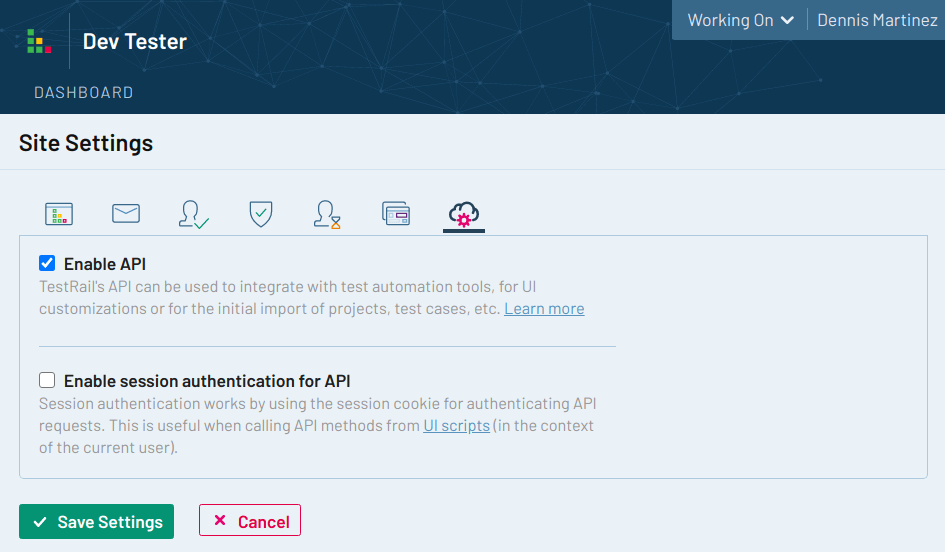
Additionally, you need to enable TestRail's API to allow TestCafe to send its results to your account. This setting is not enabled by default. To enable the TestRail API, log in to your account as an administrator, and go to Administration (on the upper-right corner on your dashboard), click on Site Settings, and select the API section (last icon on the navigation). Check the box labeled "Enable API" and save the settings. You don't need to enable session authentication for the API, so you can leave it unchecked.

After setting up a project with your test cases and enabling the API, your TestRail account is ready to accept your automated test results. The setup process detailed here are for TestRail Cloud. TestRail also allows you to install an instance of the application to your servers instead of a cloud-based account. I haven't used TestRail Server, but if your organization uses it instead of TestRail Cloud, I assume that the setup process is the same.
Setting up the TestCafe reporter for publishing test runs to TestRail
This article's tests come from a TestCafe test suite repository using the same tests used in my book, End-to-End Testing with TestCafe. This repo contains 11 end-to-end tests covering functionality for the TeamYap application explicitly built to give readers hands-on learning opportunities with TestCafe.
Installing the TestRail reporter for a TestCafe test suite is simple. As with most TestCafe reporters, it's available as a plugin that you can install using npm, just like any other TestCafe plugin. However, there is a caveat: The latest version of the reporter plugin doesn't work.
I reached out to the plugin owner to ask why the plugin doesn't work. He told me that the current version is meant for his organization's internal use and is currently not working with TestRail anymore, with no plans to fix it. The source code for the latest version of the plugin is private, so I couldn't lend him a hand to correct the problem. I don't understand his reasoning for not forking the project into a private repo or how he gained ownership of the npm repository, but that's a separate topic.
In the meantime, the workaround is to install an older version of the plugin. If you attempt to use the current version, it prints out a warning message asking you to use version 2.0.6 of the plugin for TestRail functionality. However, any 2.0 version will work. For this project, I'll use version 2.0.8 of the plugin, which can be installed with the following command:
npm install --save [email protected]Once the reporter plugin is installed for your TestCafe project, you can use the reporter when running your tests. Before you can do that, you still need some additional setup.
The way the reporter plugin works is by using environment variables to configure the integration with TestRail, and your TestCafe test names need to be formatted in a specific way to link them with a TestRail test case. Below, you'll find the different settings you need to set up the reporter.
Using environment variables to configure your TestRail credentials
The reporter plugin uses certain environment variables for the TestRail API credentials. You need to set the following environment variables if you want to send your TestCafe test run results to TestRail.
TESTRAIL_ENABLE: This variable accepts a boolean value (`true` orfalse) to tell the reporter plugin to send your test run results to TestRail. By default, it's set tofalse, which is useful to avoid publishing your test results when running tests locally. Usually, this variable is set totruein a continuous integration environment.TESTRAIL_HOST: In this variable, you need to set up the host of your TestRail instance. For example, the TestRail account used in this article is hosted athttps://devtester1.testrail.io/. Keep in mind that it's important to include the full URL, including the protocol (https://, in this example).TESTRAIL_USER: Here, you'll specify the username of a TestRail account with access to your project. When the reporter plugin sends the test run results to TestRail, they'll get created under the account specified here.TESTRAIL_PASS: You can use either the TestRail account password for the user specified in the previous environment variable, or use an API key created for the account. It's recommended to use an API key since you can limit access to your TestRail account and easily revoke it.PROJECT_NAME: This variable indicates the TestRail project name containing the test cases for your automated test suite.PLAN_NAME: TestRail uses the concept of "Test Plans" to manage multiple test runs if you need to run your tests on different configurations. This variable allows you to specify a plan name. If you don't set a plan name, it will publish your test results under theTestAutomation_1test plan by default.
If you're having issues publishing your TestCafe results to TestRail, verify that you set all of these environment variables correctly.
Formatting your TestCafe test descriptions
To link a specific TestCafe test case to a TestRail test case, the reporter plugin requires a specific formatting of the test name in TestCafe:
test("<Test Type> | <Test Name> | <TestRail Test Case ID>", async t => {
  // Your test code goes here as usual.
});
Replace the following segments of the example above with your test case details:
<Test Type>: The type of test (like "smoke" or "regression").<Test Name>: The name of your test, a description of what it does.<TestRail Test Case ID>: The test case ID from TestRail that will link with your TestCafe test.
Of those three segments, the most important one is the TestRail Test Case ID - it must match a test case for the project in your TestRail account. The other two segments (test type and test name) don't affect the integration between TestCafe and TestRail. However, you should still ensure this information accurately describes your test.
Here's an example from the test repo used in this article. This test is a smoke test for verifying that the login functionality works correctly for the TeamYap application, where the TestRail test case ID is "C1":
test("Smoke | User with valid account can log in | C1", async t => {
  // Test code...
});
Running tests and sending results to TestRail
With the necessary environment variables set and your test names adequately formatted, all that's left is to run your tests and have the results sent automatically to TestRail.
The only thing you need to do is to specify the reporter when executing the TestCafe test suite. You can easily do this from the command line:
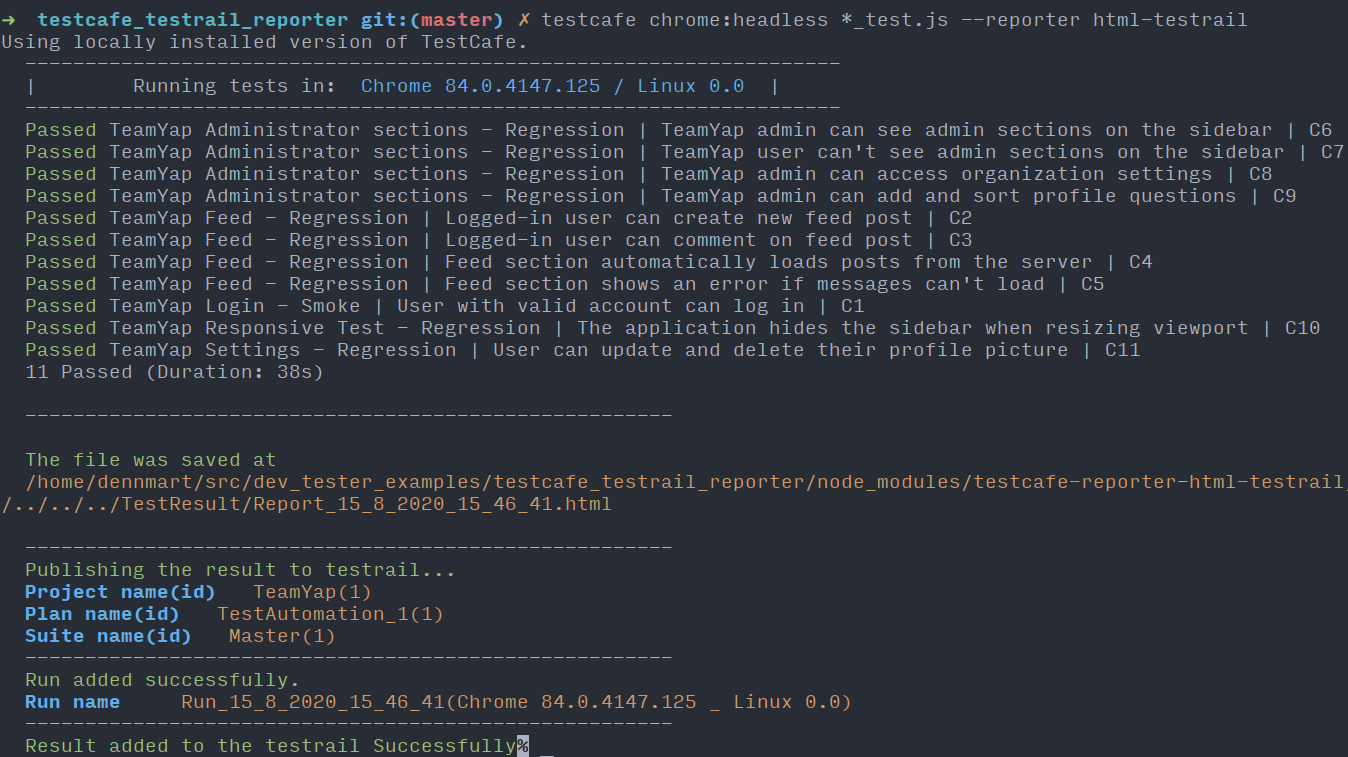
testcafe chrome:headless *_test.js --reporter html-testrailThis command will run your tests as you would expect. The output will be different from the default TestCafe reporter, but it will display the results of each test similarly.
After the test suite completes its execution and the TESTRAIL_ENABLE environment variable is set to true for your system, the reporter publishes the results to your TestRail account. If your TestRail account credentials are correct, you'll see the details for the newly created TestRail test run in the output.

The project and test plan names used are the ones you set up in the environment variables (as explained above). The name of the test run on TestRail will be a string that includes a timestamp of the test run, and the browser details provided by TestCafe.
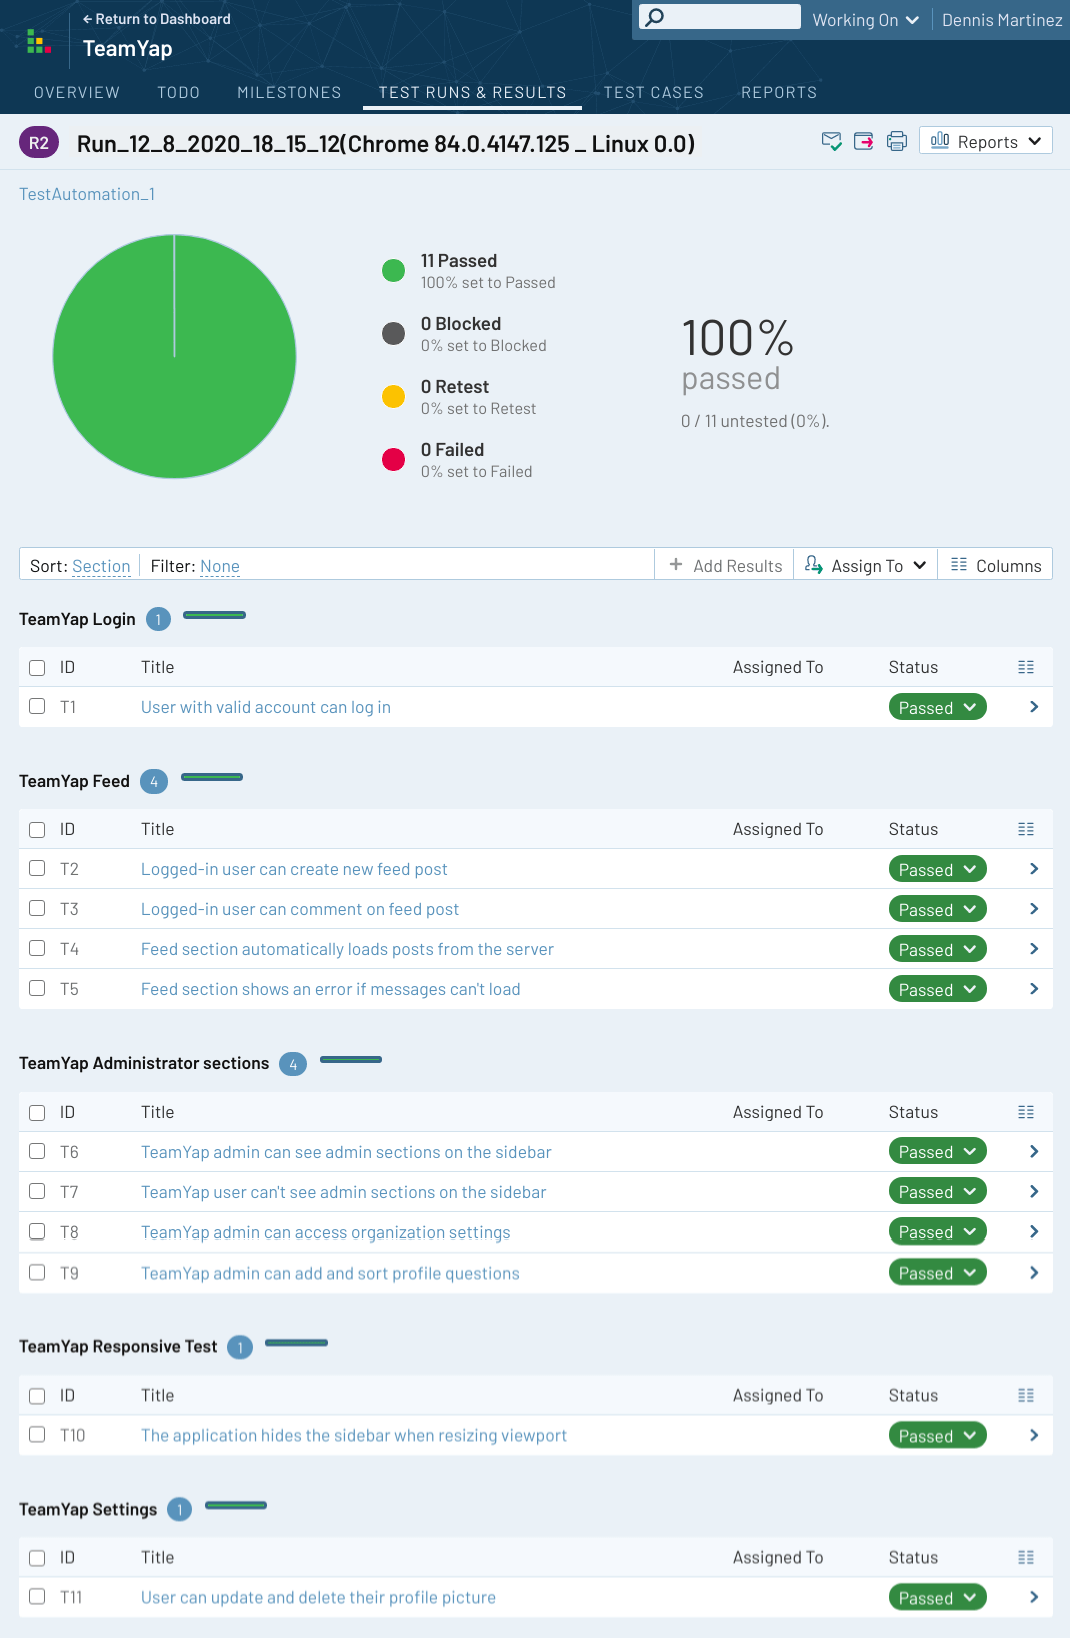
If you go to your TestRail account, you'll see your newly-created test run under your test plans and the results for each test. Each test gets automatically linked to the test case, so over time, you can generate reports, view the history of test results, and export the data for your needs. You can then perform your usual TestRail duties like closing the test plan or re-assigning failing tests to other team members.

One thing to keep in mind is that you don't need to match the exact number of test cases between TestRail and TestCafe. For example, if you don't format the test name in TestCafe to include a TestRail test case ID, you can still execute it. It'll run, but the result won't show up in the test run on TestRail.
However, you will need to ensure that any test case IDs in the TestCafe test name match a test case ID on TestRail. For example, if you format a TestCafe test name to use a test case ID of "C1234", you must have a TestRail test case with that ID. Otherwise, the reporter will raise an error and send incomplete test results to TestRail.
This automatic integration isn't for all teams
When the organization I worked for used this approach, it worked well for their needs since they were at the beginning stages of creating the test suite. All they wanted was for the TestCafe test runs to get included in TestRail and avoid having to go into TestRail to manually add the scenarios covered by the project's end-to-end tests.
However, this automatic integration between TestCafe and TestRail might not work for your team in a few scenarios. Here are a few situations where it's probably best to run your automated tests and update TestRail separately:
- You have lots of test cases in TestRail, but few automated tests covering them in TestCafe. Automatically creating test runs in TestRail for just a handful of automated tests isn't worth the effort unless you plan to boost your test automation efforts shortly.
- You need more fine-grained organization around test cases in TestRail, such as setting time estimates and priorities. You can't set any of this information from your TestCafe tests using the reporter plugin, so your team will have to set these by hand.
- You need to run the same tests in different environments that aren't supported or available in TestCafe. Each time you execute your TestCafe tests, it creates a test run under the specified test plan name. If your project needs to run your test cases in an environment TestCafe doesn't support or can't access, you'll need to create these test runs in TestRail manually.
The way the plugin uses the formatting of the test names in TestCafe also isn't ideal. The formatting can look messy since you have to include the type of test and ID along with the description. It's also easy to accidentally format the description incorrectly. Using metadata would be ideal for specifying TestRail related data like the test case ID, assignee, and more. Unfortunately, the reporter plugin only checks the TestCafe test name for its integration.
It all boils down to how much effort your team needs to maintain your TestRail account and TestCafe test suite. Sometimes these integrations cost more time than you think it could save. Pay attention to whether these approaches make your work easier or if it becomes a burden on your team.
Summary
Test case management tools are great to keep you and your team up to date with test plans for your projects. However, getting your test automation integrated with these systems often requires additional work to connect your automated test runs with your defined test cases.
If you use TestRail to manage your test cases and have a TestCafe test suite, you can easily keep your test case management tool synchronized. Thanks to TestCafe's easy-to-use plugin system, you can add a reporter called testcafe-reporter-html-testrail to handle this integration for you. All you need to do is configure a few environment variables and format your TestCafe test names to include the TestRail test case ID.
When correctly set up, the reporter plugin automatically submits your TestCafe test run to the configured TestRail account, linking each test to its result. Now you can manage your automated test results in your test case management tool with just some up-front setup.
While this approach might not work for all testing teams, it does help eliminate the busywork of entering your automated test results into TestRail by hand. If that's all your organization needs, this approach will save you lots of time while keeping your entire team on the same page with your test plans.
How have you managed your test automation with your test case management tools? Share your experiences in the comments section!


