
Looking around test-related forums, social media accounts, and blogs like this one, you might notice more testers talking about testing APIs. It's with good reason. As I've mentioned plenty of times in previous articles, API testing is an essential part of modern software development and QA. As more applications rely on these interfaces, it's up to us as testers to ensure they work well across the board.
Here on Dev Tester, I've written a few articles covering API testing, such as how to create fast and reliable automated test suites with some JavaScript libraries and things to consider when validating your APIs. This article adds another layer of testing to the mix for making sure your API can withstand expected and potential workloads - load testing.
You might think that load testing is a complex skill to learn and put into practice. Fortunately, load testing isn't a difficult skill to add to your toolbelt. You have a wide selection of load testing tools, both commercial and open-source, so you'll likely find a tool that's simple yet powerful enough to fit your needs.
One such tool I recently discovered is called Artillery. I took the toolkit for a spin on a small project and was impressed with how easy it lets you create load-testing scripts compared to other tools I've used in the past. Read on to learn how simple it is to get Artillery up and running in a real-world project and make sure your APIs are battle-tested.
Why is load testing an API important?
A simple way of defining load testing is to put pressure on a system and verify how the system responds. Often, load tests will push your systems to the higher end of its expected workload to ensure that it continues functioning as expected under normal use. Depending on your needs, these tests can also go beyond the max workload, providing data points on improving overall system performance.
One of the main reasons to do load testing is to ensure a certain level of everyday performance in your API. Speed matters to the users of your applications and most people won't tolerate a sluggish experience. Before your application goes out to the world, it needs to work in a reasonable amount of time for what you're providing. If it doesn't, your customers are likely to leave and never come back. The difference between a fast-responding website and a slow one can be a significant amount of money in some circumstances.
Another reason to perform load testing is to see how resilient your systems are to spikes in traffic. Even if you expect your system to have a moderate amount of usage, you never know if an influx of new customers suddenly appears. You'll need to be ready if this happens, especially if your business is prone to ebbs and flows of traffic. For instance, I once worked as part of an e-commerce website, and our Black Friday / Cyber Monday traffic was nearly ten times the traffic of a normal day. We needed to prepare for this well in advance - it would have been disastrous to deal with this as the virtual stampede of visitors made their orders.
One reason that's not mentioned enough is that, quite frankly, most applications are built with performance as an afterthought. As a developer, I admit that app performance is sometimes the last thing on my mind, especially as deadlines loom close. With load testing, you can detect and smoke out critical performance issues early during the development process and avoid having sub-optimal code getting deployed to your customers.
In short, load testing is crucial to ensure your app behaves well under normal load and during peak times in your business. It's also important since it provides a pleasant user experience by making your systems responsive and can be the difference between gaining a new customer and losing one to a competitor.
Getting Artillery up and running
To demonstrate how simple it is to get started with load testing in your project, we'll use an open-source toolkit called Artillery. Artillery is a Node.js package designed for testing backend systems, such as APIs. Out of the box, it supports your standard HTTP APIs, along with protocols like WebSockets. It also integrates with the Socket.io library for Node.js applications. Artillery also sports a plugin interface to extend its functionality.
An important distinction to make with Artillery is that it's not designed for testing web applications through the browser or client-side JavaScript. If you need to do load testing on a web application through the browser, you'll need a tool focused on UI testing or built to do web performance testing. For example, you can do performance testing using TestCafe or use a more robust load testing tool like Apache JMeter.
Another note I wanted to make is that this article talks about the open-source version of Artillery. The team behind Artillery also provides a paid version called Artillery Pro, which contains added functionality like better integration with Amazon AWS services and distributed load testing. I'm not related in any way to the team behind Artillery and don't have access to Artillery Pro, so the focus of this article is solely on the free version of the tool that anyone can download and use.
Setting up Artillery
Since Artillery is a Node.js package, it's relatively simple to install as long as your system runs Node.js (version 12.0 or above). You can download Node.js to install it in your system if you want to follow along, or install it using my preferred method or setting up nvm (Node Version Manager).
Once you have Node.js set up, installing Artillery is a simple one-line command:
npm install -g artilleryThis command will install Artillery globally in your system. You can also use npm install -D artillery inside a Node.js project to install it as a development dependency if you prefer to keep the library as part of your project only.
To verify Artillery is ready for use, you can run the command artillery -V (or npx artillery -V if you installed it as a development dependency inside your project) to see its information. You can also use artillery dino for a fun way to verify your installation - completely pointless, but that's part of the fun.
Artillery in action
To see Artillery in action, let's set one up on a real API project as an example. For this article, I'm using an application I previously built for API testing called Airport Gap. This app provides a simple API that I've used in other Dev Tester articles for testing purposes.
For the load testing process, I set up Airport Gap on a separate temporary server to avoid interfering with the real website. Usually, you'll want to do this with your projects, as well. While there are plenty of valid reasons to load-test a production server, it's best to create a separate environment that reflects production instead. It'll make your job easier by avoiding disruptions on customer-facing sites, and you can set up the application to better fit load testing. For instance, Airport Gap is rate-limited in production, which defeats the purpose of load testing. My temporary environment shut it off without having to do the same in production.
With a separate environment solely for load testing, we can begin using Artillery to start putting the app through its paces. For this, we need to create a test script. Artillery works by running through a simple test script, either in YAML or JSON format. The test scripts consist of two sections - the configuration portion of the test (called config) and the scenarios you want to run for each simulated or virtual user in the load test (called scenarios). These sections will tell Artillery where and what to test, how many virtual users to spawn, and other settings. For this article, I'll write the test scripts in YAML format.
Testing with a consistent flow of requests per second
First, we'll start with a simple example, creating a test that hits an API endpoint for one minute, sending 25 virtual users per second. The following Artillery test script would run this load test:
config:
  target: "https://airportgap-stress-test.dev-tester.com/api"
  phases:
    - duration: 60
      arrivalRate: 25

scenarios:
  - name: "Get first page of airports"
    flow:
      - get:
          url: "/airports"
As mentioned earlier, Artillery test scripts consist of two main sections. The first section, config, contains two configuration settings:
target: This allows you to specify the base URL for all of the requests defined later in the test script.phases: Here, you'll specify the duration of the test, how many virtual users you want to send during the test, and how often.
The phases setting is the most important configuration for this test, as it allows you to control the amount of load you want to send. For this test, the duration key lets you specify how many seconds you want Artillery to run this test. The second key, arrivalRate, tells Artillery how many virtual users you want it to send to your system every second. You can set different settings for this configuration, as we'll see later in other examples.
The scenarios setting allows you to specify one or more requests you want Artillery to make during the test. Each scenario is a sequence of steps that run in order, as defined by the flow key. The flow key contains each step in the scenario to run. Since we're load-testing an HTTP API, we'll use HTTP request methods such as GET and POST to tell Artillery what to do throughout the process. In this example, we have a single scenario that makes a request to the GET /airports endpoint on Airport Gap.
After saving this script in a file - in our example, our file is called airports.yml - we can run through the test with Artillery from the command line with the following:
artillery run airports.ymlThis command kicks off the load test, with Artillery making requests to the specified target URL at a rate of 25 requests every second. Every ten seconds, your terminal prints out an update of what Artillery performed and different results such as scenarios launched and completed, response status codes received, and different response time stats.
At the end of the test run, Artillery prints out the results of the entire test:
All virtual users finished
Summary report @ 17:12:54(+0900) 2021-02-27
  Scenarios launched:  1500
  Scenarios completed: 1500
  Requests completed:  1500
  Mean response/sec: 24.81
  Response time (msec):
    min: 110.1
    max: 443.3
    median: 137.6
    p95: 178.1
    p99: 251
  Scenario counts:
    Get first page of airports: 1500 (100%)
  Codes:
    200: 1500
These results provide the insight you need to know how your system behaved under load. Artillery provides the number of mean responses per second, along with all kinds of statistics on response times like minimum, maximum, median, and percentiles. It also shows the response codes received, so you can see if your API begins failing under stress.
With that, you've completed your first API load test using Artillery. With about 10 lines of code inside a YAML file, it shows how simple it is to create basic load tests for your systems.
Testing with a fixed number of requests over a period of time
Another load test Artillery makes easy is to send a specific number of requests for a given time duration. For example, let's say we want to test how Airport Gap performs with 1000 users making a request to GET /airports in a minute. To accomplish this, all that needs to change in the test script is the type of phase:
config:
  target: "https://airportgap-stress-test.dev-tester.com/api"
  phases:
    - duration: 60
      arrivalCount: 1000

scenarios:
  - name: "Get first page of airports"
    flow:
      - get:
          url: "/airports"
Under the phases setting, we changed the type of phase from arrivalRate to arrivalCount. This setting tells Artillery that we want to send a total of 1000 requests spread out evenly for 60 seconds (about 17 requests every second). Effectively, you could accomplish the same with arrivalRate if you want, but it's another way to perform your tests more explicitly if you need a fixed number of requests in total.
Running this test script with the same command as before (artillery run airports.yml) shows the results of this configuration change:
All virtual users finished
Summary report @ 17:27:24(+0900) 2021-02-27
  Scenarios launched:  1000
  Scenarios completed: 1000
  Requests completed:  1000
  Mean response/sec: 16.55
  Response time (msec):
    min: 115.8
    max: 479.8
    median: 140.2
    p95: 188.4
    p99: 367
  Scenario counts:
    Get first page of airports: 1000 (100%)
  Codes:
    200: 1000
Testing with gradually increasing requests
Both of the example tests shown above have performed requests at a constant rate. However, you can modify this by providing a setting to tell Artillery to linearly ramp up the number of requests during the test's execution. Instead of sending 25 virtual users per second, let's tell Artillery to start with 5 virtual users and gradually ramp up the number of requests up to a maximum of 25:
config:
  target: "https://airportgap-stress-test.dev-tester.com/api"
  phases:
    - duration: 60
      arrivalRate: 5
      rampTo: 25

scenarios:
  - name: "Get first page of airports"
    flow:
      - get:
          url: "/airports"
Once again, the only modifications to the test script are in the phases setting. We went back to using arrivalRate to tell Artillery how many virtual users to send to Airport Gap. However, the script now contains a new setting called rampTo. This setting tells Artillery to gradually scale up the number of virtual users per second up to the defined number. Since Artillery prints out a status report every ten seconds, this setting is useful to pinpoint when your API begins slowing down or returning unsuccessful responses.
Once again, running this test script using Artillery shows the difference of requests made throughout the load test:
All virtual users finished
Summary report @ 17:40:04(+0900) 2021-02-27
  Scenarios launched:  902
  Scenarios completed: 902
  Requests completed:  902
  Mean response/sec: 14.81
  Response time (msec):
    min: 112.1
    max: 449.1
    median: 141.2
    p95: 181.9
    p99: 387
  Scenario counts:
    Get first page of airports: 902 (100%)
  Codes:
    200: 902
One note with rampTo is that it can also gradually decrease the number of requests during a test. If you specify a lower rampTo number than the arrivalRate, Artillery is smart enough to wind down the number of requests until reaching the number of virtual users specified in this setting.
Testing with multiple phases
One of the cool things about Artillery test scripts is that they're flexible enough to accommodate multiple types of phases to test for different request rates, one after another. So far, we're only done one kind of phase per test. Let's build upon that by combining the three types of tests you've learned so far. Doing that will let us roll different methods into a single, continuous load test.
For this example, we'll split things into three phases. First, we'll send 10 requests a second for the next 30 seconds as a warm-up. When that's done, we want Artillery to send a total of 1000 virtual users spread out during the next 30 seconds. Finally, we'll ramp things down by going from 25 requests per second to 5 requests per second in the last 30 seconds of the test:
config:
  target: "https://airportgap-stress-test.dev-tester.com/api"
  phases:
    - duration: 30
      arrivalRate: 10
    - duration: 30
      arrivalCount: 1000
    - duration: 30
      arrivalRate: 25
      rampTo: 5

scenarios:
  - name: "Get first page of airports"
    flow:
      - get:
          url: "/airports"
Combining different types of phases during a test opens up all sorts of possibilities to reflect real-world usage on a system. Your applications won't ever receive a constant flow of legit traffic, so having multiple phases can help find issues that can pop up in production by mixing up the number of requests coming in during different periods.
You can then run this test as usual, with Artillery running each phase in order and displaying the results after they're all done:
All virtual users finished
Summary report @ 17:49:42(+0900) 2021-02-27
  Scenarios launched:  1774
  Scenarios completed: 1774
  Requests completed:  1774
  Mean response/sec: 19.57
  Response time (msec):
    min: 111.9
    max: 465.9
    median: 135.9
    p95: 178
    p99: 286.1
  Scenario counts:
    Get first page of airports: 1774 (100%)
  Codes:
    200: 1774
Adding data to your Artillery tests
In the examples shown thus far, we've only covered a single API endpoint, GET /airports. However, we want to expand our testing further to look at other endpoints and request methods, particularly those requiring additional parameters. Most APIs will have endpoints that require different types of data processing on the backend, so it's a good idea to ensure those endpoints work when under heavy load.
For HTTP APIs, you'll normally send one or more parameters in the URL itself or as part of the request body. While you can hard-code these variables when running your load tests, Artillery has better ways of taking different parameters and passing them along to your scenarios. We'll describe two common approaches for setting different parameters to use throughout your test runs.
Using inline variables in your scenarios
The Airport Gap API contains an endpoint for calculating distances between two airports (POST /airports/distance). The endpoint requires two parameters (from and to), which define the two airports for performing the calculation. First, let's see how to create a test script for Artillery that load-tests this endpoint:
config:
  target: "https://airportgap-stress-test.dev-tester.com/api"
  phases:
    - duration: 60
      arrivalRate: 5
      rampTo: 25

scenarios:
  - name: "Calculate airport distances"
    flow:
      - post:
          url: "/airports/distance"
          json:
            from: "KIX"
            to: "SFO"
The config section of the script should be familiar to you by now. The scenarios section now has a few new changes to reflect the different requests we're making. Since the endpoint we want to load-test is a POST request, we specify it inside the test script. Also, the Airport Gap API requires JSON as part of its request body. Artillery contains the json setting inside the flow segment of your scenario to send any parameters necessary in the request. Here, we set the from and to parameters required by the endpoint.
This test script works, but it has a couple of drawbacks that you might not want for load testing purposes. In many backend systems, many of these requests might be cached by a separate system that you're not interested in checking. If you're only performing load testing on a single endpoint, you might be putting the load on the wrong thing and invalidating your intentions. To get around this limitation, it's better to run the test using a combination of parameters.
You might think you'll need to duplicate the scenarios for different parameters. Thankfully, Artillery provides an easy way to handle multiple parameters through variables. Variables allow you to define a list of parameters you want to use throughout your scenarios, and Artillery will handle injecting them where defined.
Let's take the same test script used for load-testing the POST /airports/distance endpoint and set up a list of different variables to use throughout the test run:
config:
  target: "https://airportgap-stress-test.dev-tester.com/api"
  phases:
    - duration: 60
      arrivalRate: 5
      rampTo: 25
  variables:
    from:
      - "KIX"
      - "NRT"
      - "SFO"
    to:
      - "ICN"
      - "JFK"
      - "SJU"

scenarios:
  - name: "Calculate airport distances"
    flow:
      - post:
          url: "/airports/distance"
          json:
            from: "{{ from }}"
            to: "{{ to }}"
Now we have a lot more going on in this test script. The main change here is the variables setting in the config section of the script. This setting is how you can define a list of different parameters that can get used later in your scenarios. For this test, we set two lists of variables, each defining different airport codes for performing the distance calculation in the API.
To put these variables to use, we have to change the JSON parameters in our scenario. To access one of the variables from our configuration, Artillery uses a templating system. It replaces whatever's defined inside the double curly brackets ({{ and }}) into one of the values from the variables list. In the example above, the {{ from }} and {{ to }} strings are automatically translated into a value from their respective list.
By default, Artillery randomizes the variable it chooses per request. For instance, in one request, it may use "KIX" and "SJU", and in the next, it can use "NRT" and "ICN". The randomization lets you run a variety of different requests without having to duplicate or modify your scenarios.
Data-driven testing through payload files
Artillery also provides support for injecting data through variables using payload files. A payload file is a CSV-formatted (comma-separated values) list that Artillery reads and will let you use the data from the file inside your scenarios. It works similar to using inline variables, as mentioned in the previous section, but using a payload file can let you add much more data to use in your requests without cluttering your test script.
Let's expand our load testing script by using a payload file to cover two scenarios. The first scenario will test an endpoint to fetch a user's API token for making authenticated requests (POST /tokens). The second scenario will check an endpoint requiring authentication (GET /favorites) using the token as a request header. Both scenarios will use data from a CSV file called users.csv, which contains the following test data:
[email protected],stresstester1,sxQk7rkizyJuJm1BjyLbREuY
[email protected],stresstester2,58DSSnRtGvXYxQNnsm3MrdTG
[email protected],stresstester3,SxFXyVgFVt2M6VQsQAaQpLts
[email protected],stresstester4,3tGfR31V774QL3cexKyTdaoq
[email protected],stresstester5,WcF1ML84GTTu2ErxALfYeNa6
The CSV file contains data for five users in our test server. Each line of the CSV file contains three fields, each separated by a comma. The first field is the user's email address. The second field contains their account's password. The last field contains their authentication token to make API requests. Keep in mind that anyone with access to this CSV file will see this in plain text, so make sure not to use sensitive data when performing these kinds of tests. If possible, use accounts with fake data or disposable environments that get shut down after you're done testing.
With the CSV file in place, we can add it to our test script and access its information in our new scenarios:
config:
  target: "https://airportgap-stress-test.dev-tester.com/api"
  phases:
    - duration: 60
      arrivalRate: 5
      rampTo: 25
  payload:
    path: "users.csv"
    fields:
      - "email"
      - "password"
      - "token"

scenarios:
  - name: "Fetch a user's token"
    flow:
      - post:
          url: "/tokens"
          json:
            email: "{{ email }}"
            password: "{{ password }}"

  - name: "Get user's favorite airports"
    flow:
      - get:
          url: "/favorites"
          headers:
            Authorization: "Bearer token={{ token }}"
The first change you'll notice is the payload setting in the config section. As done with the variables setting in the previous example, payload will allow you to specify the CSV file you want Artillery to parse. The path setting inside of payload lets you define the file. The fields setting will define the variable name to use for each field inside the CSV. Since our CSV has three fields, we'll list them with descriptive names here.
For this example, we'll expand our load testing to hit two different endpoints throughout the test run, as explained earlier in this section. The POST /tokens flow requires two parameters - an email and a password. We'll use the data from the payload file and inject it into the request.
The second flow, GET /favorites, uses the token from the CSV file to make the request. Since the token must be defined in a request header, we're using the headers setting in our scenario instead of json. Artillery allows you to set arbitrary headers per request, which we're doing in this section.
Running these tests as before shows that we're beginning to see our test server begin to struggle:
All virtual users finished
Summary report @ 12:08:26(+0900) 2021-02-28
  Scenarios launched:  879
  Scenarios completed: 879
  Requests completed:  879
  Mean response/sec: 7.75
  Response time (msec):
    min: 109.1
    max: 54340.2
    median: 17847.6
    p95: 51034.9
    p99: 53544.8
  Scenario counts:
    Fetch a user's token: 467 (53.129%)
    Get user's favorite airports: 412 (46.871%)
  Codes:
    200: 823
    500: 54
    525: 2
Most of the response codes are successful, but now we see some error response codes (500 and 525). If your load tests begin to receive non-200 responses like this, you'll need to dig deeper to find the issue. It might be that our servers are underpowered, or there's a bottleneck between different system components. There's a chance the application code is poorly optimized, and these endpoints may need further optimization. Whatever the issue is, it's a good thing to spot early because now you can take action before your users hit these limits.
Taking your Artillery tests even further
All of the examples shown in this article serve as the basics of Artillery, and they only scratch the surface of what the toolkit can do for your applications. The Artillery documentation contains lots of additional information on what the toolkit can do for you. Here are a few more useful bits of functionality you can employ for your load testing.
Generating reports
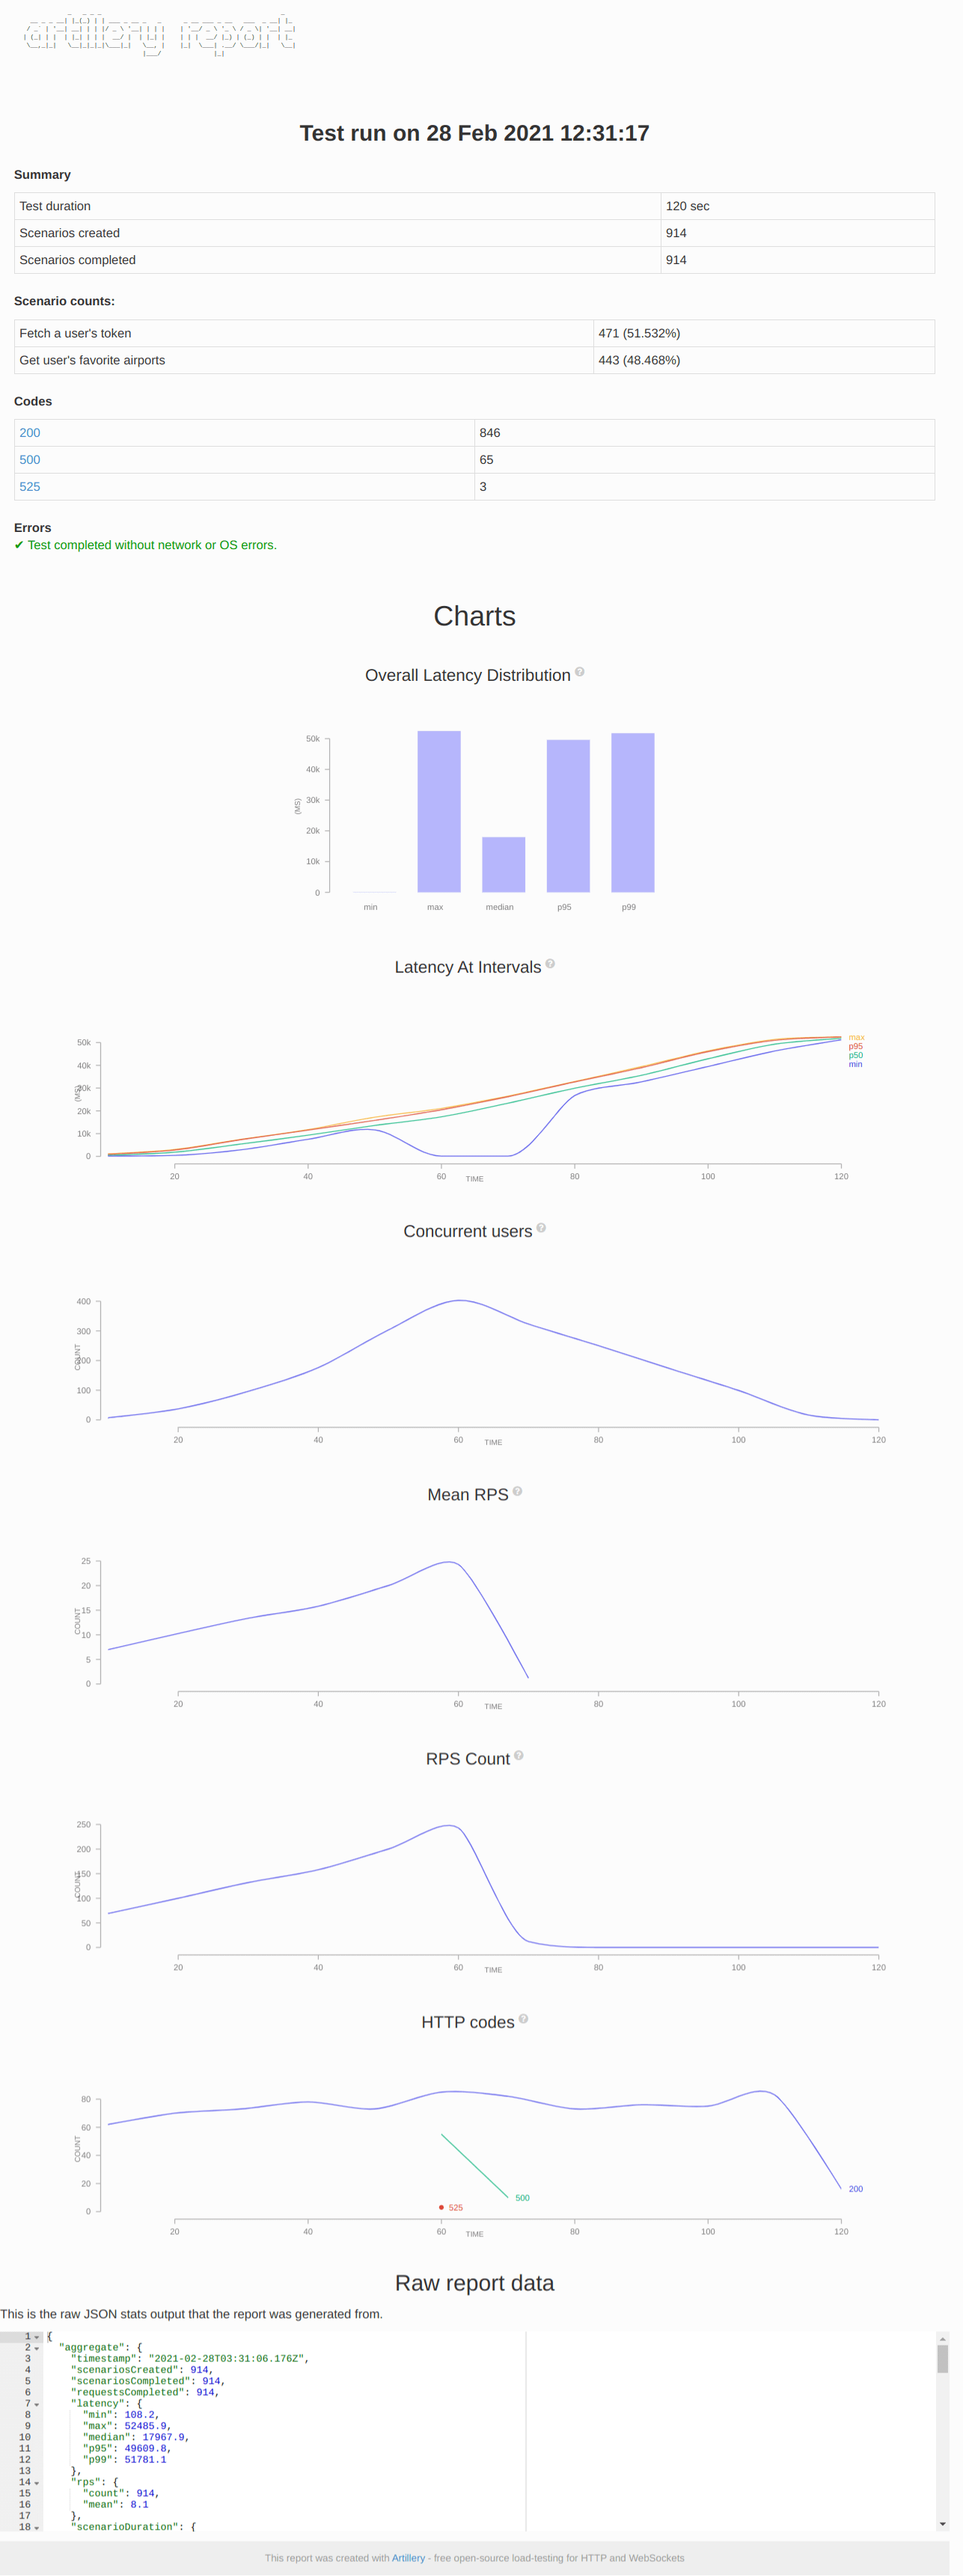
When executing a load test using Artillery, the toolkit will print out a status report during and after the test run, with some useful information. However, you can generate a detailed HTML report of your test run, complete with graphs to help you pinpoint where your system began to buckle under load.
Generating an HTML report of a load test is a two-step process. First, you need to run your test with an additional command-line switch to output the test results in JSON format:
artillery run --output report.json airports.ymlAfter your test runs, you'll have a report.json file containing detailed information about the load test. You can take this file and have Artillery convert it into a nice-looking HTML file:
artillery report --output report.html report.jsonThe generated HTML file contains a full report of the load test, letting you peer into how your tests performed throughout the duration of the test run. It gives you more information to debug any issues you might have spotted.
Adding performance testing as part of continuous integration
For teams that are serious about keeping their APIs performant, you'll need to constantly load-test your systems to ensure they in peak condition. An excellent way of doing this is by leveraging existing continuous integration systems. For example, you can kick off a quick load test after every commit or set up your CI system to run an extensive load test at night and deliver a report for you to see the next day.
By default, Artillery will run your load tests and report their results without an explicit pass/fail condition. If you want your test to have different conditions for passing or failing a specific test, you can add a configuration setting called ensure. This setting lets you specify a maximum threshold for response time latency or error rates. If your load test goes over this defined threshold, Artillery finishes the test run with a non-zero exit code, which your CI pipeline can use to denote a failure.
Let's imagine we want to make sure our API requests during the load test never take over one second (1000 milliseconds). To do that in Artillery, add the ensure setting in the config section, specifying the maximum threshold you want:
config:
  ensure:
    max: 1000
Besides max, you can also use min (minimum response time), median (median response time), p95 (95th percentile), and p99 (99th percentile) for different thresholds. Also, you can combine more than one setting to cover different areas of your response latency.
Also, you can ensure your API doesn't return a certain percentage of error codes throughout a load test using the maxErrorRate key. For example, if you don't want your API to return errors for over one percent of your requests during the load test, you can use the following configuration:
config:
  ensure:
    maxErrorRate: 1
Artillery will let you know after a test run if any of your thresholds failed:
All virtual users finished
Summary report @ 15:01:39(+0900) 2021-02-28
  Scenarios launched:  929
  Scenarios completed: 929
  Requests completed:  929
  Mean response/sec: 8.38
  Response time (msec):
    min: 117
    max: 50879.5
    median: 16431.6
    p95: 48273.3
    p99: 50326.8
  Scenario counts:
    Get user's favorite airports: 493 (53.068%)
    Fetch a user's token: 436 (46.932%)
  Codes:
    200: 892
    500: 34
    520: 1
    525: 2

ensure condition failed: ensure.max < 1000
Expanding Artillery through plugins
The default functionality that Artillery comes with takes you far on your load testing journey. If all you need is to load-test an HTTP API or WebSockets, you can handle most of your needs with what's provided in the toolkit. That doesn't mean you're out of luck if you have additional needs. Artillery comes with support for plugins that extend its already-robust functionality.
You can find publicly-available plugins by searching for artillery-plugin- in the NPM registry. These plugins are free and open source, so you just need to include them in your project, tweak the configuration to your test script to let Artillery know about the plugin, and that's it. These are a couple of the more interesting plugins I found for the toolkit:
artillery-plugin-expect
Artillery is a load testing tool by itself. The artillery-plugin-expect plugin also makes Artillery a functional testing library alongside your usual load tests by letting you add assertions for your scenarios. While my personal recommendation is to use a tool built for functional testing, this plugin can add extra coverage to an existent test suite.
artillery-plugin-fuzzer
The artillery-plugin-fuzzer plugin makes it easy to add fuzzing to your load tests. When configured, it provides a special variable called naughtyString that pulls in random data from The Big List of Naughty Strings for use in your scenarios. Like the previously-mentioned plugin, adding fuzz testing to your existing test script can improve your API's quality by testing for different kinds of input.
artillery-plugin-metrics-by-endpoint
Artillery's default reporting shows response time metrics for all of the endpoints used throughout the load test. For finer-grained metrics for each URL defined in your scenarios, the artillery-plugin-metrics-by-endpoint plugin will give you the information you need.
Besides these three plugins, you can find other interesting and useful plugins for your testing needs. Others include adding the ability for Artillery to load-test other systems like Kafka or sending its test run results to another environment like Elasticsearch and Amazon Cloudwatch.
Summary
Part of verifying that your application's APIs work well includes making sure they perform well, especially with a lot of traffic. Load testing is an essential skill to have in your repertoire these days since speed matters for your system. If your application responds slowly, there's a good chance your users will leave and not come back.
You might think that load testing is a difficult skill to acquire, but you can get started rather quickly. For this article, I took a look at the Artillery toolkit. Artillery is a simple Node.js package that's simple to install and set up basic load tests in minutes. However, it's also a fairly robust tool that goes beyond just hammering an API endpoint for a specific amount of time. While this article covered plenty of ground, it only scratches the surface of what Artillery can do for you.
The examples from this article show how easy and straightforward it is to create a small test script to load-test your API. Artillery can throw a constant flow of virtual users to your defined endpoints and return all kinds of stats. You can also gradually ramp up or scale down the requests throughout a given period. Combining these methods improves your chance of detecting performance issues in a controlled environment.
Besides sending requests to your API, Artillery lets you take your load testing further. You can generate well-crafted HTML reports that help you pinpoint when your API began to show signs of performance degradation. It also allows you to configure thresholds for maximum response times or error rates to integrate with your continuous integration system. Finally, Artillery lets you expand its functionality through a plugin system.
Whether you use Artillery for load testing or you decide on another tool, the important thing is to take the time to test how your API works beyond its current usage. Don't wait until a sudden influx of traffic brings your API to its knees, leading you to scramble for solutions in the middle of a crisis. Taking preventive measures early with performance testing will save your team lots of effort in the future.
How do you make sure your API is performing up to your standards? Share your strategies and tactics with others in the comments section below!


