Last week on Dev Tester, we covered three useful ways to debug your TestCafe tests. These debugging methods can help you get to the bottom of why a test fails when you least expect it to fail. They're especially useful since the techniques explored in the previous article come included with TestCafe out of the box. There's little to no setup for all of these methods.
The three methods we talked about last week - taking screenshots and video, slowing down test execution, and pausing tests for further exploration on the browser - aren't the only debugging tricks TestCafe has under its sleeve. TestCafe has a few more debugging techniques to let you get deeper into the state of your tests.
This week, we'll discuss two more ways to debug your TestCafe tests. These methods are a bit more advanced and require some setup before you wield their power. Most people will probably never need to use these methods. But these ways of debugging tests can provide lots of insight into slow and flaky tests, so it's a helpful technique to have in your toolbox.
Debugging tests using the Chrome and Edge Developer Tools
TestCafe is a tool built on Node.js, which has a powerful built-in debugger known as Inspector. This tool is a Node.js process that allows a debugging client to connect and see the insides of your application or script. From there, you can check out different aspects of the code, like assigned variables and their values, function definitions, and more.
TestCafe has a command-line flag that allows you to kick-start the debugging tool from Node.js for your test suite. By adding the --inspect-brk flag when running your tests, TestCafe starts the Inspector debugging process on a local port in your system (127.0.0.1:9229 by default). The debugger process immediately pauses the test execution, so you won't see anything happening yet.
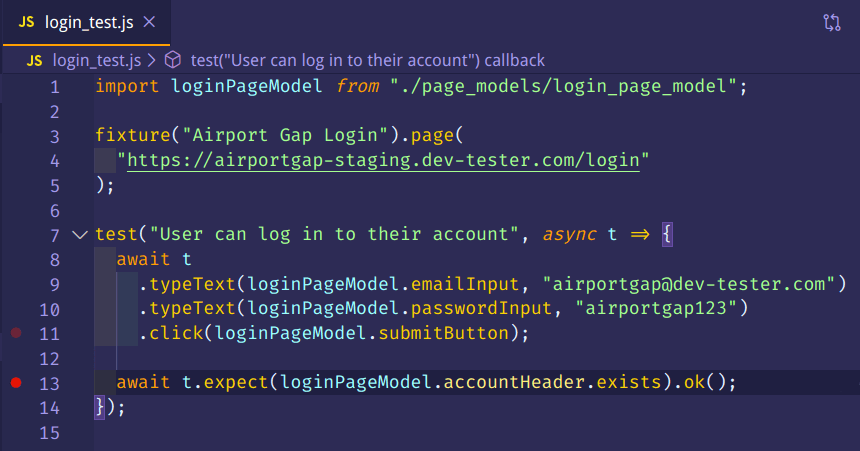
The next step you should do is to open your test and place breakpoints where you want the test execution to halt. You can add breakpoints in TestCafe (and any Node.js application or script) with the debugger keyword. As an example, say you want to debug the login test from the "How to Get Started with TestCafe" article on Dev Tester. You can place a breakpoint after the login form gets submitted like this:
import loginPageModel from "./page_models/login_page_model";

fixture("Airport Gap Login").page(
  "https://airportgap-staging.dev-tester.com/login"
);

test("User can log in to their account", async t => {
  await t
    .typeText(loginPageModel.emailInput, "[email protected]")
    .typeText(loginPageModel.passwordInput, "airportgap123")
    .click(loginPageModel.submitButton);

  debugger;

  await t.expect(loginPageModel.accountHeader.exists).ok();
});
Finally, you need to connect a debugging client to the Inspector process. Thankfully, you most likely have one at your fingertips - the Google Chrome or Microsoft Edge browser. Chrome DevTools and Edge DevTools have debugging tools built in that you can use to hook up to Inspector. You'll need to point them to a debugging process before getting started.
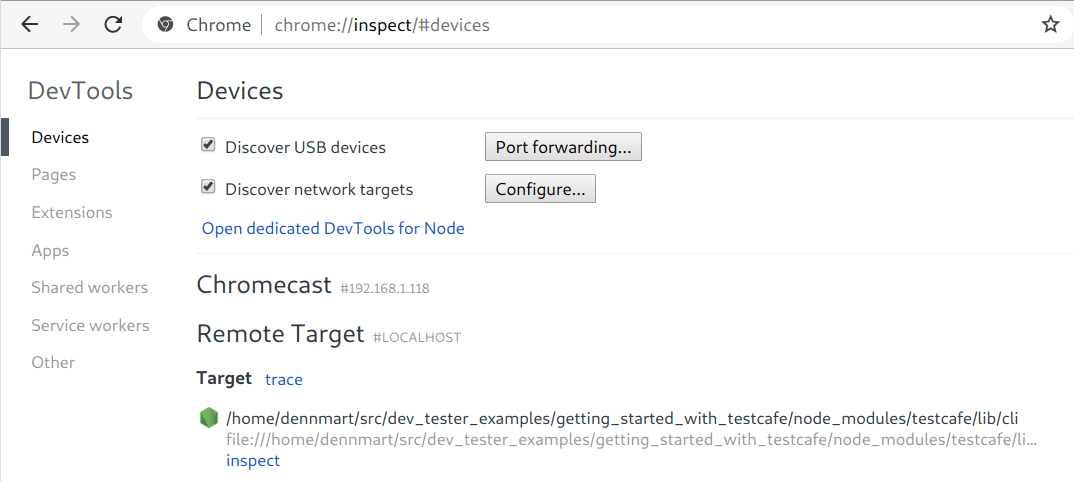
To connect Chrome DevTools or Edge DevTools to the running Inspector process that TestCafe kicked off with the --inspect-brk flag, open your preferred browser and enter one of the following URLs to tell the browser where to connect:
- Chrome:
chrome://inspect - Edge:
edge://inspect
This section contains a few options, but the area of focus here is the "Remote Target" section. When Node.js Inspector is active, you'll see an entry for the debugger process available for inspection.
Clicking on the "Inspect" link under the entry connects your browser to the Node.js debugging process and opens the browser's debugger tools. From here, you can perform different advanced actions like stepping through the TestCafe test process, profiling the code to identify performance issues, and more. These are all advanced topics that we won't cover here.
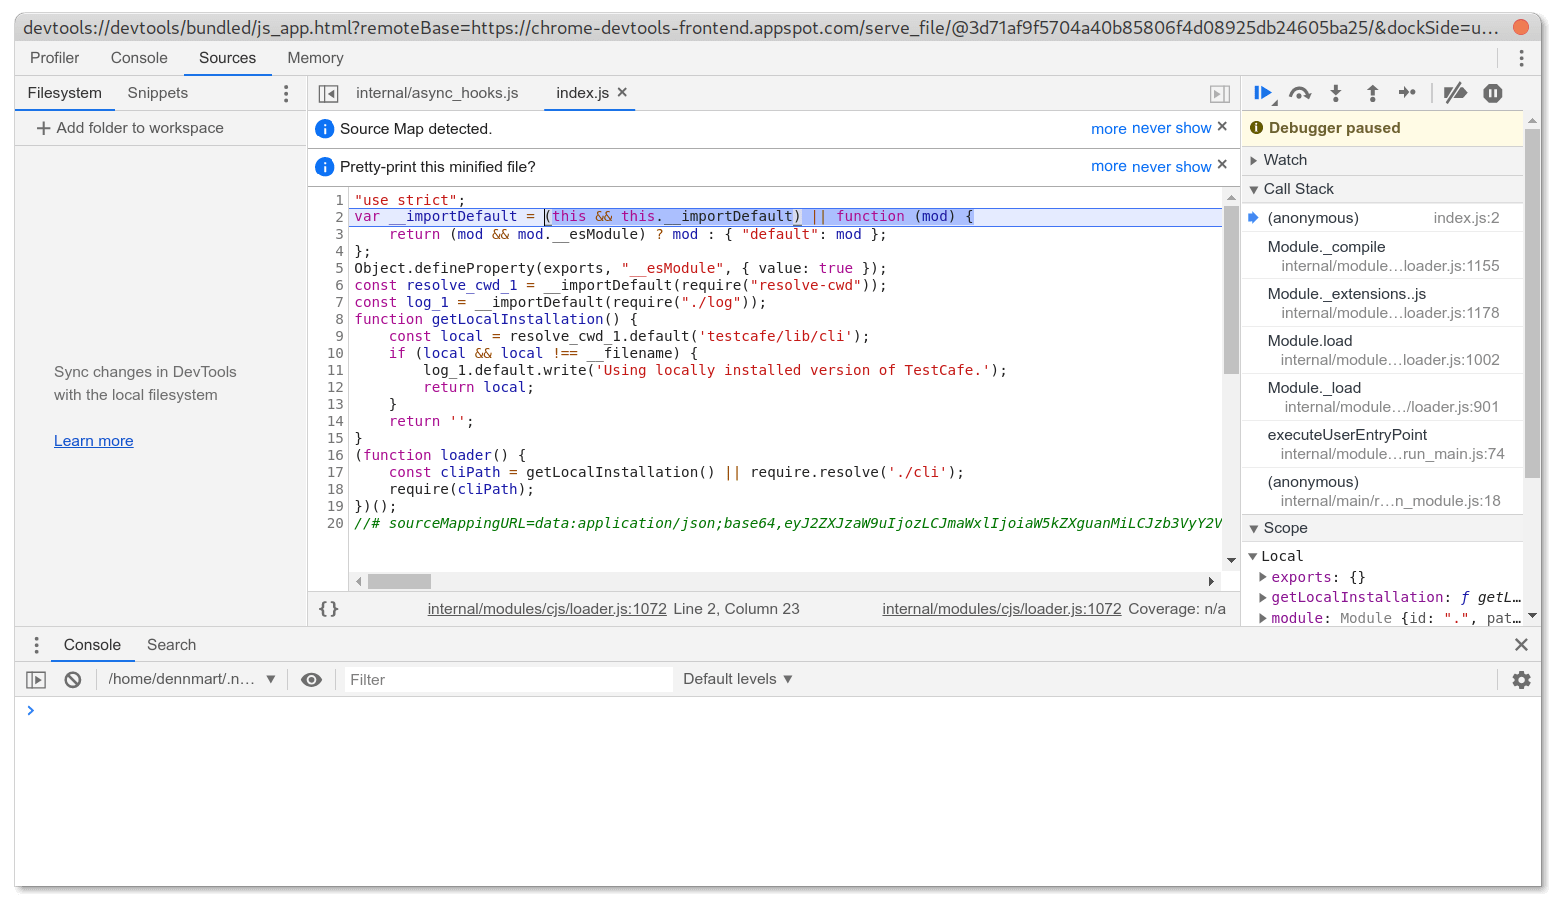
The primary tool you'll most likely use for debugging your TestCafe tests in the browser's DevTools area is managing the script execution. Using the icons on the upper-right of the debugging window, you can kick-off the script execution to start the test, step through the script when finding a breakpoint, and more.
Clicking on the "Resume script execution" icon, which is the only active icon when starting the debugging process, starts the test in the same way as usual. The main difference is when TestCafe hits the debugger keyword in your code, it will pause the test execution to allow you to explore the test using the browser's DevTools debugger.

From here, you can inspect the current state of the test code by hovering over different variables and functions. You can also use the debugging icons to continue normal test execution and stepping through the code to locate any issues.
Debugging tests using Visual Studio Code
Visual Studio Code is possibly the most popular code editors for JavaScript these days and with good reason. It's lightweight and fast despite being a full-fledged editor, has lots of extensions built by the user community, and is cross-platform so it works on most major operating systems.
Out of the box, Visual Studio Code also contains excellent debugging tools for Node.js that integrate right in the editor. That means you can set breakpoints right next to your code, launch TestCafe tests in debug mode, and perform the usual debugging techniques like pausing script execution and stepping through the code - all without leaving the editor. It requires some initial setup, but once it's working, debugging tests inside Visual Studio Code is more straightforward than using your browser's DevTools, as explained earlier.
To set up debugging for your TestCafe project in Visual Studio Code, make sure the directory containing your test suite has a valid package.json file with TestCafe as a dependency, either in the dependencies attribute or the devDependencies attribute. For example:
{
  "name": "getting_started_with_testcafe",
  "version": "1.0.0",
  "description": "Project to use for Dev Tester blog post",
  "scripts": {
    "test": "testcafe chrome '**/*_test.js'"
  },
  "author": "Dennis Martinez",
  "dependencies": {
    "testcafe": "^1.8.3"
  }
}
Next, you need to create a launch configuration file. This file allows you to save the debugging set up you need for your project, so the next time, you can launch your test in debug mode directly. You can create a launch configuration by selecting the "Run" icon on the Activity Bar on the left of the editor.
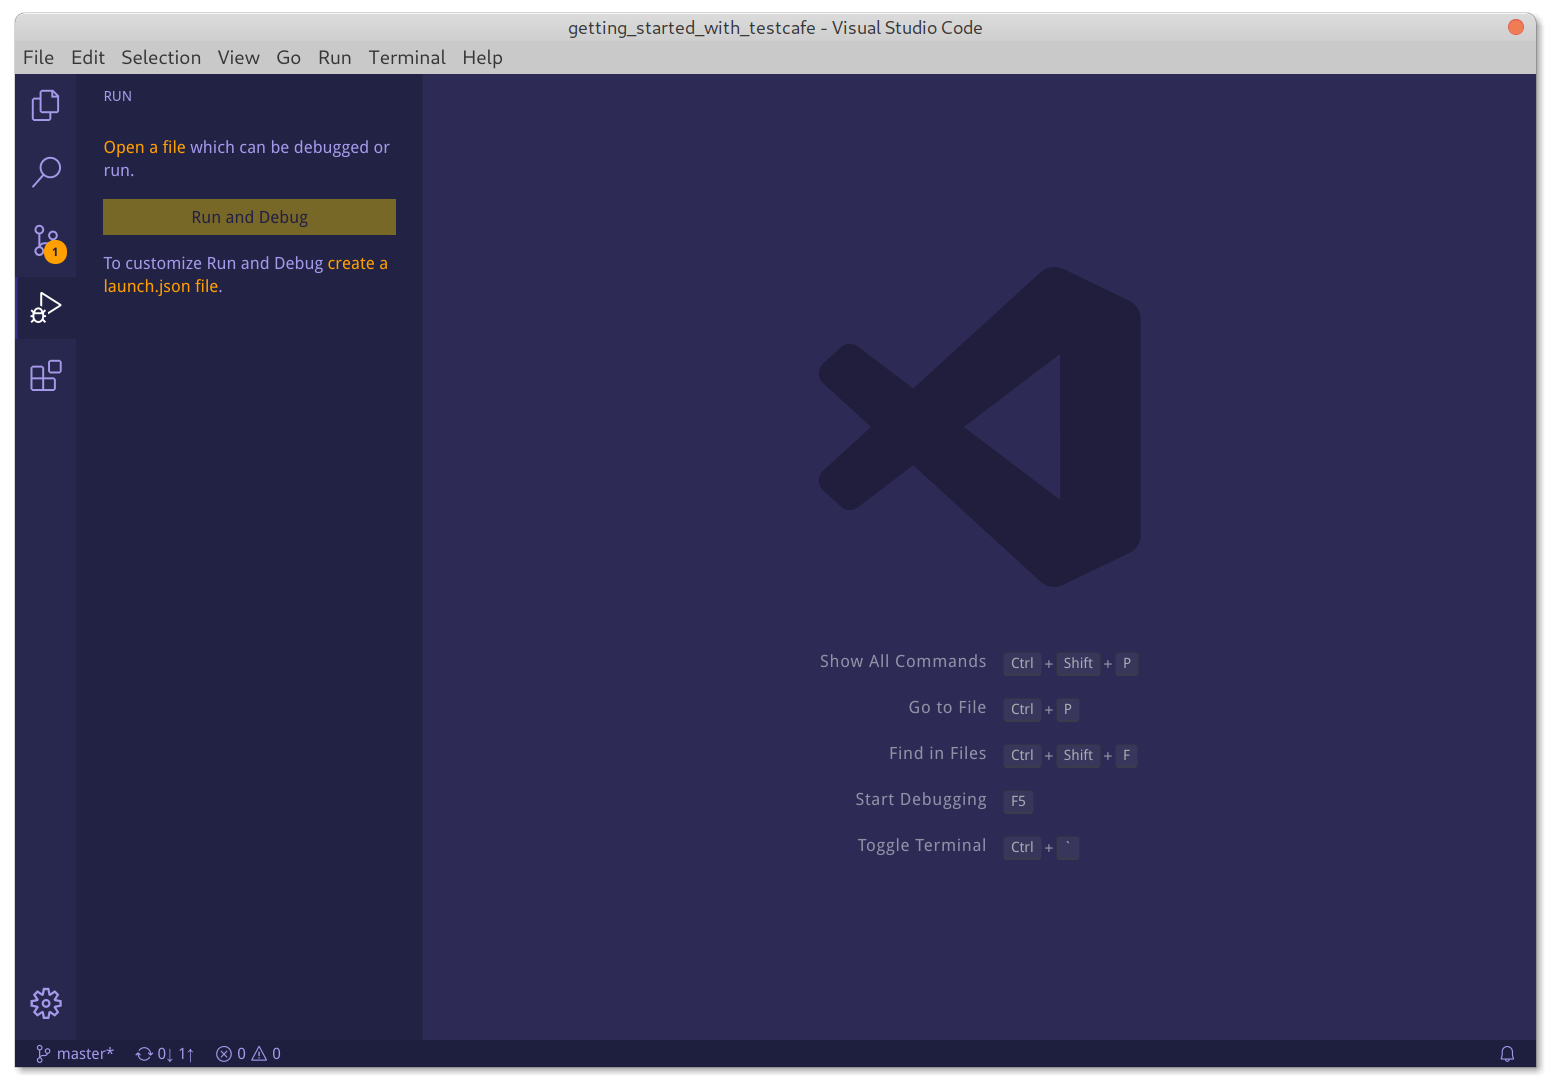
The first time you create a launch configuration for your project, you can click on the link where it specifies you can create a launch.json file. The editor will ask whether you want to use Node.js debugging tools or other tools, depending on your Visual Studio Code environment. Choose Node.js here if prompted, and you'll have a new file called launch.json created in the .vscode directory of your project.
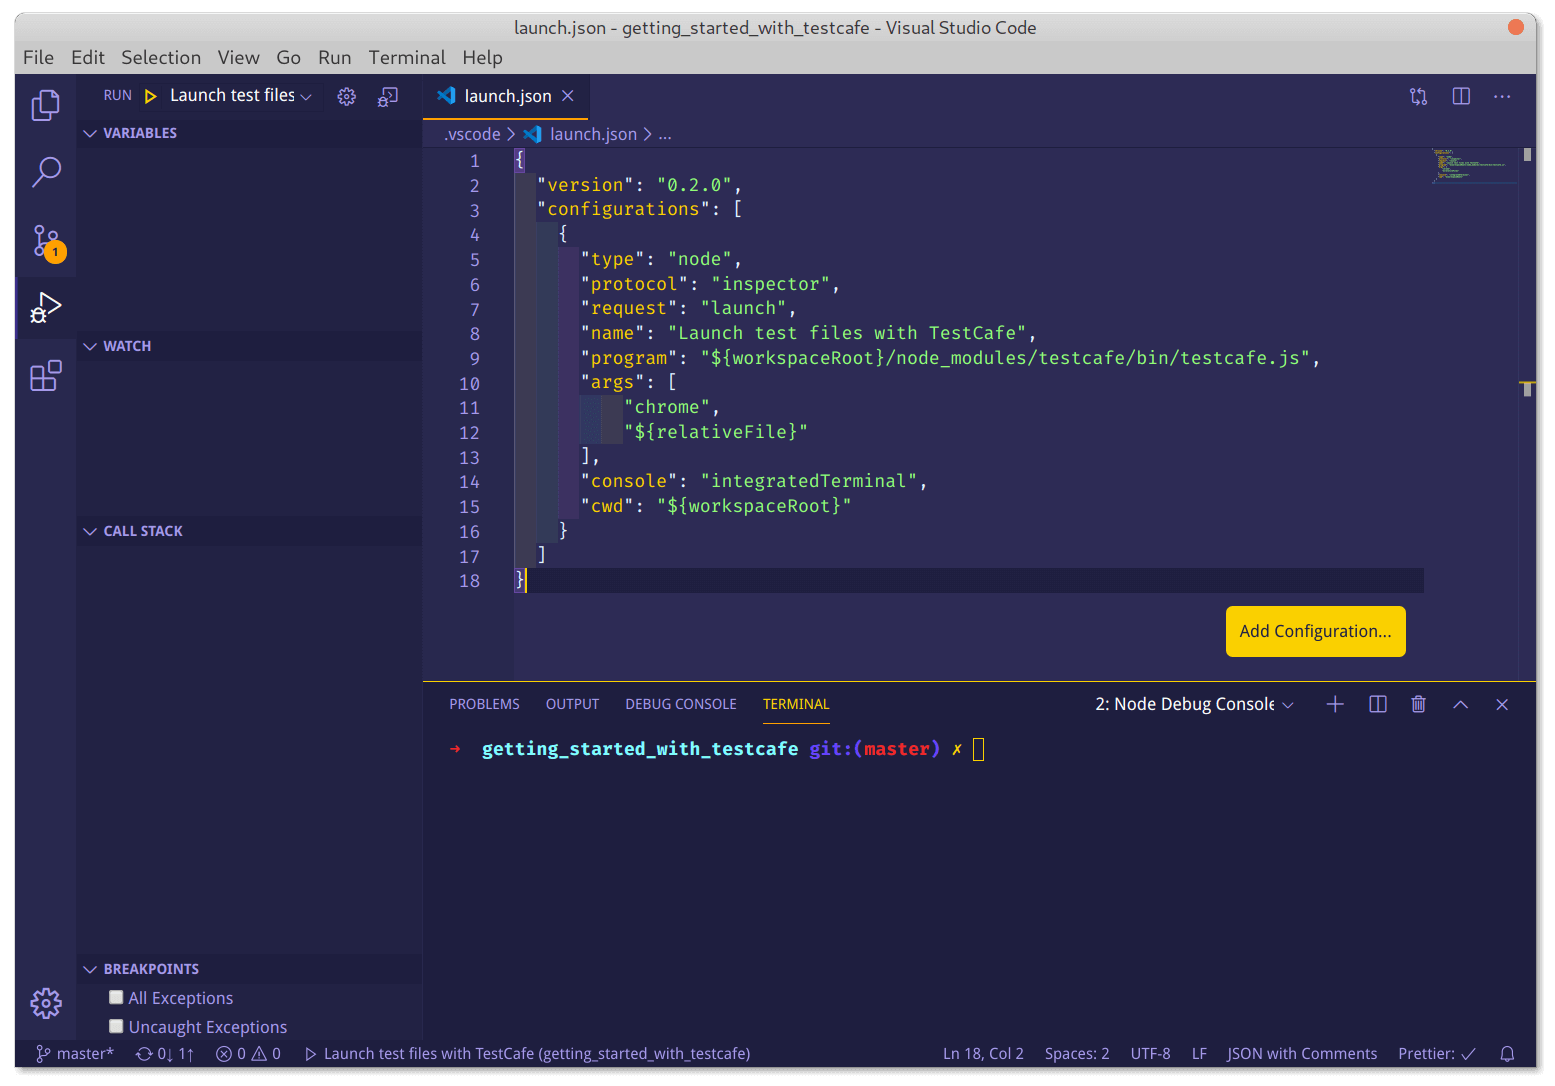
The opened file is a template that allows you to configure how you want to execute and debug your project. For TestCafe, use the following configuration, as taken from TestCafe's documentation:
{
  "version": "0.2.0",
  "configurations": [
    {
      "type": "node",
      "protocol": "inspector",
      "request": "launch",
      "name": "Launch test files with TestCafe",
      "program": "${workspaceRoot}/node_modules/testcafe/bin/testcafe.js",
      "args": [
          "firefox",
          "${relativeFile}"
      ],
      "console": "integratedTerminal",
      "cwd": "${workspaceRoot}"
    }
  ]
}
The TestCafe documentation has an excellent in-depth explanation for each of these options. You shouldn't need to update anything here, although you may want to change the browser specified in the args attribute. For instance, change firefox to chrome if you're going to run your tests in Chrome.
Saving the configuration in launch.json adds the option to run your test files using TestCafe. It appears in the Run section on the left-hand side of Visual Studio Code, as well as the status bar at the bottom of the editor.
With your debugging configuration ready to use, all that's left is to set at least one breakpoint in your tests. It's simple to do in Visual Studio Code. You can toggle a breakpoint by pressing the F9 key on any line of code where you place your cursor in a test file. You can also toggle breakpoints with your mouse by clicking on the left side of any line number of your code. The red dot next to the line number indicates a breakpoint.
You can now use Visual Studio Code to execute the current test file using TestCafe in debug mode. You can run the test by clicking on the "Launch test files with TestCafe" option that appears on the status bar at the bottom, or by pressing the F5 key. Your test will launch as usual, and when it lands on a breakpoint, the test execution halts and Visual Studio Code enters debugging mode.

You'll know when Visual Studio Code is in debugging mode when the status bar changes color (yellow, in this theme's case) and by the presence of additional debugging icons at the top of your code. Similar to the browser's DevTools, you can inspect the current state of the test, step into and out of the script, and continue normal execution.
Summary
As shown in last week's article, TestCafe has a few easy ways to do quick debugging. However, debugging methods like taking a screenshot, slowing down test execution, or merely pausing tests sometimes isn't enough. You might need to bring out more advanced techniques to dig deep.
Since TestCafe is a Node.js tool, you can take advantage of the advanced debugging tools built into Node.js. You can start a Node.js debugging session and inspect the insides of your tests using the developer tools on Google Chrome or Microsoft Edge. If your preferred code editor is Visual Studio Code, you can configure it to launch your tests and use the editor's built-in debugging tools without leaving your code.
These methods are a bit advanced, and you will find that using a more straightforward debugging process is usually enough. But for the moments there's a tricky bug you can't figure out any other way, these debugging tools can do the trick. They're a powerful tool to have at the ready when you need them.
What kinds of bugs have you been surprised to uncover using some of these debugging tools? Share your story in the comments section below!
Want to boost your automation testing skills?
With the End-to-End Testing with TestCafe book, you'll learn how to use TestCafe to write robust end-to-end tests and improve the quality of your code, boost your confidence in your work, and deliver faster with less bugs.
Enter your email address below to receive the first three chapters of the End-to-End Testing with TestCafe book for free and a discount not available anywhere else.